Intangible Interaction
Week 13-Project Workshop
![]()
![]()
Week 11-Prototyping Party
During class, we had an hour to spend on prototyping. I created a low-budget string phone and tested whether this idea is playful or not. And I guess the answer is yes, because people wanted to test it out and tried to talk to one another
![]()
![]()
Ideas from Phil
Foam Core
Heat shrink tubing white
Week 10-Proposal Template
During our in-class feedback session, Mica shared the idea of separate addressable LED lights. Because moving the light and branching out the light on a single strip sounds hard since I don’t know how can I fabricate such a light strip. For starters, I think a projection will help me out better visualize how the light will move along.(+ I can use black tape to cover up for lights that intersect.)
Week 9-Project Proposals
Concept: A word on abandoned houses, disappearing communities, and nostalgia
The "Invisible Neighbors" project aims to bring back forgotten human connections through playfulness. By installing a simple string telephone device between buildings in abandoned neighborhoods, people at both ends of the rope can communicate and rekindle their relationships. The lights are activated by sound vibrations, symbolizing that it takes time and effort to establish meaningful communication.The project serves as a visual representation of the time and effort required to build relationships and revive memories, as the lights slowly come to life with each spoken word, showcasing the power of communication.
A place comes to life when people make it their own by forming connections. With the string phones, we won’t be able to listen in on the current conversations, but it’s a fun way to reminisce about the relationships that once flourished in the community, and they remain hidden within the walls.
![]()
![]()
I bought EL Wires to start prototyping. Something to keep in mind that the wires can bend up to certain point. So, I had to make the prototype bigger.
![]()
![]()
![]()
![]()
Open Soft Machines
Week 8-Getting Weather Data from Database
I watched the recording for this weeks lecture because couldn’t attend class in-person. This was my first time connecting to wifi and using the antenna of the arduino ︎ I thought that it would be more complicated but the recording and the discussions made me realise that it’s pretty straightforward.
At first, I got the status code -2 error on the console for a couple of times. Due to this, the wifi connection wasn’t there and I couldn’t get the results. Then, I remember Yeseul’s notes about this error and found myself a different Arduino. The one that I was using has a u-blox number of 21/21 and this was causing the problem because it was an older version of the nano iot33. I changed my arduino to something-22 and the problem resolved.
![]()
Defining the secret pass was tricky. I still can’t figure out adding a new section to a code and include a library or password. That’s why I use one of the examples and change the code accordingly. Then, I built a circuit with 3 LED’s. Apparently, the air quality was lower than the threshold and the green LED lit up. I wasn’t sure if that is correcy because how can the air quality is good in East Village?
![]()
![]()
![]()
Week 7-Curious Cube Presentations
Week 6-Field Trip
WE GOT MOVEMENT
Yonatan helped us figure out the best way to write the logic for the code. We decided that instead of having it move in 4 directions, we’d start with it just moving forward and backward, but always away from the person nearby. After some debugging, we got some movement! It’s unpredictable and does not happen entirely in the way we need it to, but it’s a start. Next, we need to figure out the threshold for when it moves. Another issue is that, turning a car to a different way can be done in two different ways: either you turn two wheels in opposite directions, or only turn one wheel for a while and than move booth. Both of these caused some problems for us because of insufficient power.
![]()
![]()
The issue we ran into is that the moveForwards function works great, but there’s something with the moveBackwards code that doesn’t work. When that function is called, only one of the wheels turns. We tried switching the pins, using new wires, restarting everything, but nothing worked.
While trying to figure out the code, we started prototyping the cube. We used cardboards and calculated how big our cube is going to be, by taking the wheel structure into consideration.
![]()
Then, we had about one million problems. Yonatan helped us with just about everything and we owe our lives to him.
After replacing pretty much every aspect of this circuit, we were left with a problem:
We wrote a simple sketch that calls two functions - moveForward and moveBackward, that move the wheels forward and backward. When the board is connected to the computer, it runs fine. When we power it externally using a 9v battery, it runs continuously forward and does not follow the loop in the code. We aren’t sure why.
Before ruining anything up I draw the circuit to have it in hand.
![]()
After talking to David Rios and Jeff Feddersen, we removed the voltage regulators and IT WORKED!!! We ended up having to add another 9v battery, which required me to do some fancy soldering. I connected both 9v batteries in serial. To smooth out the fluctuations, we added 2 capacitors for both the 3.3v and the 9v.
Next, we got started on fabrication. We lasercut a prototype in cardboard first and tested it out on the floor. It worked, but the movement was a little chaotic. We found that the sound of the motors, coupled with their intensity, did not have the calm, sleepy vibe we were going for. Also, we were running out of time and didn’t see a world in which we’d figure out the speaker & LEDs we had envisioned in time. We decided to rebrand from Sleepy Cube to Catch Me If You Can Cube.
![]()
![]()
![]()
![]()
![]()
![]()
![]()
![]()
Week 5-Sensing Environment
I met Lily over the weekend to work on the gearhead motors and test it out. We put together the circuit using two H-bridges so that the motors could work independently of each other (so the car could turn). We connected 2 buttons to test out the motors before trying to connect the sensor.
We tried to figure out the movement of wheels to turn and move the car. There is two possible iteration: either the wheels turn in opposite directions to turn around the car, or only one of the wheel turns and the other one stays still. This then created one more problem. To turn a car around and keep it moving, we actually need two functions: one for turning the other direction, and another fun just moving in that direction. We decided on just making it move first because it is more complicated. If we can figure out the movement, we’ll add another turning movements etc.
![]()
![]()
![]()
While testing the sensor, we came to conclusion that the location of the sensor (floor, desk etc) affects the readings of the sensor. Since our box will be closer to the floor, we moved the circuit at a relative height to get a more reliable reading. After that, we combined the two sketches so we got sensor data and the wheels on the motor to move. Next, we plan to implement some if statements into the code so the wheels move when it senses a person in each direction.
Week 4- Curious Cube Ideas & Light Pipes
SLEEPY CUBE
The feedback session went well this week; I enjoyed pitching our idea. People suggested that the box can turn the other way rather than moving away. Since me and Lily have never worked with something moving, we think that it can be a useful idea.
We were not quite sure which idea to go for, but we decided to merge the two idea together. (daft punk helmet idea and the sleepy cube) I really liked how fiber optics work and we thought about how the lights can contribute to the sleepy cube personality.
ex project 1: Link
How does it work?
Bill of Materials
![]()
![]()
WEATHER AS MEDIUM
While I was searching for project that use “weather” as a medium I run into a bunch of them. These three are my favorites:(click on the names of the installations to learn more)
-Rain Room, 2012 by Random International
![]()
- Windswept, 2011 by Charles Sowers Studio
![]()
-Blow Up, 2005 by Scott Snibbe
![]()
Week 3- The Delicate World of Proximity/Distance Sensing (2)
PROJECT #3 - CURIOUS CUBE
For the project, I’ll be working with Lily Crandall. And our project idea is called “Sleepy Cube”.
Our cube has a sleepy personality and doesn’t like to be bothered. When there’s someone approaching the box gets grumpy and moves away from people.
![]()
![]()
![]()
Other ideas:
Week 2- The Delicate World of Proximity/Distance Sensing
PROJECT #2 - PROXIMITY SENSOR RESEARCH
Kyungah and I chose the mini PIR sensor - BS412.The sensor was not the most straightforward, but we tried our best. Funnily enough, we managed to melt down the cap of the sensor.
Description
PIR (Pyroelectric "Passive" InfraRed Sensor) sensors allow you to sense motion and detect whether a human/pet has moved in or out of the sensor's range from about 5 meters away. They are made out of a pyroelectric sensor, which can detect level of infrared radiation. (Image on the right, the rectangular center refers to the sensor)
Application & Dimentions & Benefits
The sensor can be used within intelligent appliances, alarms, motion detectors, sensor lamps, security systems, and automatic controls.
The BS sensor window is 4mm x 3mm and the dimentions of the sensor itself are 11.8mm x 9.73mm.(Image on the left shows a comparison between the dimentions) Therefore, the benefits are: compact, requires low energy, power adjustable,cheap, and fully contained - only need VD,GND, and a resistor.
![]()
![]()
![]()
![]()
![]()
Week 1 - What is Intangible Interaction?
PROJECT #1 - SELF CHECKOUT EXPERIENCE
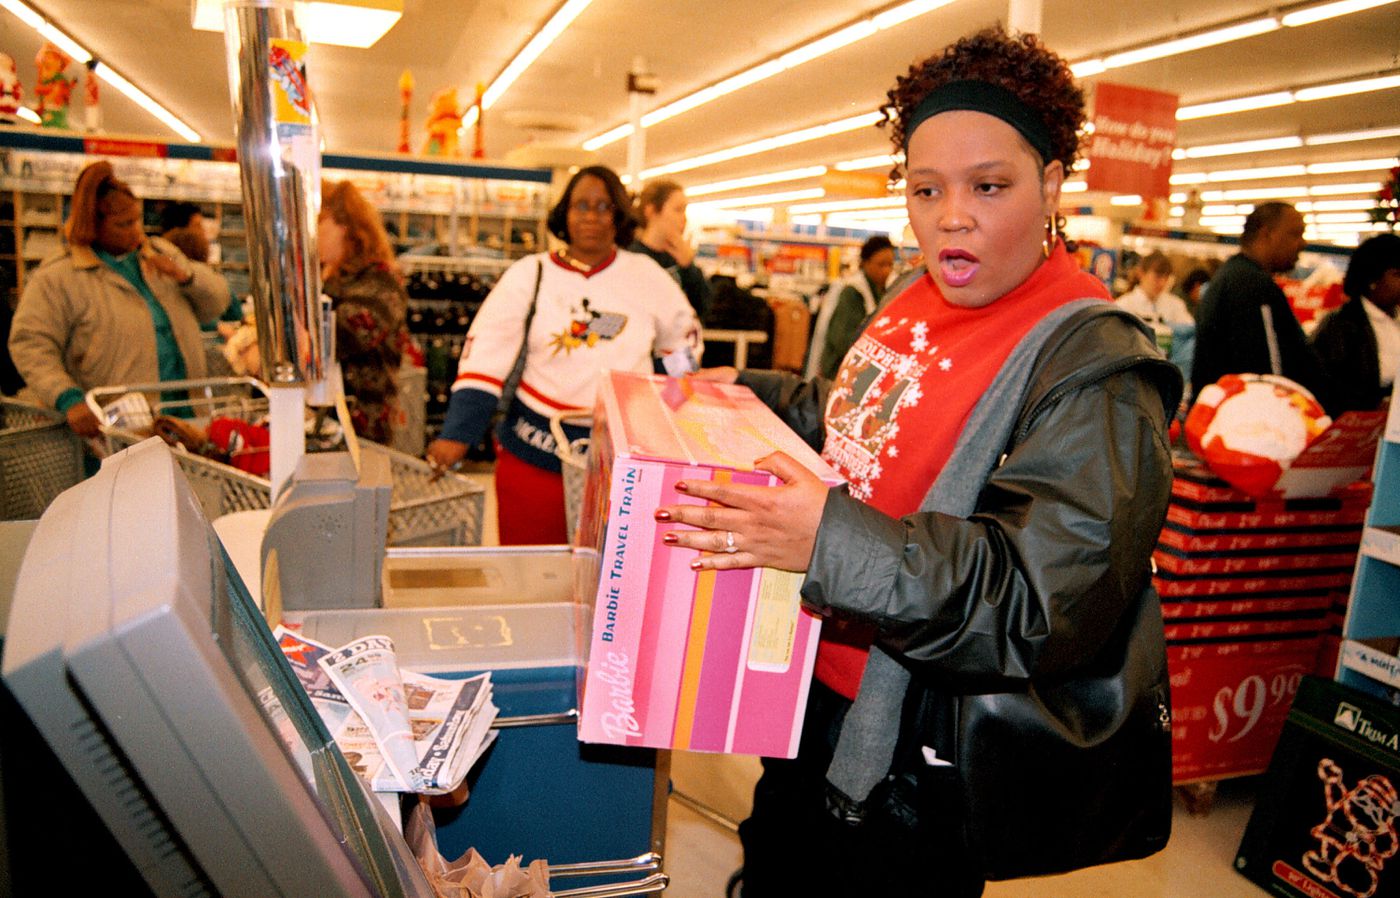
For our first project, we (me, Mary, and Vera) decided to focus on the self checkout machines that Uniqlo and other retail companies use. How these machines work is that, once you’re ready to check out, you bring your shopping basket and place it next to the scanning area. The machine reads all the tags of the clothes, meaning that you don’t have to scan each piece individually.
I went to Uniqlo last weekend to get a better understanding of this technology works. Personally, I never saw this machine, so I wanted to give it a shot!
![]()
Research
The self-checkout technology at UNIQLO is based on the Radio Frequency Identification (RFID) technology, which is commonly used for tracking and identification purposes. This technology came into the commercial realm in 1970’s, where the majority of early uses were related to electronic article surveillance (EAS) equipment to counter the theft of merchandise. Today RFID’s are used in numerous ways with some applications including:
RFID tracking system has several advantages over other systems (like barcodes, for example):
Radio-frequency identification (RFID) uses electromagnetic fields to automatically identify and track tags attached to objects. Within the electromagnetic spectrum, there are three primary frequency ranges used for RFID transmissions – Low Frequency, High Frequency, and Ultra-High Frequency. Different frequency ranges have different applications, distance ranges, and associated costs.
System Components
RFID systems typically have four components: RFID tag, RFID reader, antenna, and a computer database.
![]()
![]()
When choosing an RFID system it is helpful to ask the following questions:
PROJECT #1 - MY UNIQLO BUYING EXPERIENCE
![]()
Self Checkout steps
(blue steps are not included in their chart. But I realized that they are crucial part of the process)
![]()
![]()
Different types of tags
Since we did the research, I knew what to look out for. I tried to find the RFID tags but they were only visable when I hold them over the light. If someone is unaware of this technology, it’s really hard to see or locate these tags.
Small items only have the RFID tags(Image on the left). Larger pieces have both the RFID tags and the ink tags to prevent shoplifting (Image on the right). If they are programmed, the RFID tags are triggered when the chip crosses the detection sensor and the alarm would be triggered to alert store employees to the theft. (Click Link)
![]()
![]()
Common errors of the system:
RFID label technology is used to eliminate the barcode scanning process and create a faster and smoother shopping experience. BUT,
Ideation
I observed people’s buying experience at Uniqlo. It was quite funny to see their reactions, mix of confusion and a bit of admiration over the technology. When I told this to Mary and Vera, we thought about those photo sections after you ride a rollercoaster. What if that machine takes a funny photo of you while being super confused about how to proceed with the machine and display them over the main counter. So, we imagined a world where the security law is passed and there is no ethics concern haha. You can even get this image printed out with your receipt.
![]()
![]()
![]()


Week 11-Prototyping Party
During class, we had an hour to spend on prototyping. I created a low-budget string phone and tested whether this idea is playful or not. And I guess the answer is yes, because people wanted to test it out and tried to talk to one another


Ideas from Phil
Foam Core
Heat shrink tubing white
Week 10-Proposal Template
During our in-class feedback session, Mica shared the idea of separate addressable LED lights. Because moving the light and branching out the light on a single strip sounds hard since I don’t know how can I fabricate such a light strip. For starters, I think a projection will help me out better visualize how the light will move along.(+ I can use black tape to cover up for lights that intersect.)
Inspirations
Neil Mendoza - The Robotic Voice Activated Word Kicking Machine
Kimchi and Chips - 483 Lines
Youtube - Dynamic Projection Mapping
Week 9-Project Proposals
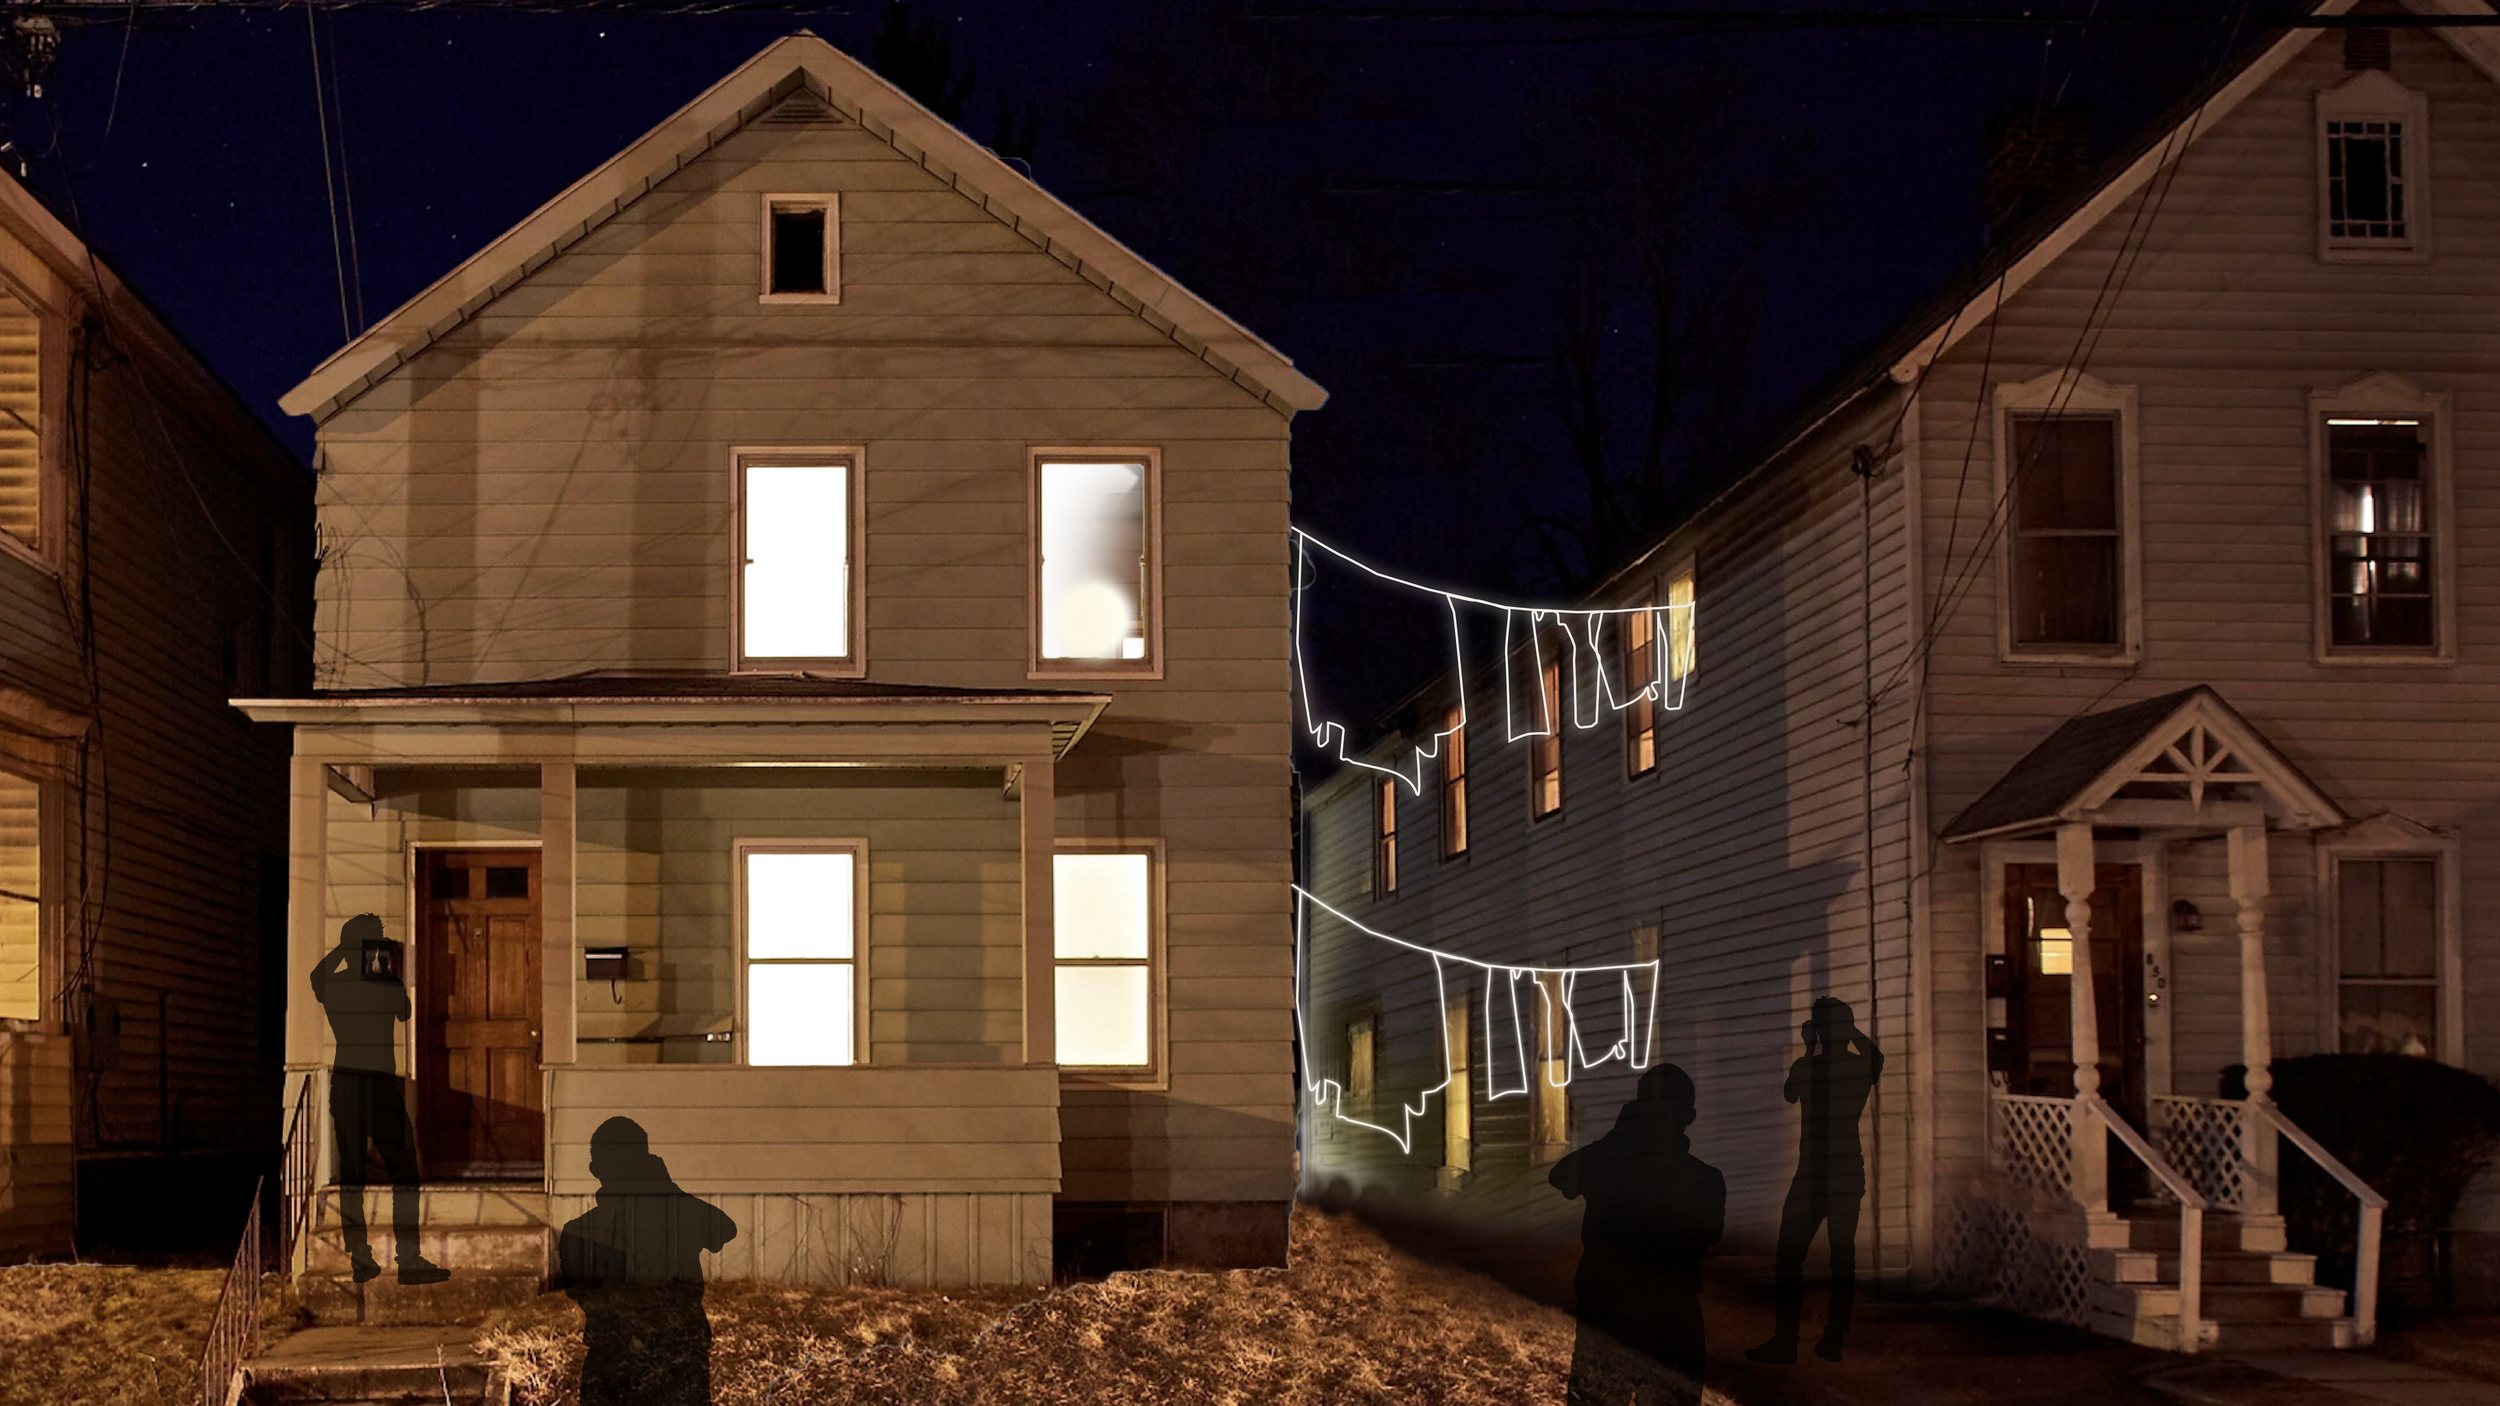
Concept: A word on abandoned houses, disappearing communities, and nostalgia
The "Invisible Neighbors" project aims to bring back forgotten human connections through playfulness. By installing a simple string telephone device between buildings in abandoned neighborhoods, people at both ends of the rope can communicate and rekindle their relationships. The lights are activated by sound vibrations, symbolizing that it takes time and effort to establish meaningful communication.The project serves as a visual representation of the time and effort required to build relationships and revive memories, as the lights slowly come to life with each spoken word, showcasing the power of communication.
A place comes to life when people make it their own by forming connections. With the string phones, we won’t be able to listen in on the current conversations, but it’s a fun way to reminisce about the relationships that once flourished in the community, and they remain hidden within the walls.

I bought EL Wires to start prototyping. Something to keep in mind that the wires can bend up to certain point. So, I had to make the prototype bigger.


Open Soft Machines
Week 8-Getting Weather Data from Database
I watched the recording for this weeks lecture because couldn’t attend class in-person. This was my first time connecting to wifi and using the antenna of the arduino ︎ I thought that it would be more complicated but the recording and the discussions made me realise that it’s pretty straightforward.
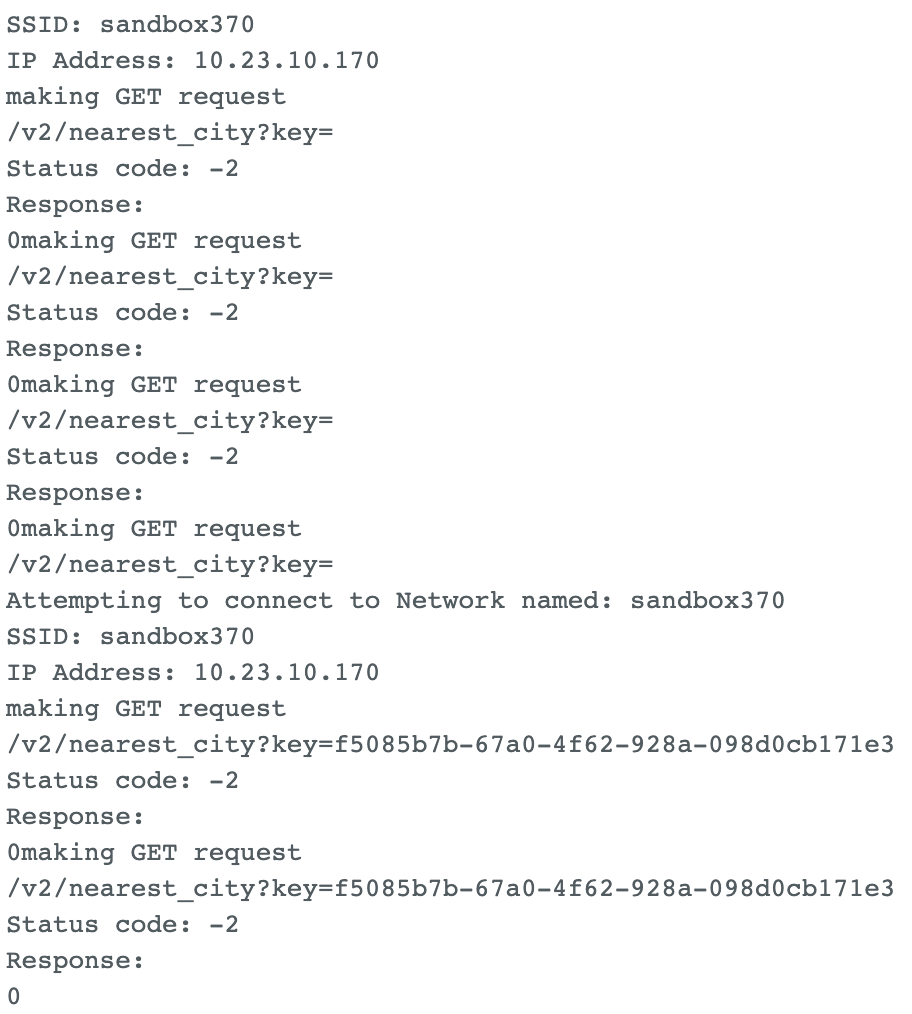
At first, I got the status code -2 error on the console for a couple of times. Due to this, the wifi connection wasn’t there and I couldn’t get the results. Then, I remember Yeseul’s notes about this error and found myself a different Arduino. The one that I was using has a u-blox number of 21/21 and this was causing the problem because it was an older version of the nano iot33. I changed my arduino to something-22 and the problem resolved.

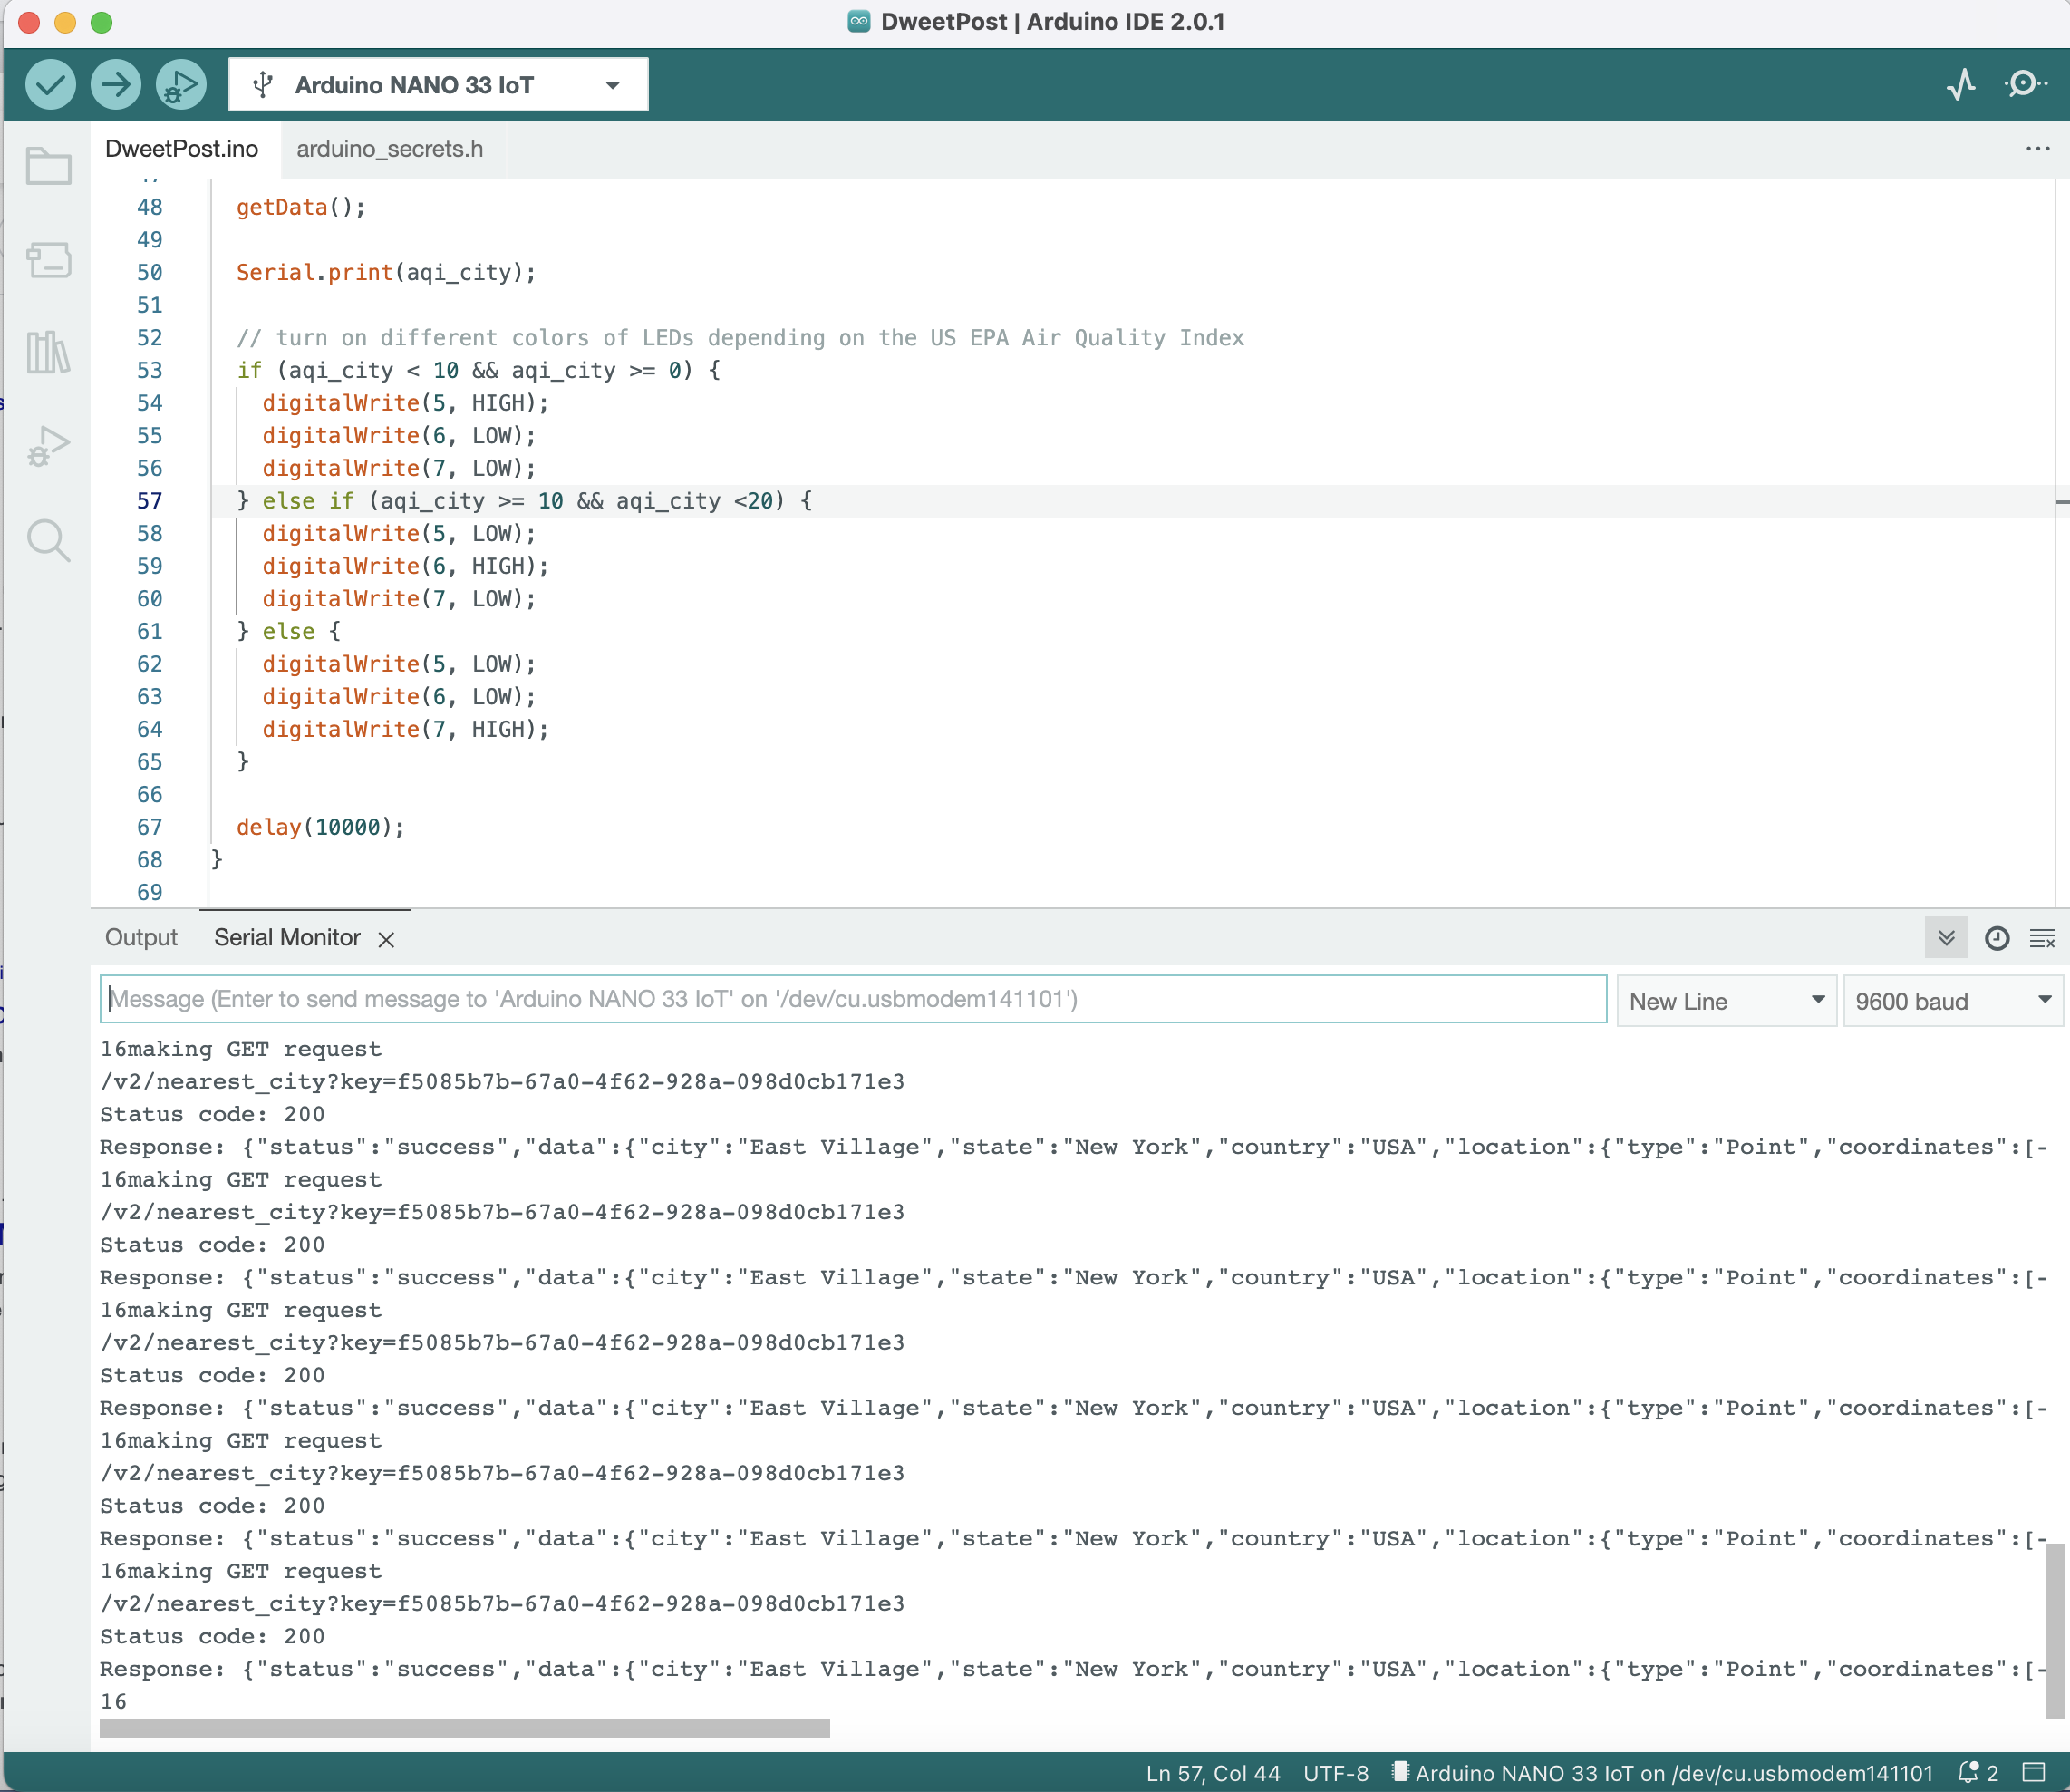
The weather API that we’re using provides us with different metrics related to weather and air quality. To test it out, I changed the value to tp (temperature in Celcius) and 16 was the response. It was such a fine day and the weather was 16 degrees! So, it API was working correctly!!! The number 16 was in between 10 and 20 thus the yellow LED got bright!

I tried to change the location and get a different link for the API, but I was not successful implementing it into the code.
Week 7-Curious Cube Presentations
Week 6-Field Trip
WE GOT MOVEMENT
Yonatan helped us figure out the best way to write the logic for the code. We decided that instead of having it move in 4 directions, we’d start with it just moving forward and backward, but always away from the person nearby. After some debugging, we got some movement! It’s unpredictable and does not happen entirely in the way we need it to, but it’s a start. Next, we need to figure out the threshold for when it moves. Another issue is that, turning a car to a different way can be done in two different ways: either you turn two wheels in opposite directions, or only turn one wheel for a while and than move booth. Both of these caused some problems for us because of insufficient power.

The issue we ran into is that the moveForwards function works great, but there’s something with the moveBackwards code that doesn’t work. When that function is called, only one of the wheels turns. We tried switching the pins, using new wires, restarting everything, but nothing worked.
While trying to figure out the code, we started prototyping the cube. We used cardboards and calculated how big our cube is going to be, by taking the wheel structure into consideration.

Then, we had about one million problems. Yonatan helped us with just about everything and we owe our lives to him.
1. We tried to solve the problem of only one wheel working for the moveBackwards function. At some point during this troubleshooting, we found out that one of the wires attached to the motor had fallen off. The copper coil had snapped off. This happened shortly after to the other motor. We replaced both motors.
2. We decided to try a new breadboard. The h-bridges started acting up and we both burned a finger. One of them burned my breadboard : (
3. We changed breadboards again, and switched out the wires. We still couldn’t get the wheels to turn for moveBackwards, and Yonatan suggested we try switching Arduinos. We were using one from the shop, and put mine in instead. It worked.
4. It was at this point we switched from 2 h-bridges to a single motor driver. After putting the whole circuit together, the wheels still weren’t turning correctly. Turns out, two of the wires somewhere in the circuit weren’t long enough and they weren’t actually connecting anything.
5. We replaced almost all of the wires. Then we realized that one of the batteries had melted the coil, so we had to ditch that battery pack. We picked up a 9v battery to use instead.
After replacing pretty much every aspect of this circuit, we were left with a problem:
We wrote a simple sketch that calls two functions - moveForward and moveBackward, that move the wheels forward and backward. When the board is connected to the computer, it runs fine. When we power it externally using a 9v battery, it runs continuously forward and does not follow the loop in the code. We aren’t sure why.
Before ruining anything up I draw the circuit to have it in hand.
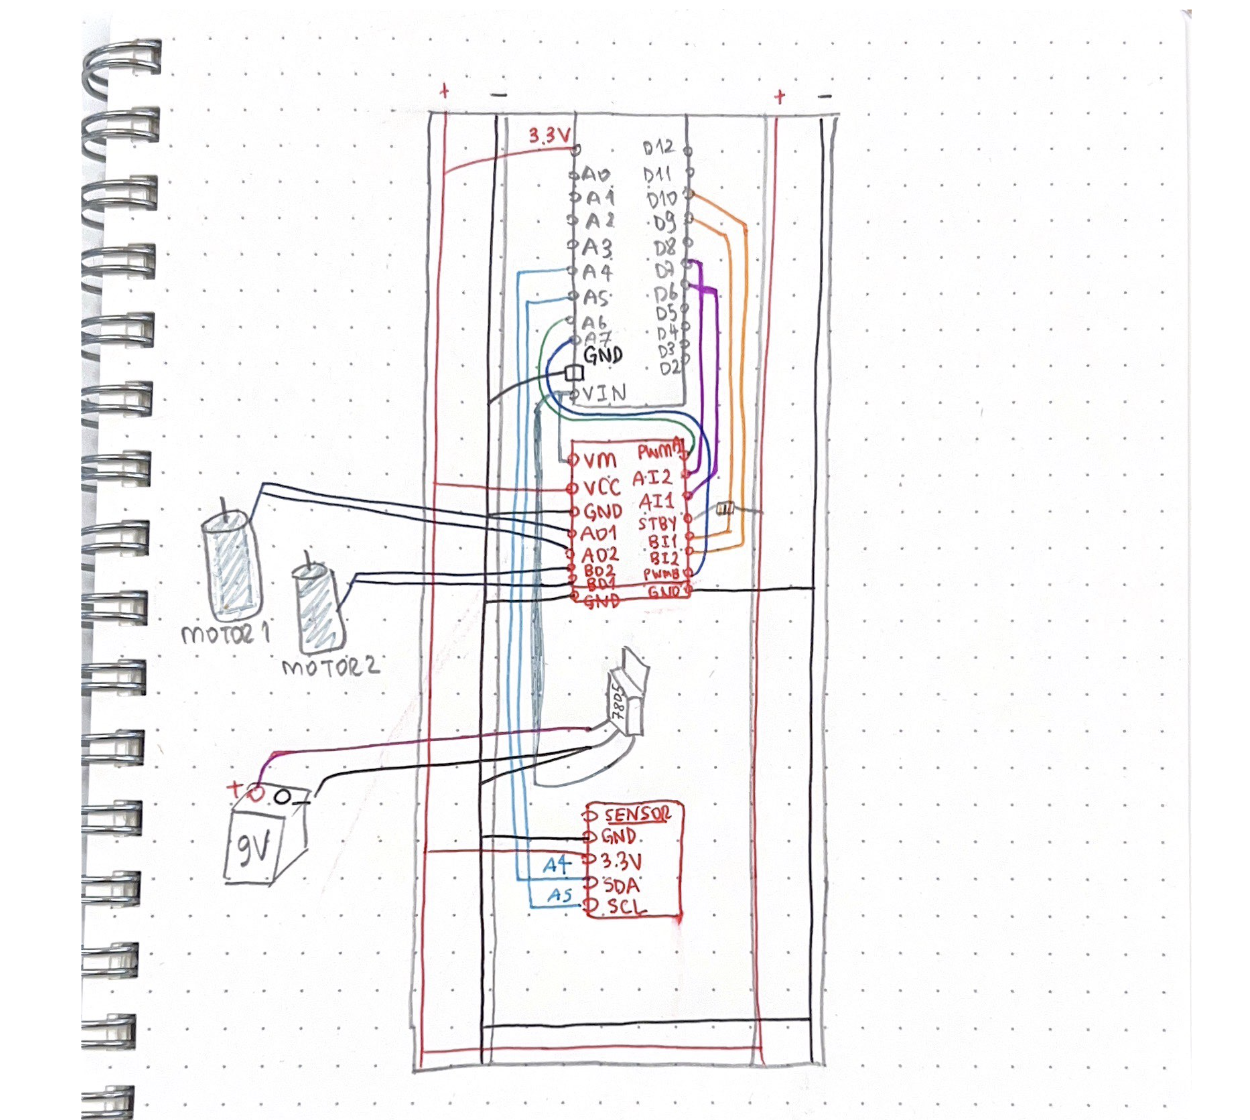
After talking to David Rios and Jeff Feddersen, we removed the voltage regulators and IT WORKED!!! We ended up having to add another 9v battery, which required me to do some fancy soldering. I connected both 9v batteries in serial. To smooth out the fluctuations, we added 2 capacitors for both the 3.3v and the 9v.
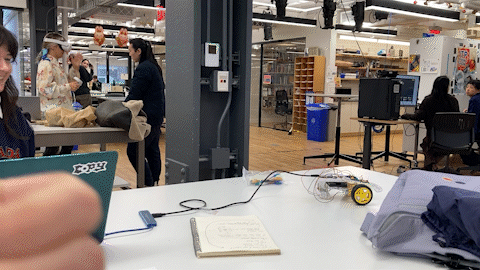
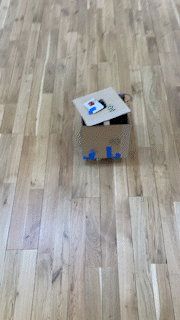
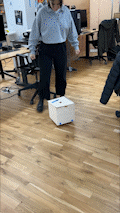
Next, we got started on fabrication. We lasercut a prototype in cardboard first and tested it out on the floor. It worked, but the movement was a little chaotic. We found that the sound of the motors, coupled with their intensity, did not have the calm, sleepy vibe we were going for. Also, we were running out of time and didn’t see a world in which we’d figure out the speaker & LEDs we had envisioned in time. We decided to rebrand from Sleepy Cube to Catch Me If You Can Cube.
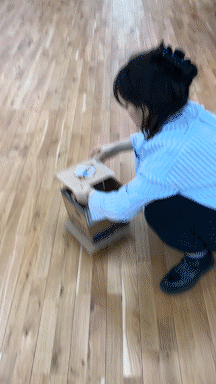
The whole thing got in the box! We added a net on the top for the small breadboard with the sensor so it could get data. Then, we spent some time testing it with different values for the threshold.
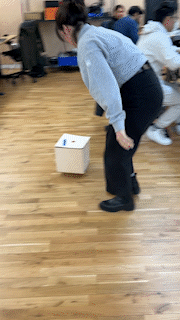
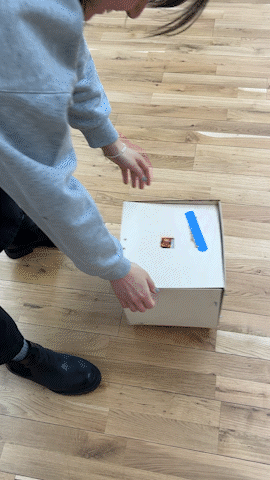
I added a net inside to fix the breadboard and the sensor. And voila! This is how our cube looks at the end. We had to cover up the screws etc because it was a bit dangerous.


Week 5-Sensing Environment
I met Lily over the weekend to work on the gearhead motors and test it out. We put together the circuit using two H-bridges so that the motors could work independently of each other (so the car could turn). We connected 2 buttons to test out the motors before trying to connect the sensor.
We tried to figure out the movement of wheels to turn and move the car. There is two possible iteration: either the wheels turn in opposite directions to turn around the car, or only one of the wheel turns and the other one stays still. This then created one more problem. To turn a car around and keep it moving, we actually need two functions: one for turning the other direction, and another fun just moving in that direction. We decided on just making it move first because it is more complicated. If we can figure out the movement, we’ll add another turning movements etc.

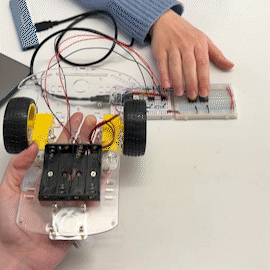
Image on the left shows the circuit we built to move the motors with buttons. The one on the right is a scene where we’re controlling the wheels indivudually and testing out if the h-bridges are working properly.
For the sensor, rather than using 4 different PIR sensors, we will be using the Qwiic AK9753 Human Presence Sensor. This sensor gives different data from each direction (up, down, left, right) and temperature/humidity. So, it’s a 4-in-1.︎ After getting that to work with the help of code from Dror’s group, we went ahead and tested out the presence sensor. It was pretty easy to set up, but the data we got from it was slightly overwhelming. We spent a lot of time testing out the range:
For the sensor, rather than using 4 different PIR sensors, we will be using the Qwiic AK9753 Human Presence Sensor. This sensor gives different data from each direction (up, down, left, right) and temperature/humidity. So, it’s a 4-in-1.︎ After getting that to work with the help of code from Dror’s group, we went ahead and tested out the presence sensor. It was pretty easy to set up, but the data we got from it was slightly overwhelming. We spent a lot of time testing out the range:
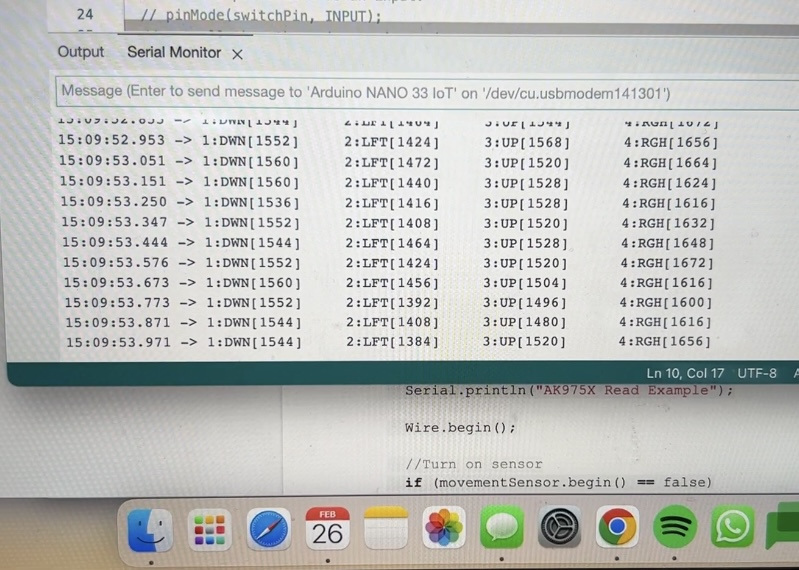
While testing the sensor, we came to conclusion that the location of the sensor (floor, desk etc) affects the readings of the sensor. Since our box will be closer to the floor, we moved the circuit at a relative height to get a more reliable reading. After that, we combined the two sketches so we got sensor data and the wheels on the motor to move. Next, we plan to implement some if statements into the code so the wheels move when it senses a person in each direction.
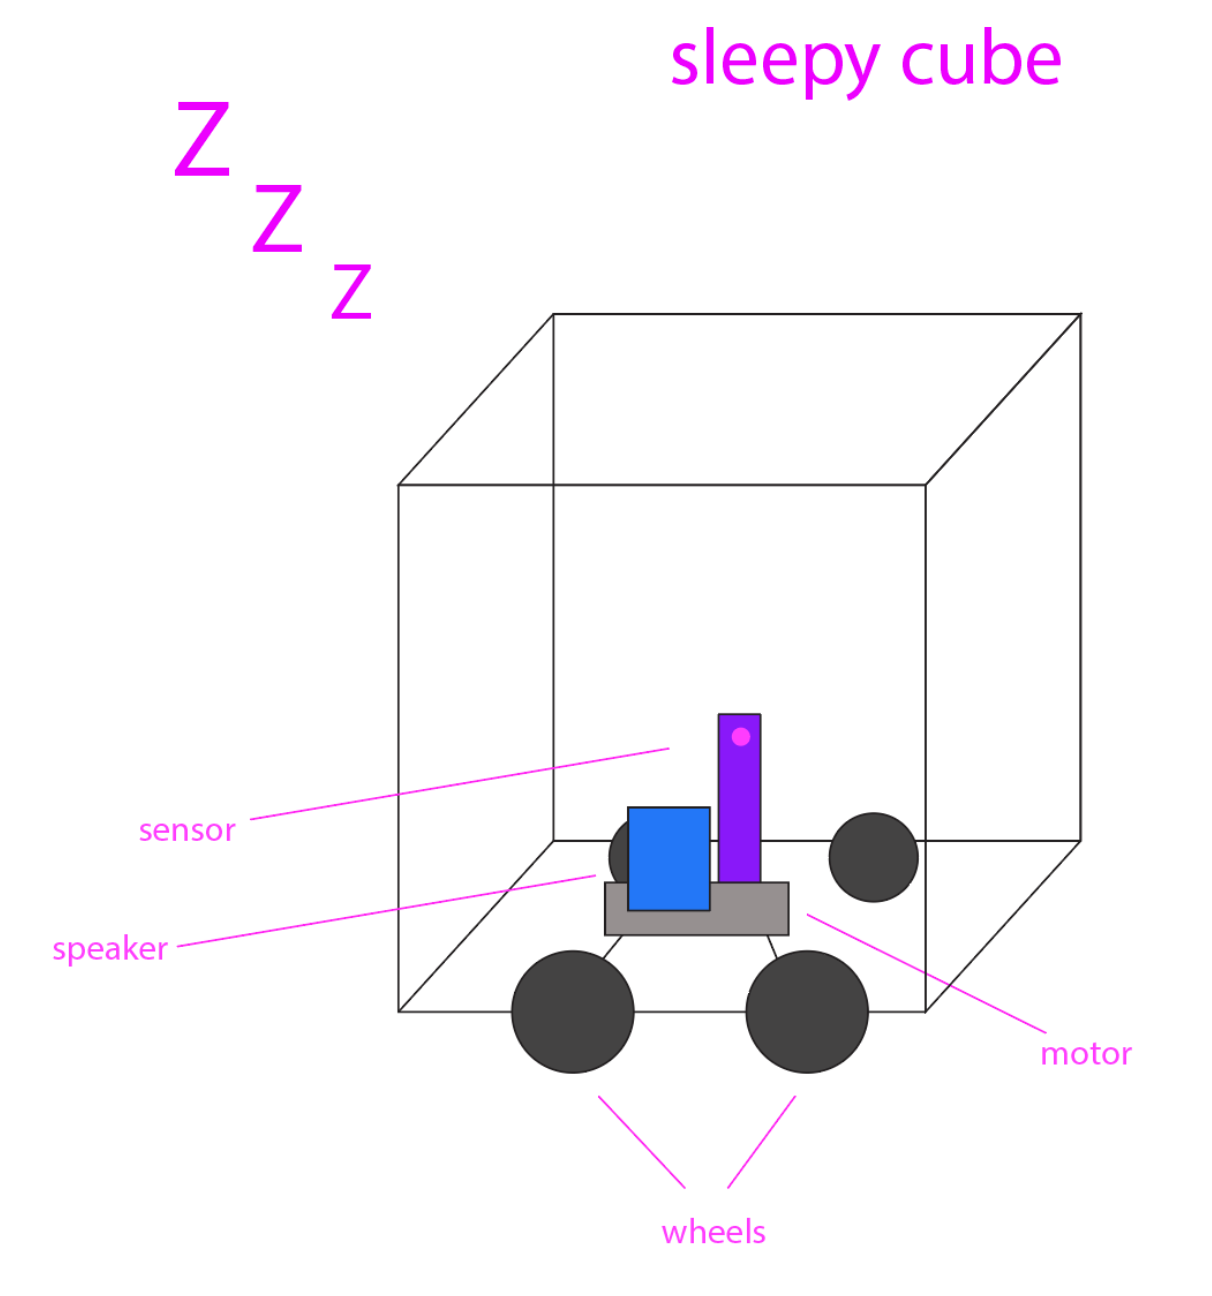
Week 4- Curious Cube Ideas & Light Pipes
SLEEPY CUBE
The feedback session went well this week; I enjoyed pitching our idea. People suggested that the box can turn the other way rather than moving away. Since me and Lily have never worked with something moving, we think that it can be a useful idea.
We were not quite sure which idea to go for, but we decided to merge the two idea together. (daft punk helmet idea and the sleepy cube) I really liked how fiber optics work and we thought about how the lights can contribute to the sleepy cube personality.
ex project 1: Link
How does it work?
- (Cube is sleeping) Speaker plays “snoring” sound.
- (Someone is approaching the cube) Proximity sensor senses whether there’s something within the given distance.
- (Someone is within a close distance, cube wakes up) The data is sent to a microcontroller to contol the speaker and the motor that moves.
- (Cube has woken up) Fiber optics are lid up.
- (Cube is grumpy) Gearhead motor moves and the box turns the other way.
- (Cube goes back to sleep) Speaker plays “snoring” sound.
Bill of Materials
- Gearhead Motor (x2 - luckily we both had these in our pcomp kits.)
- Arduino Nano33 IoT
- Speaker
- Wheels
- Proximity Sensor (TBD) (not sure which kind, it depends on how we want to place it etc.)
- Fiber optics (to represent the eyes of the cube, which will light up once it’s awake)
- Power supply
- Plywood or Acyrilic to build the box. (TBD)


WEATHER AS MEDIUM
While I was searching for project that use “weather” as a medium I run into a bunch of them. These three are my favorites:(click on the names of the installations to learn more)
-Rain Room, 2012 by Random International
Rain Room can be seen as an amplified representation of our environment. Human presence prevents the rain from falling, creating a unique atmosphere and exploring how human relationships to each other and to nature are increasingly mediated through technology.
Upon entering the installation, visitors are simultaneously exposed to and protected from the water falling all around. Although the sound and smell of the rain are intense, its touch remains absent leaving visitors dry within a continual downpour as they navigate the space.
Your physical presence is being recorded and that data is being sent to a controller that stops the rain in your area. The rain here is man-made but I still believe that the medium is weather. Also, I would want to experience the feel of walking in the rain without getting wet. Sounds fun:)

- Windswept, 2011 by Charles Sowers Studio
Windswept consists of 612 freely rotating wind direction indicators mounted parallel to the wall creating an architectural scale instrument for observing the complex interaction between wind and the building. Wind gusts, rippling and swirling through the sculpture, visually reveal the complex and ever-changing ways the wind interacts with the building and the environment.

Here, the wind is creating this beautiful visual. Nothing is man-made. The sun would also take a part in this project because the shadows will change place with the sun. Their intensity, orientation, and lenght is dependant to sun.
-Blow Up, 2005 by Scott Snibbe
Blow Up records, amplifies, and projects human breath into a room-sized field of wind. The installation comprises two devices. The first is a rectangular array of twelve small impellers, which stands on a table on one side of the gallery. This small input device is electronically linked to a large wall of twelve electric fans. The tabletop impellers are spatially and temporally synchronized to the fans in the wall. When a “sender” blows into the first device, “receivers” experience the magnified breathing patterns over their entire bodies. When he stops blowing, the wall continues to play back the most recent breathing pattern, captured in an amplified loop, until someone inspires a new pattern.

With your breath, you control the bigger fans to create wind. This feels like a cartoon idea, being able to turn something small into something way bigger!
Week 3- The Delicate World of Proximity/Distance Sensing (2)
PROJECT #3 - CURIOUS CUBE
For the project, I’ll be working with Lily Crandall. And our project idea is called “Sleepy Cube”.
What we need:
- Sensor that detects if someone is close by & measures distance
- Motor to move the wheels
- speaker to play audio (snoring)
Our cube has a sleepy personality and doesn’t like to be bothered. When there’s someone approaching the box gets grumpy and moves away from people.


Other ideas:
- A wearable box (like a Daft Punk head sets), it senses your breath and the lights reflect the movement of your breath.
- A jack-in-a-box. So, once you approach the box, something pops up.
Week 2- The Delicate World of Proximity/Distance Sensing
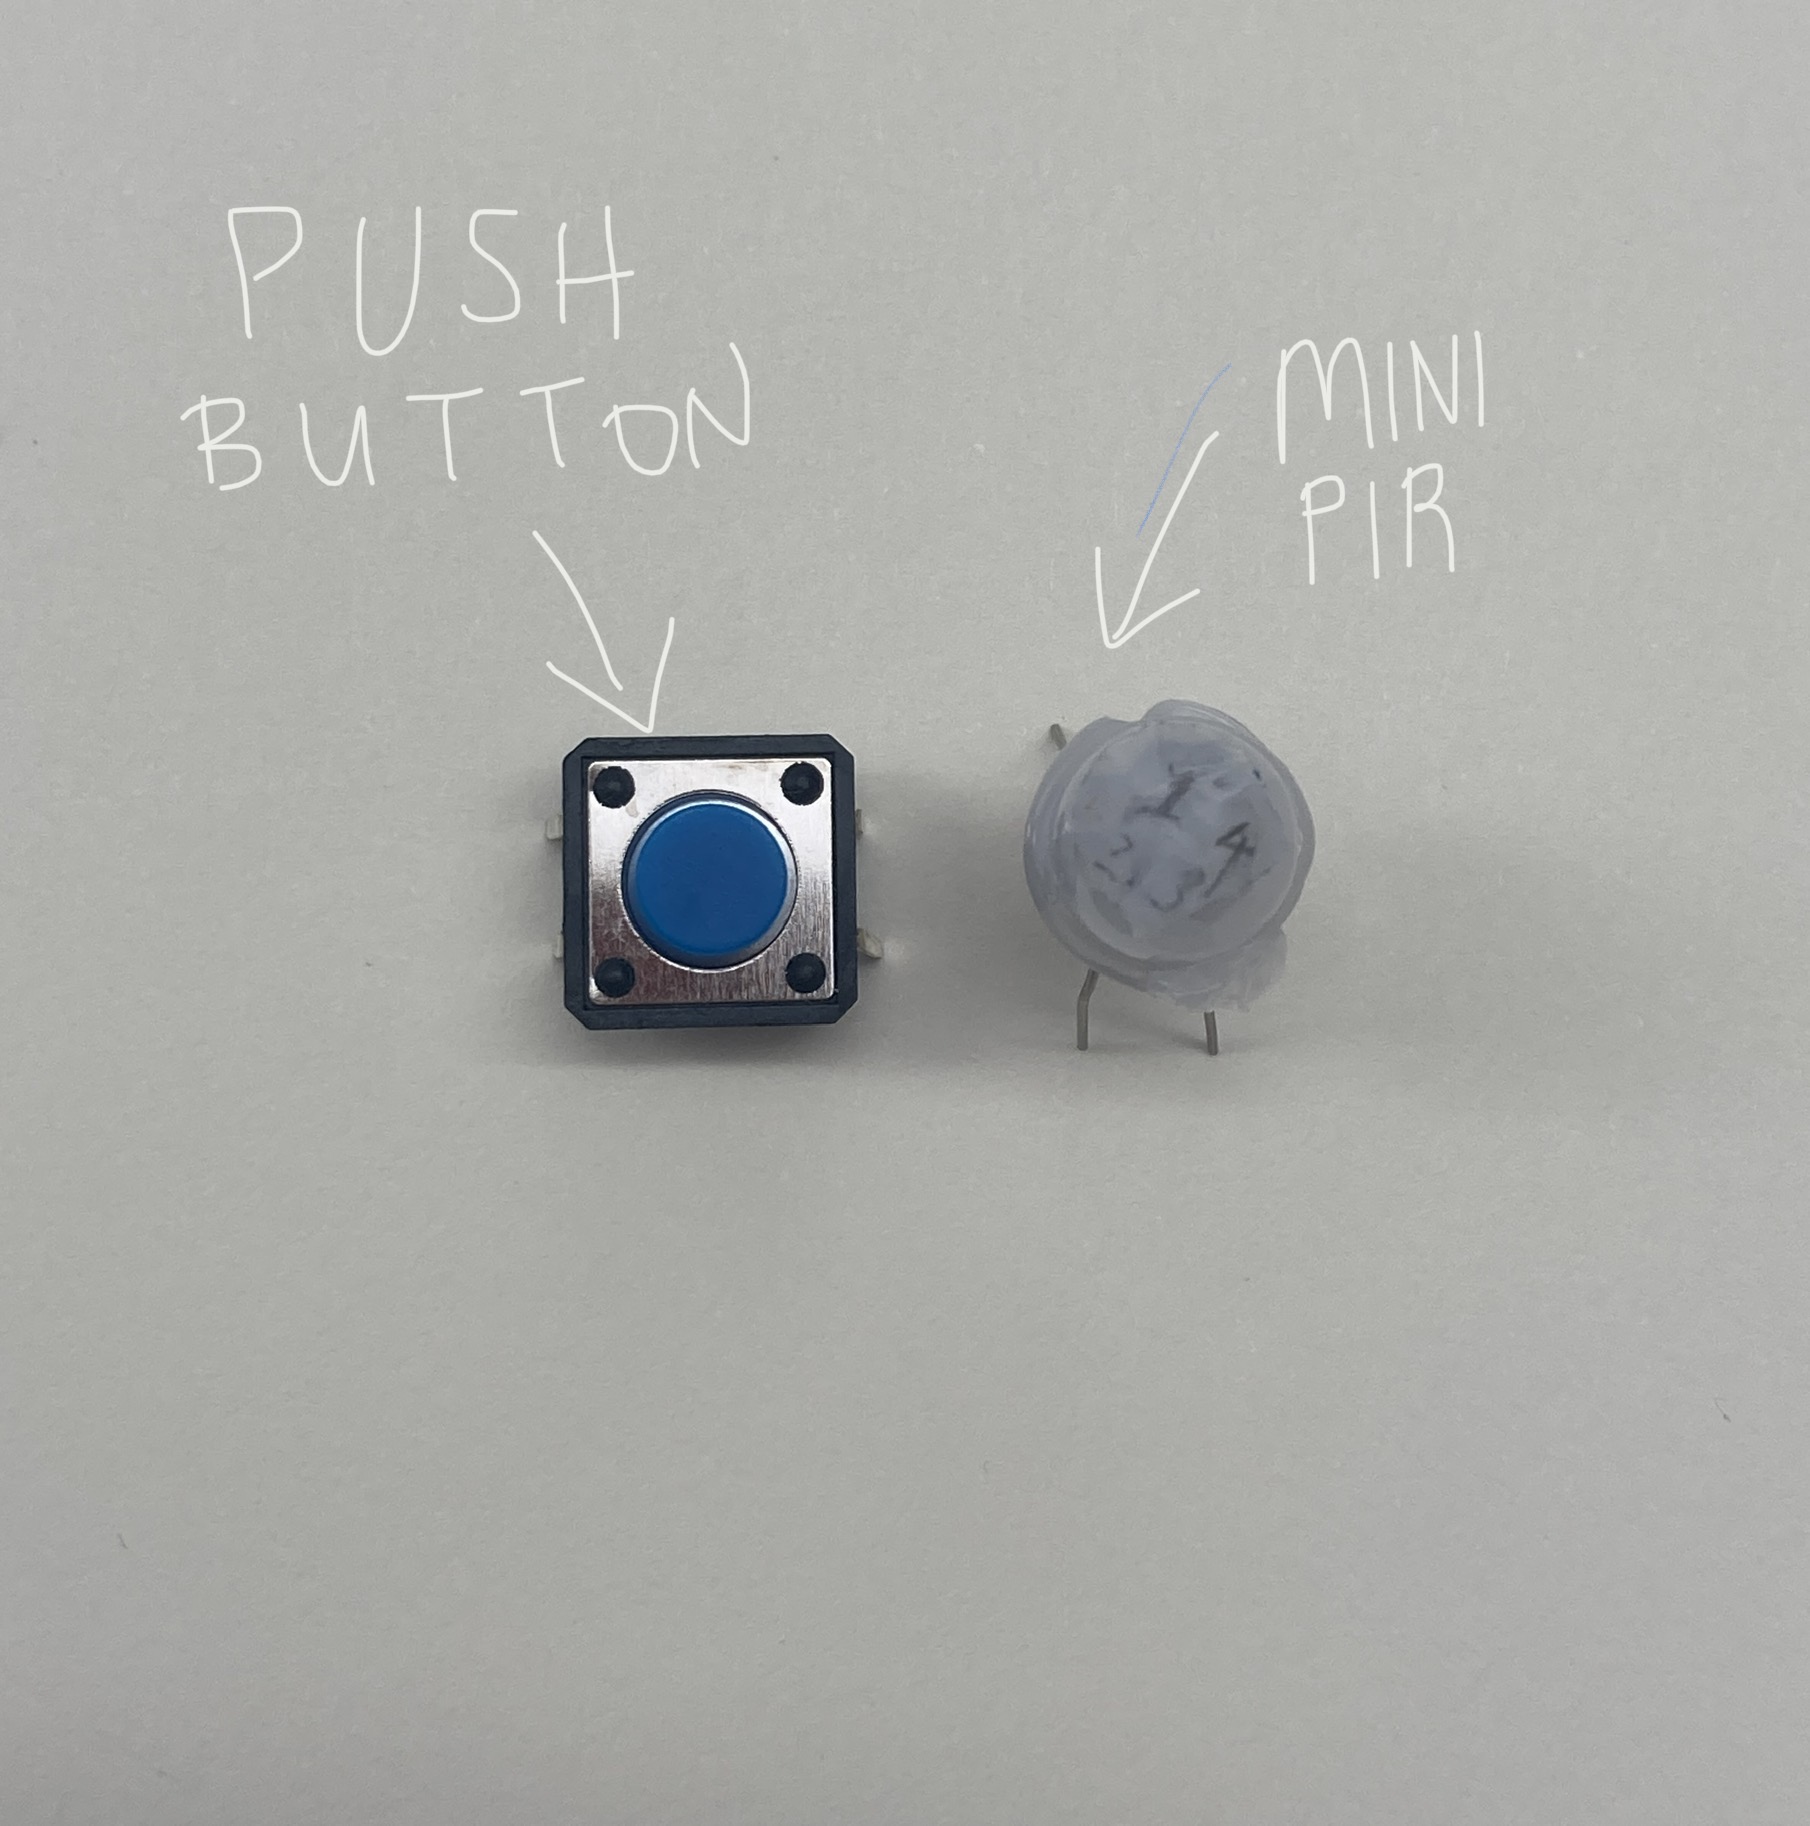
PROJECT #2 - PROXIMITY SENSOR RESEARCH
Kyungah and I chose the mini PIR sensor - BS412.The sensor was not the most straightforward, but we tried our best. Funnily enough, we managed to melt down the cap of the sensor.
Description
PIR (Pyroelectric "Passive" InfraRed Sensor) sensors allow you to sense motion and detect whether a human/pet has moved in or out of the sensor's range from about 5 meters away. They are made out of a pyroelectric sensor, which can detect level of infrared radiation. (Image on the right, the rectangular center refers to the sensor)
Application & Dimentions & Benefits
The sensor can be used within intelligent appliances, alarms, motion detectors, sensor lamps, security systems, and automatic controls.
The BS sensor window is 4mm x 3mm and the dimentions of the sensor itself are 11.8mm x 9.73mm.(Image on the left shows a comparison between the dimentions) Therefore, the benefits are: compact, requires low energy, power adjustable,cheap, and fully contained - only need VD,GND, and a resistor.
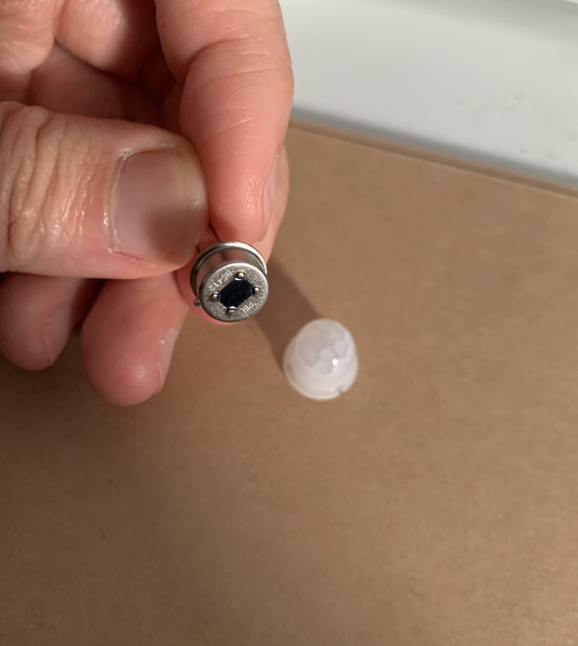
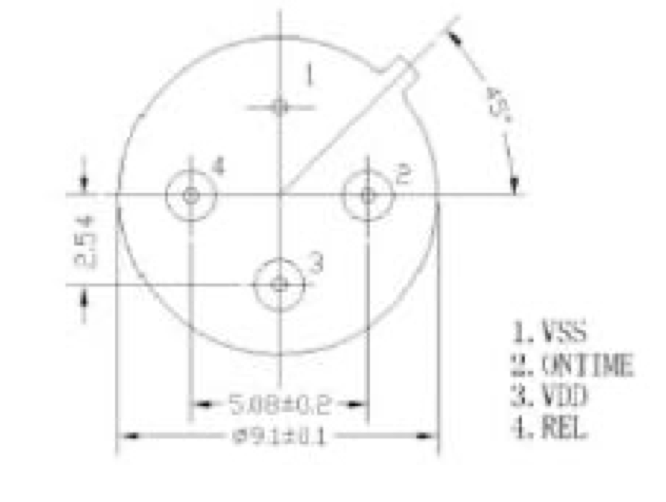
Sensor Diagram
B2412 has 4 pins. The image on the left shows the bottom view of the sensor. It was not as straightforward to visualize the pins from the top. Thus, I wrote the number of the pins on the top. Before, we tried to eye-ball it and short circuited the circuit and melted the sensor. For those of you who will use this sensor, we recommend that you do a similar thing. Image on the right displays a basic circuit with an output LED.
B2412 has 4 pins. The image on the left shows the bottom view of the sensor. It was not as straightforward to visualize the pins from the top. Thus, I wrote the number of the pins on the top. Before, we tried to eye-ball it and short circuited the circuit and melted the sensor. For those of you who will use this sensor, we recommend that you do a similar thing. Image on the right displays a basic circuit with an output LED.
Pin 1: Ground (VSS)
Pin 2: Ground (ON TIME)
Pin 3: Voltage (3.3V)(VDD)
Pin 4: Digital Pin (REL)


Week 1 - What is Intangible Interaction?
PROJECT #1 - SELF CHECKOUT EXPERIENCE
For our first project, we (me, Mary, and Vera) decided to focus on the self checkout machines that Uniqlo and other retail companies use. How these machines work is that, once you’re ready to check out, you bring your shopping basket and place it next to the scanning area. The machine reads all the tags of the clothes, meaning that you don’t have to scan each piece individually.
I went to Uniqlo last weekend to get a better understanding of this technology works. Personally, I never saw this machine, so I wanted to give it a shot!

Research
The self-checkout technology at UNIQLO is based on the Radio Frequency Identification (RFID) technology, which is commonly used for tracking and identification purposes. This technology came into the commercial realm in 1970’s, where the majority of early uses were related to electronic article surveillance (EAS) equipment to counter the theft of merchandise. Today RFID’s are used in numerous ways with some applications including:
- Inventory tracking (track and record an asset’s entire life cycle)
- Event & Attendee Tracking
- Access Control and Fobs
- Vehicle Tracking
- Tolling
- Real-Time Location Systems
RFID tracking system has several advantages over other systems (like barcodes, for example):
- Does not require line-of-sight for scanning that barcode tracking systems use, making RFID a much faster and simpler tracking process.
- Hundreds of tags can be read in seconds
- RFID tax can be very durable.
- RFID tags can hold more data than other types of tags or labels
- Read range for an RFID system can be controlled as needed from 0-150 meters
- Tags could be encrypted or locked for security tag
- Memory can be rewritten and reused
Radio-frequency identification (RFID) uses electromagnetic fields to automatically identify and track tags attached to objects. Within the electromagnetic spectrum, there are three primary frequency ranges used for RFID transmissions – Low Frequency, High Frequency, and Ultra-High Frequency. Different frequency ranges have different applications, distance ranges, and associated costs.
System Components
RFID systems typically have four components: RFID tag, RFID reader, antenna, and a computer database.
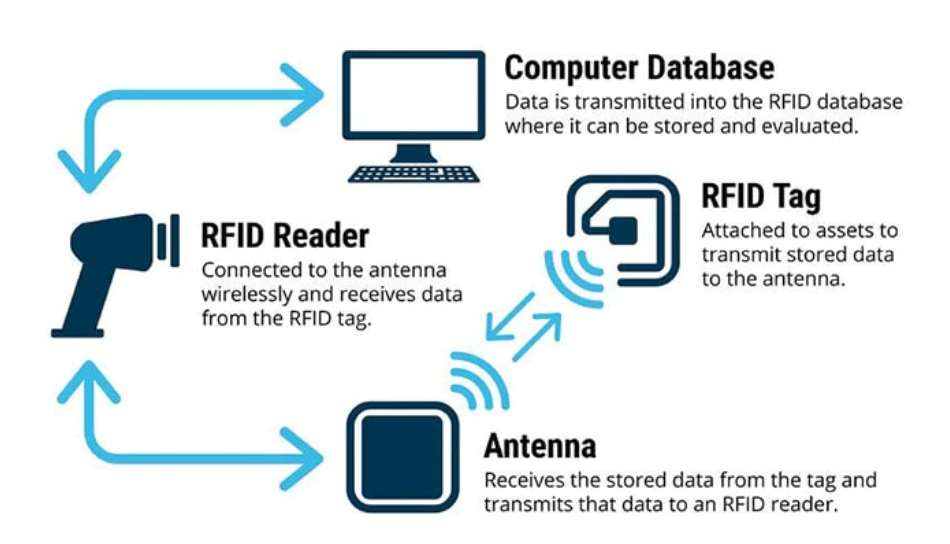
- RFID tag is comprised of two parts – an antenna for transmitting and receiving signals, and an RFID chip (or integrated circuit) which stores information like ID number. (Images on the right are examples of RFID tags). There are three main categories of RFID tags: passive, semi-passive, and active. These categories refer to how the RFID tags transmit data, and how close you have to be to pick up their signals. The ones that Uniqlo use are passive tags and they send or ‘reflect' back a signal that an RFID reader initially sends to them. These tags do not have a battery. Instead, they receive energy from the radio waves generated by the reader. When the tag receives the transmission from the reader/antenna, the energy runs through the internal antenna to the tag’s chip. The energy activates the chip, which modulates the energy with the desired information, and then transmits a signal back toward the antenna/reader. Passive tags have a limited distance range and they are one of the better options for things that are stored for extended periods of time.
- RFID reader (also known as interrogators): devices that transmit and receive radio waves in order to communicate with RFID tags. RFID readers are typically divided into two distinct types – fixed and mobile RFID readers. These also require power.
- RFID antenna: convert the RFID reader’s signal into radio waves that can be picked up by RFID tags. Without some type of RFID antenna, whether integrated or standalone, the RFID reader cannot properly send and receive signals to RFID tags.RFID antennas receive their power directly from the reader.
- Computer database: receives , processes and stores data from the RFID reader.
When choosing an RFID system it is helpful to ask the following questions:
- At what distance do you need to scan for items?
- Which RFID tags do you need (Active, Passive, or Semi-Passive)?
- Do you require weatherproof/durable tags?
- What frequency do you need your tags to operate at (Low, High, Ultra-High)?
PROJECT #1 - MY UNIQLO BUYING EXPERIENCE
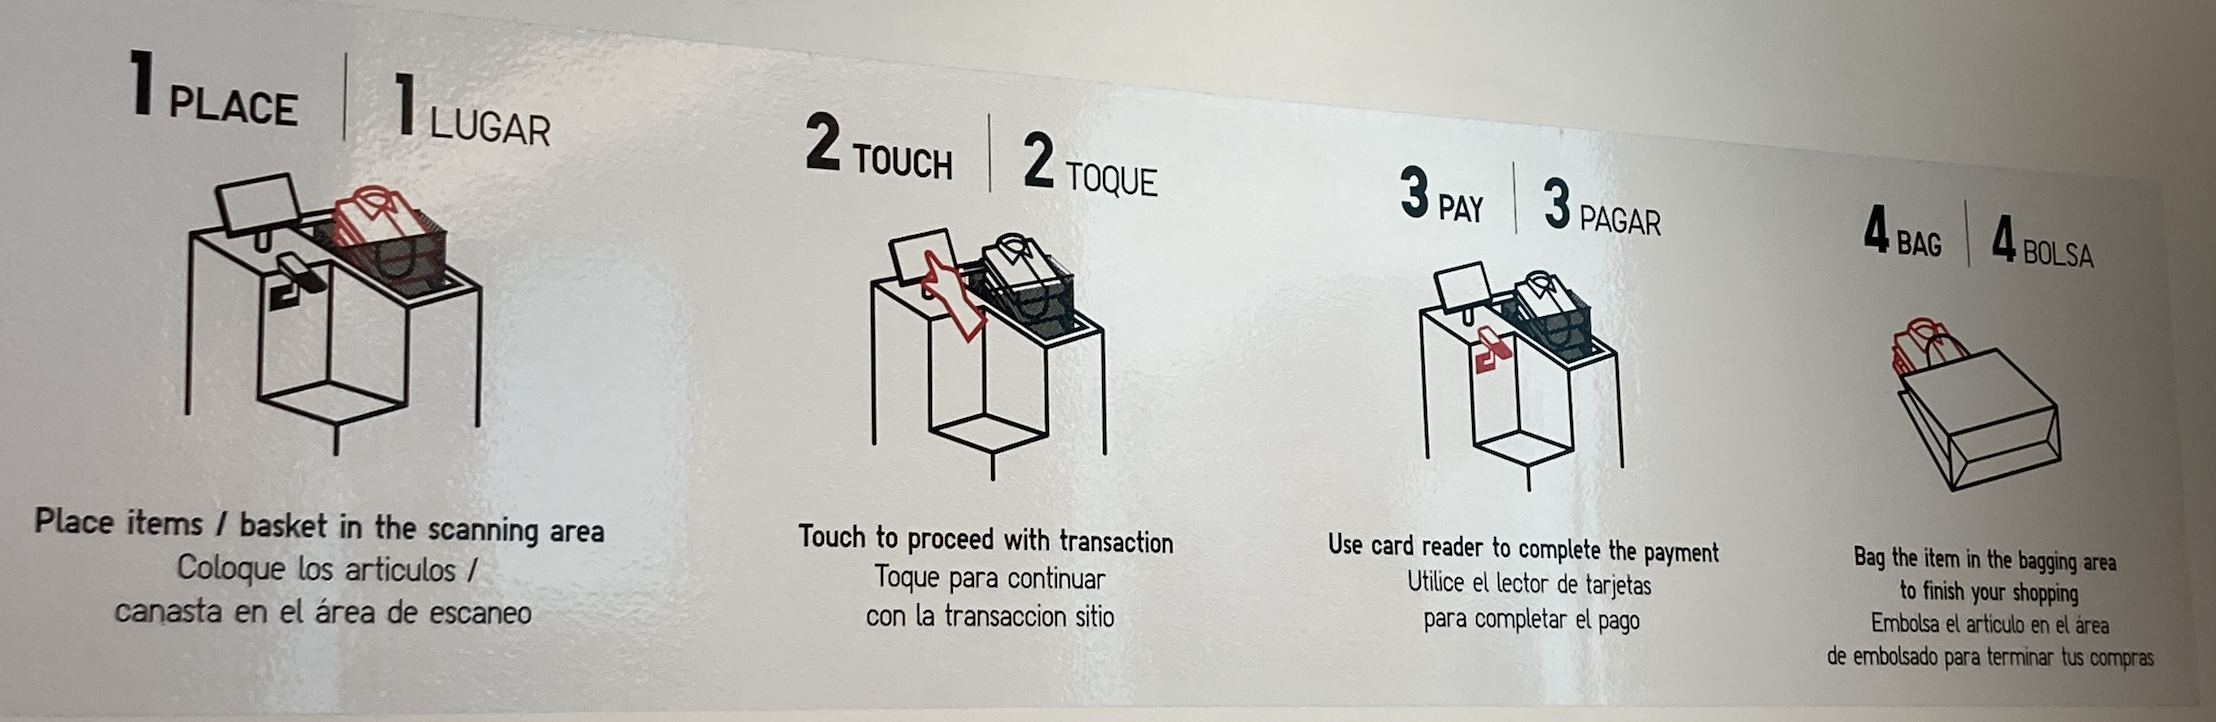
Self Checkout steps
(blue steps are not included in their chart. But I realized that they are crucial part of the process)
- Place items/basket in the scanning area
- Enter the number of items. Confirm or try again (Image below - left)
- If you get this error message: “Seek assistance from a sales associate”, the employee will do the staff login. They will remove the ink tags. (Image below - right)
- Touch to proceed with transaction
- Use card reader to complete the payment
- Bag the item in the bagging area to finish your shopping


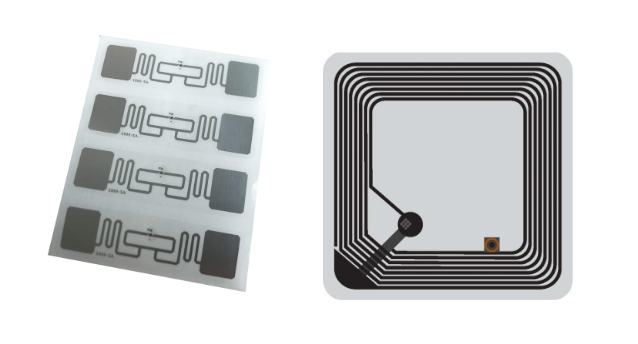
Different types of tags
Since we did the research, I knew what to look out for. I tried to find the RFID tags but they were only visable when I hold them over the light. If someone is unaware of this technology, it’s really hard to see or locate these tags.
Small items only have the RFID tags(Image on the left). Larger pieces have both the RFID tags and the ink tags to prevent shoplifting (Image on the right). If they are programmed, the RFID tags are triggered when the chip crosses the detection sensor and the alarm would be triggered to alert store employees to the theft. (Click Link)


Common errors of the system:
RFID label technology is used to eliminate the barcode scanning process and create a faster and smoother shopping experience. BUT,
- Since entering the numbers of products is not one of the steps, people tend to remove everything from the basket and start counting before proceeding with the checkout. This leads to a longer buying experience.
- When you get an error message, you have to wait for the sales associate to come by your self checkout machine and separate products with the ink tags. Then, they will bring those products to the other counter to remove the tags. Once they’re done, they’ll place those items in the basket and login with their staff ids. Now, you can proceed. If you’re going to wait for the ink tags to be removed, you might as well go to the other checkout counter. (not the self checkout). This also leads to a longer buying experience.
Ideation
I observed people’s buying experience at Uniqlo. It was quite funny to see their reactions, mix of confusion and a bit of admiration over the technology. When I told this to Mary and Vera, we thought about those photo sections after you ride a rollercoaster. What if that machine takes a funny photo of you while being super confused about how to proceed with the machine and display them over the main counter. So, we imagined a world where the security law is passed and there is no ethics concern haha. You can even get this image printed out with your receipt.


Lipsum™
Integer turpis massa, varius ultricies est sed, aliquet feugiat enim. Nulla facilisi. Ut in justo in ex faucibus ultricies. Proin id erat quis lorem vehicula commodo. Phasellus pharetra libero pretium ultricies aliquam. Vivamus eleifend, ligula ut venenatis aliquet, massa elit efficitur lorem, fermentum molestie elit ligula in ex. Duis mauris tellus, pharetra et orci a, aliquam imperdiet augue. Pellentesque elit neque, tincidunt sit amet imperdiet eget, porta ut metus. Nulla id leo tortor. Donec elementum ac sapien eget feugiat. Donec lorem dui, vestibulum quis nisl et, feugiat mattis massa.
Phasellus Rez
Praese
Praese
Suspendía
©MMXXI
Integer turpis massa varius