Designing the Absurd
Week 9 - Absurd Functions
Cocktail Machine - (from collapsible tray to salad shaker to cocktail mixer to cocktail vending machine(?))
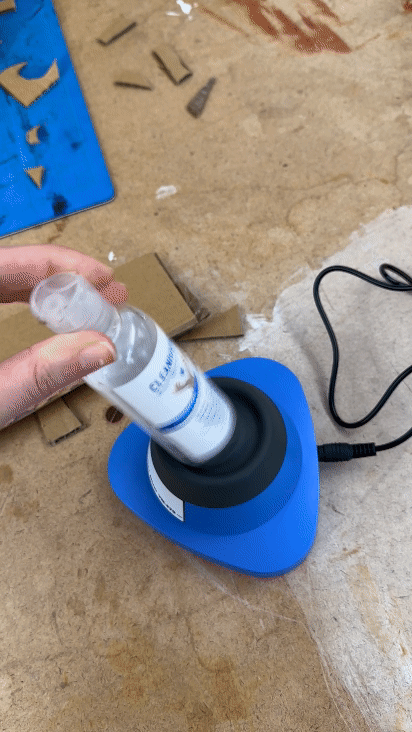
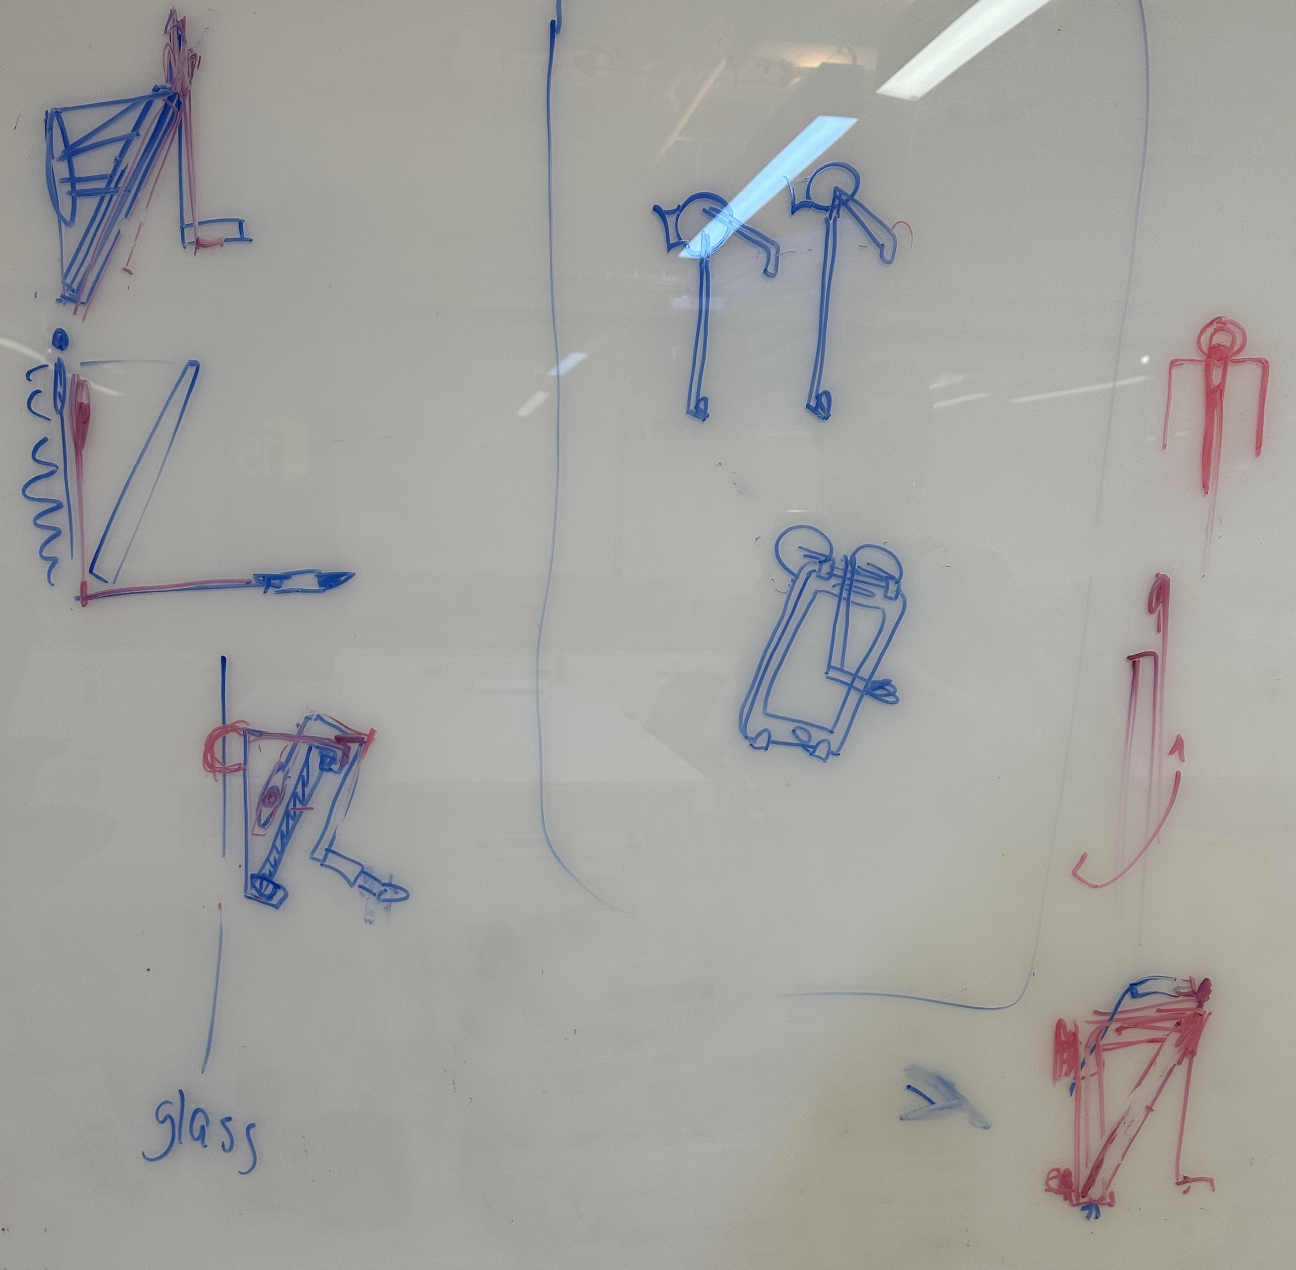
We tested out the vortex mixer thinking that we might use that technology. Below, you can find our initial sketches for different ideas.
![]()
![]()
![]()
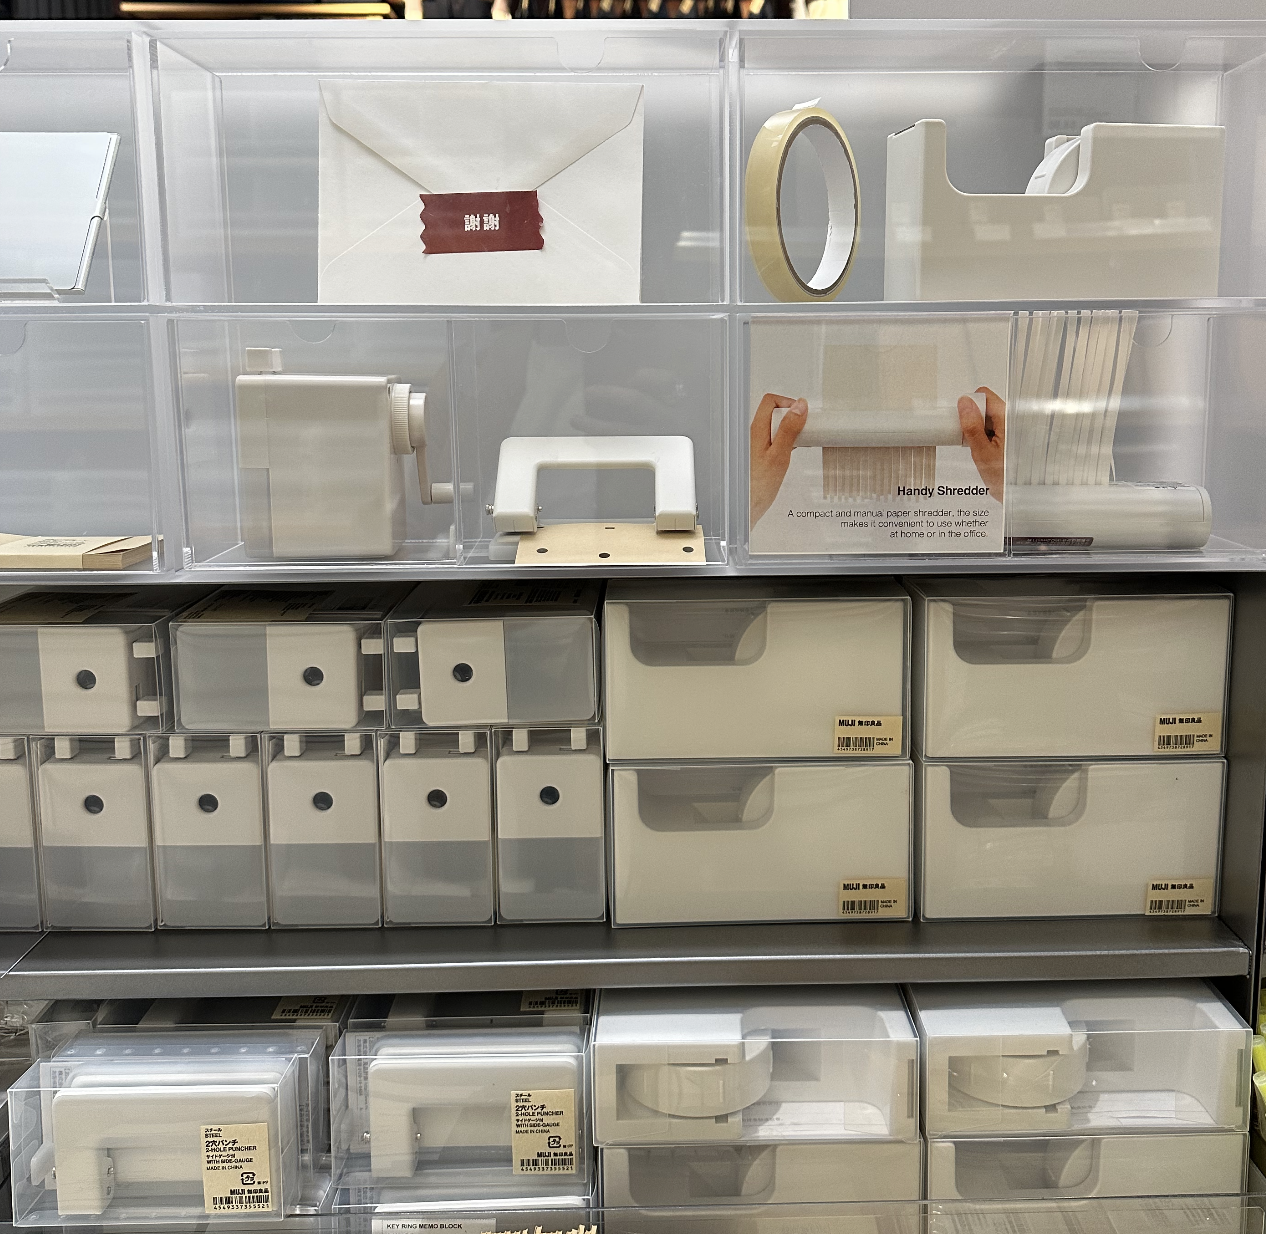
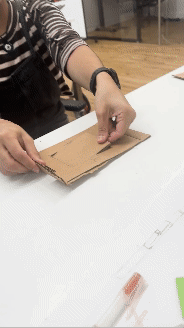
Now, we are going to create a cocktail vending machine with mechanics. So it’s an absurd way of making a cocktail. It will be placed in the guests room and could be sold in the gift shop. Sam and I sketched and Sam built the cardboard prototype. Then, I created a moodboard for it’s look&feel which helped us finalize which materials to use.
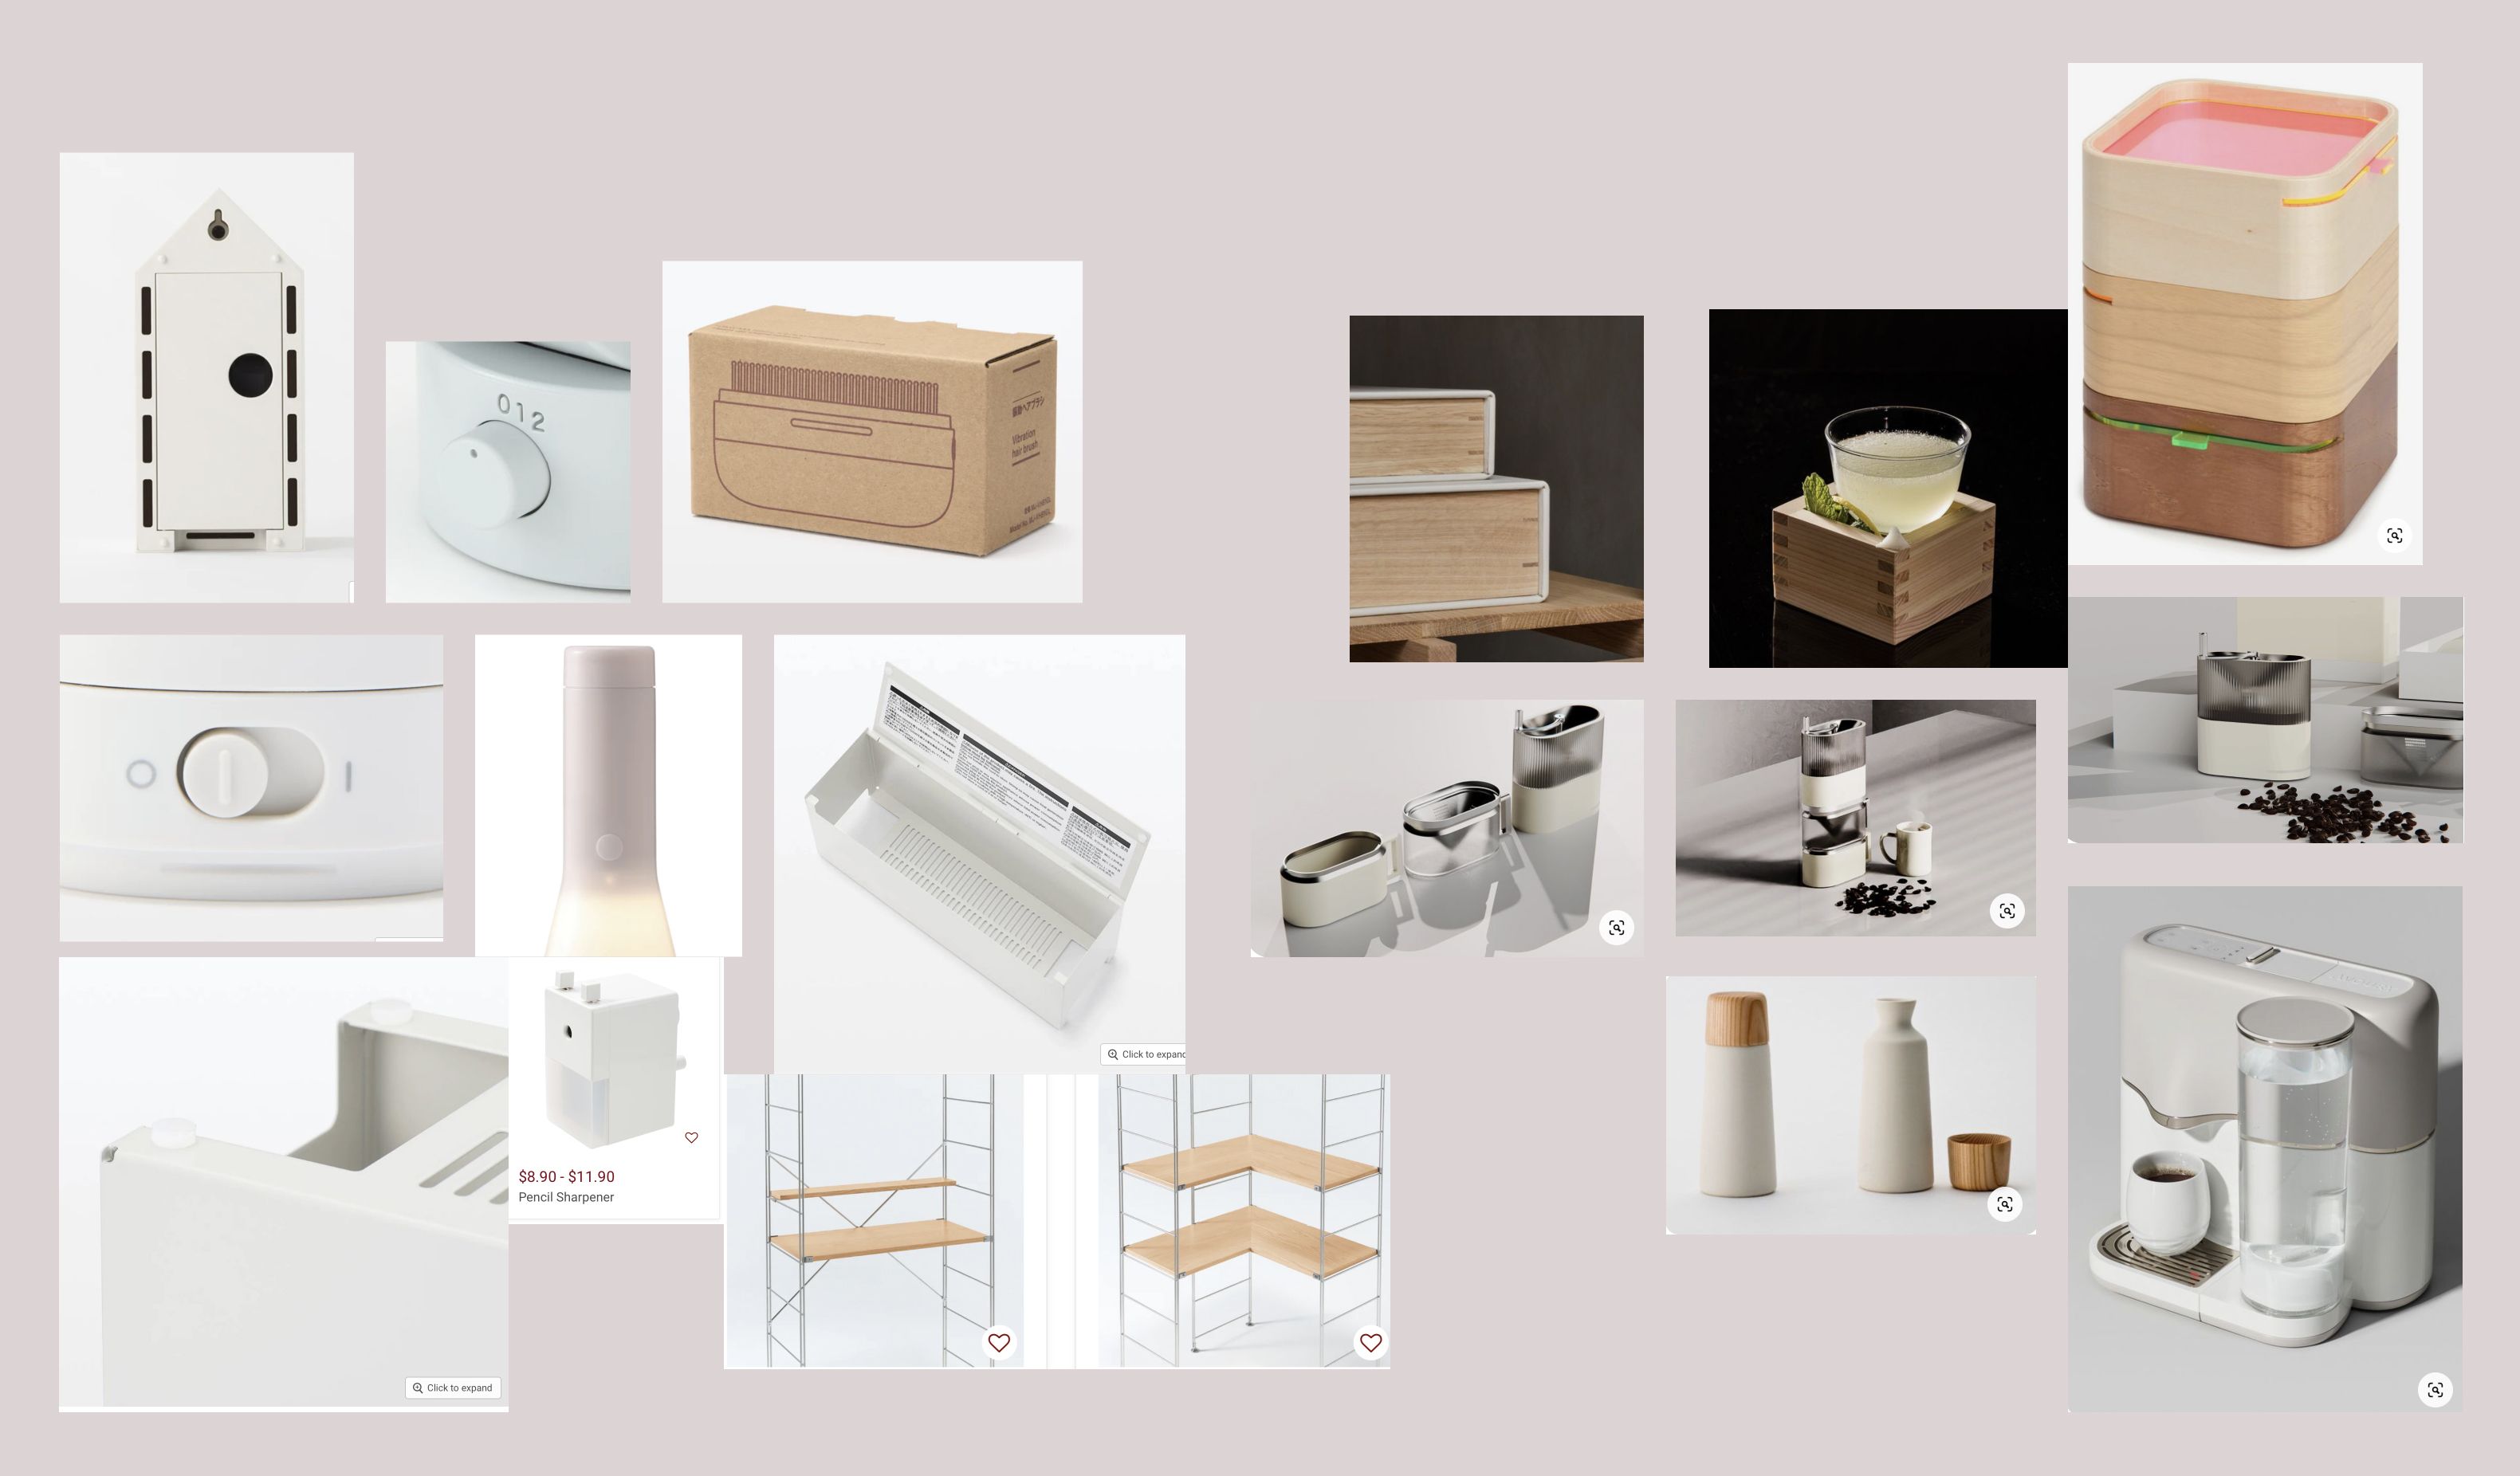
On the left, here are some close up screenshots from Muji products to see how they use color/and buttons. On the right are some Japanese style objects and machines. They helped us understand how to mix and match different materials and incorporate the green apple color.
![]()
![]()
![]()
![]()
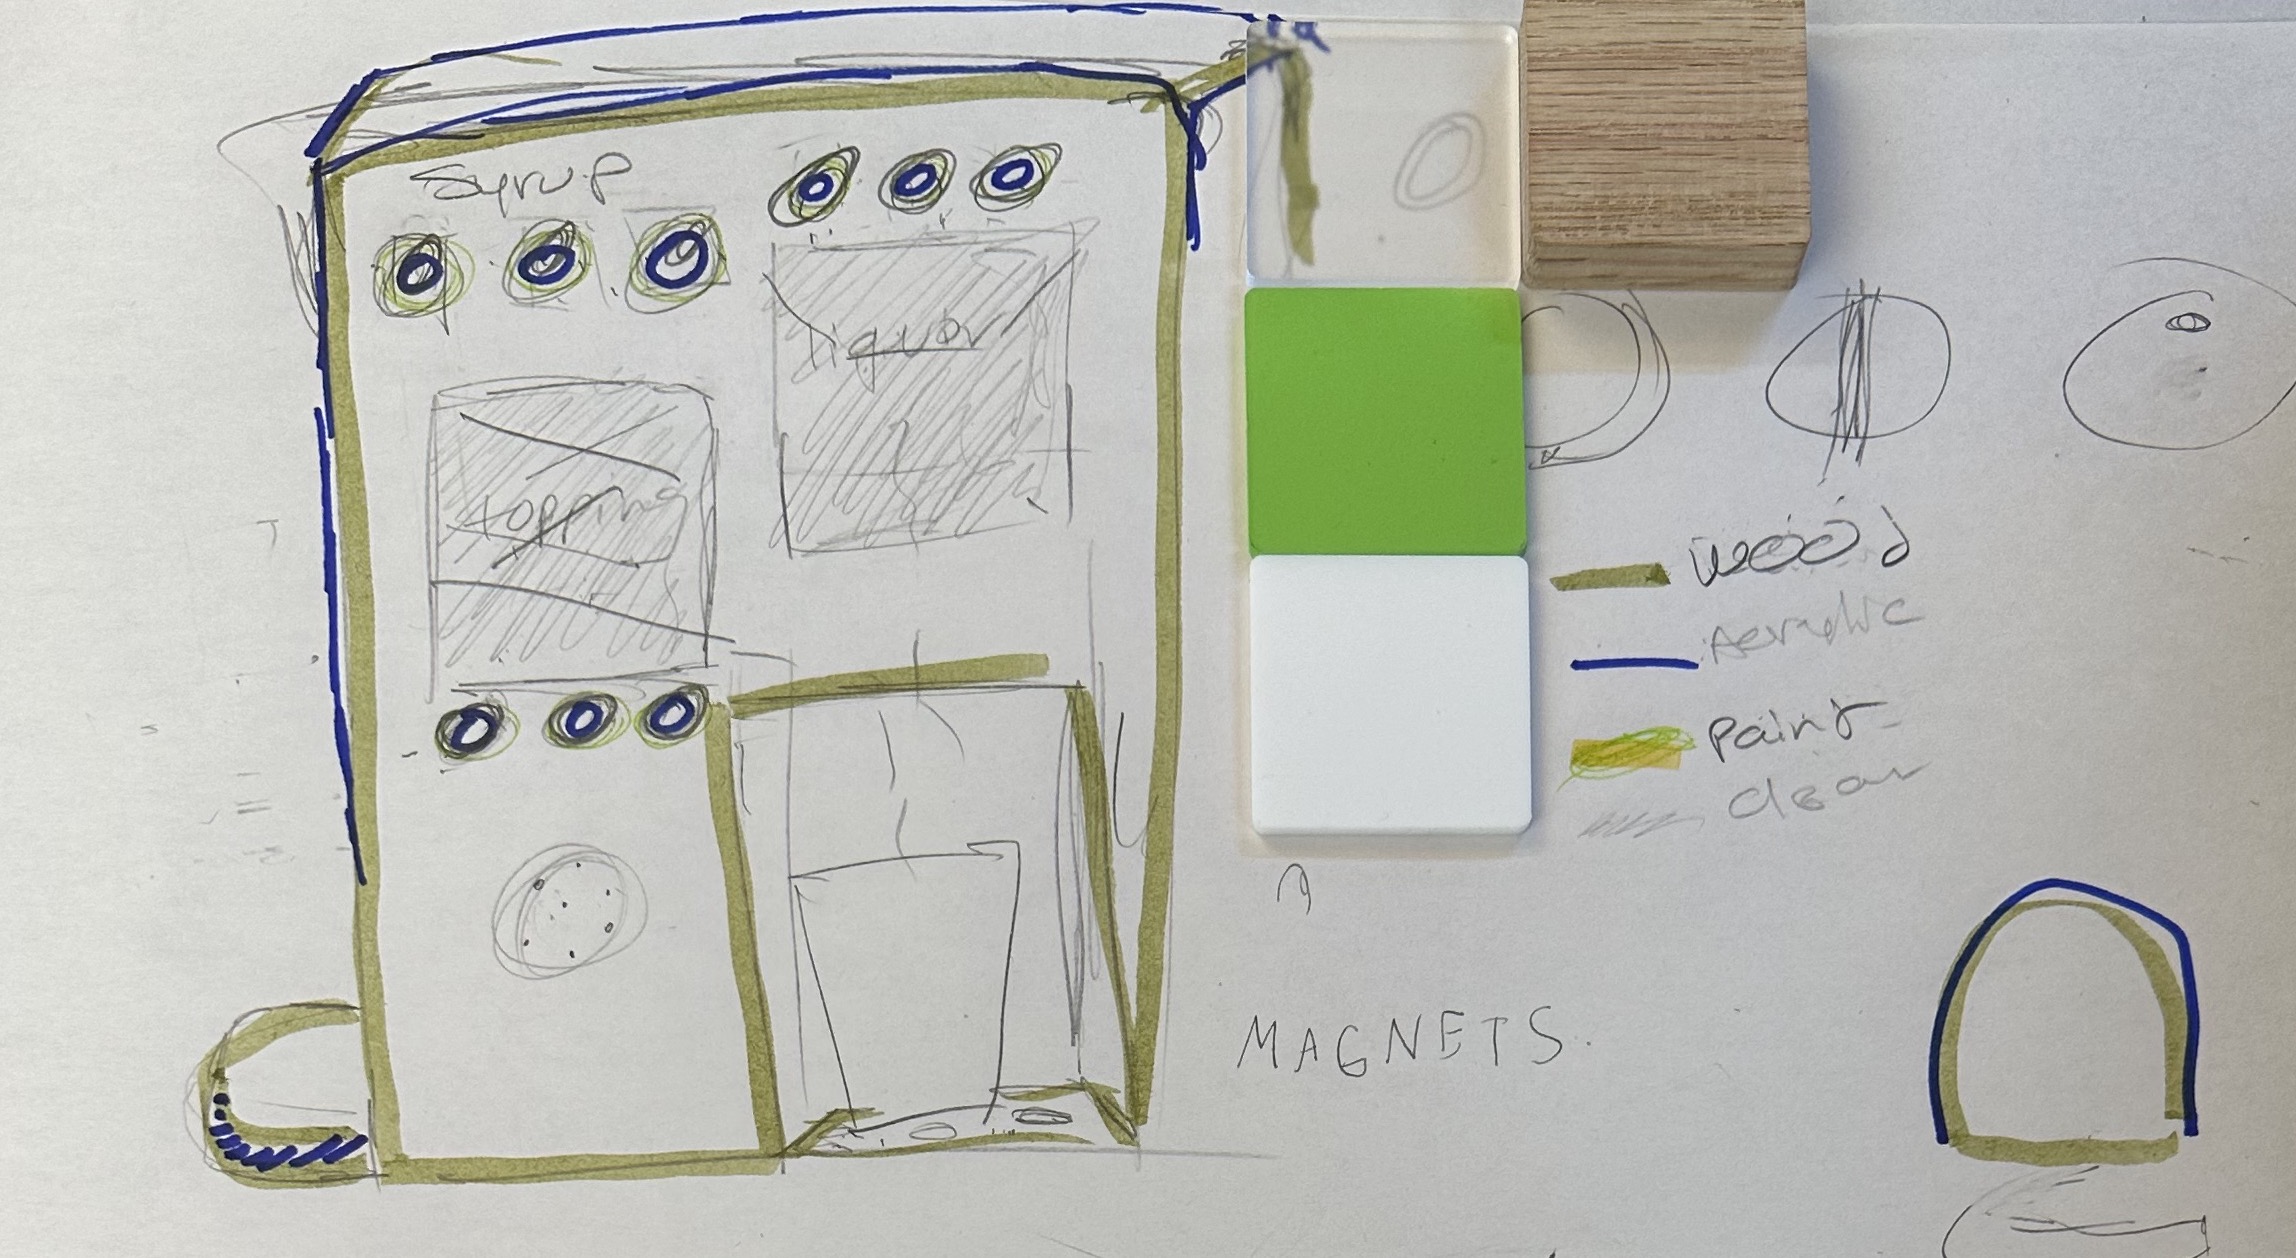
There will be three main parts to the design: the liqueur, the toppings and the cocktail mixes. The japanese vending machines use sound (music or it talking), so hopefully we’ll have a spot for the speaker too. So a mix of mechanics and electronics. The sounds will be triggered when the user puts their glass on where the glass goes. Below, is our CMF details.
![]()
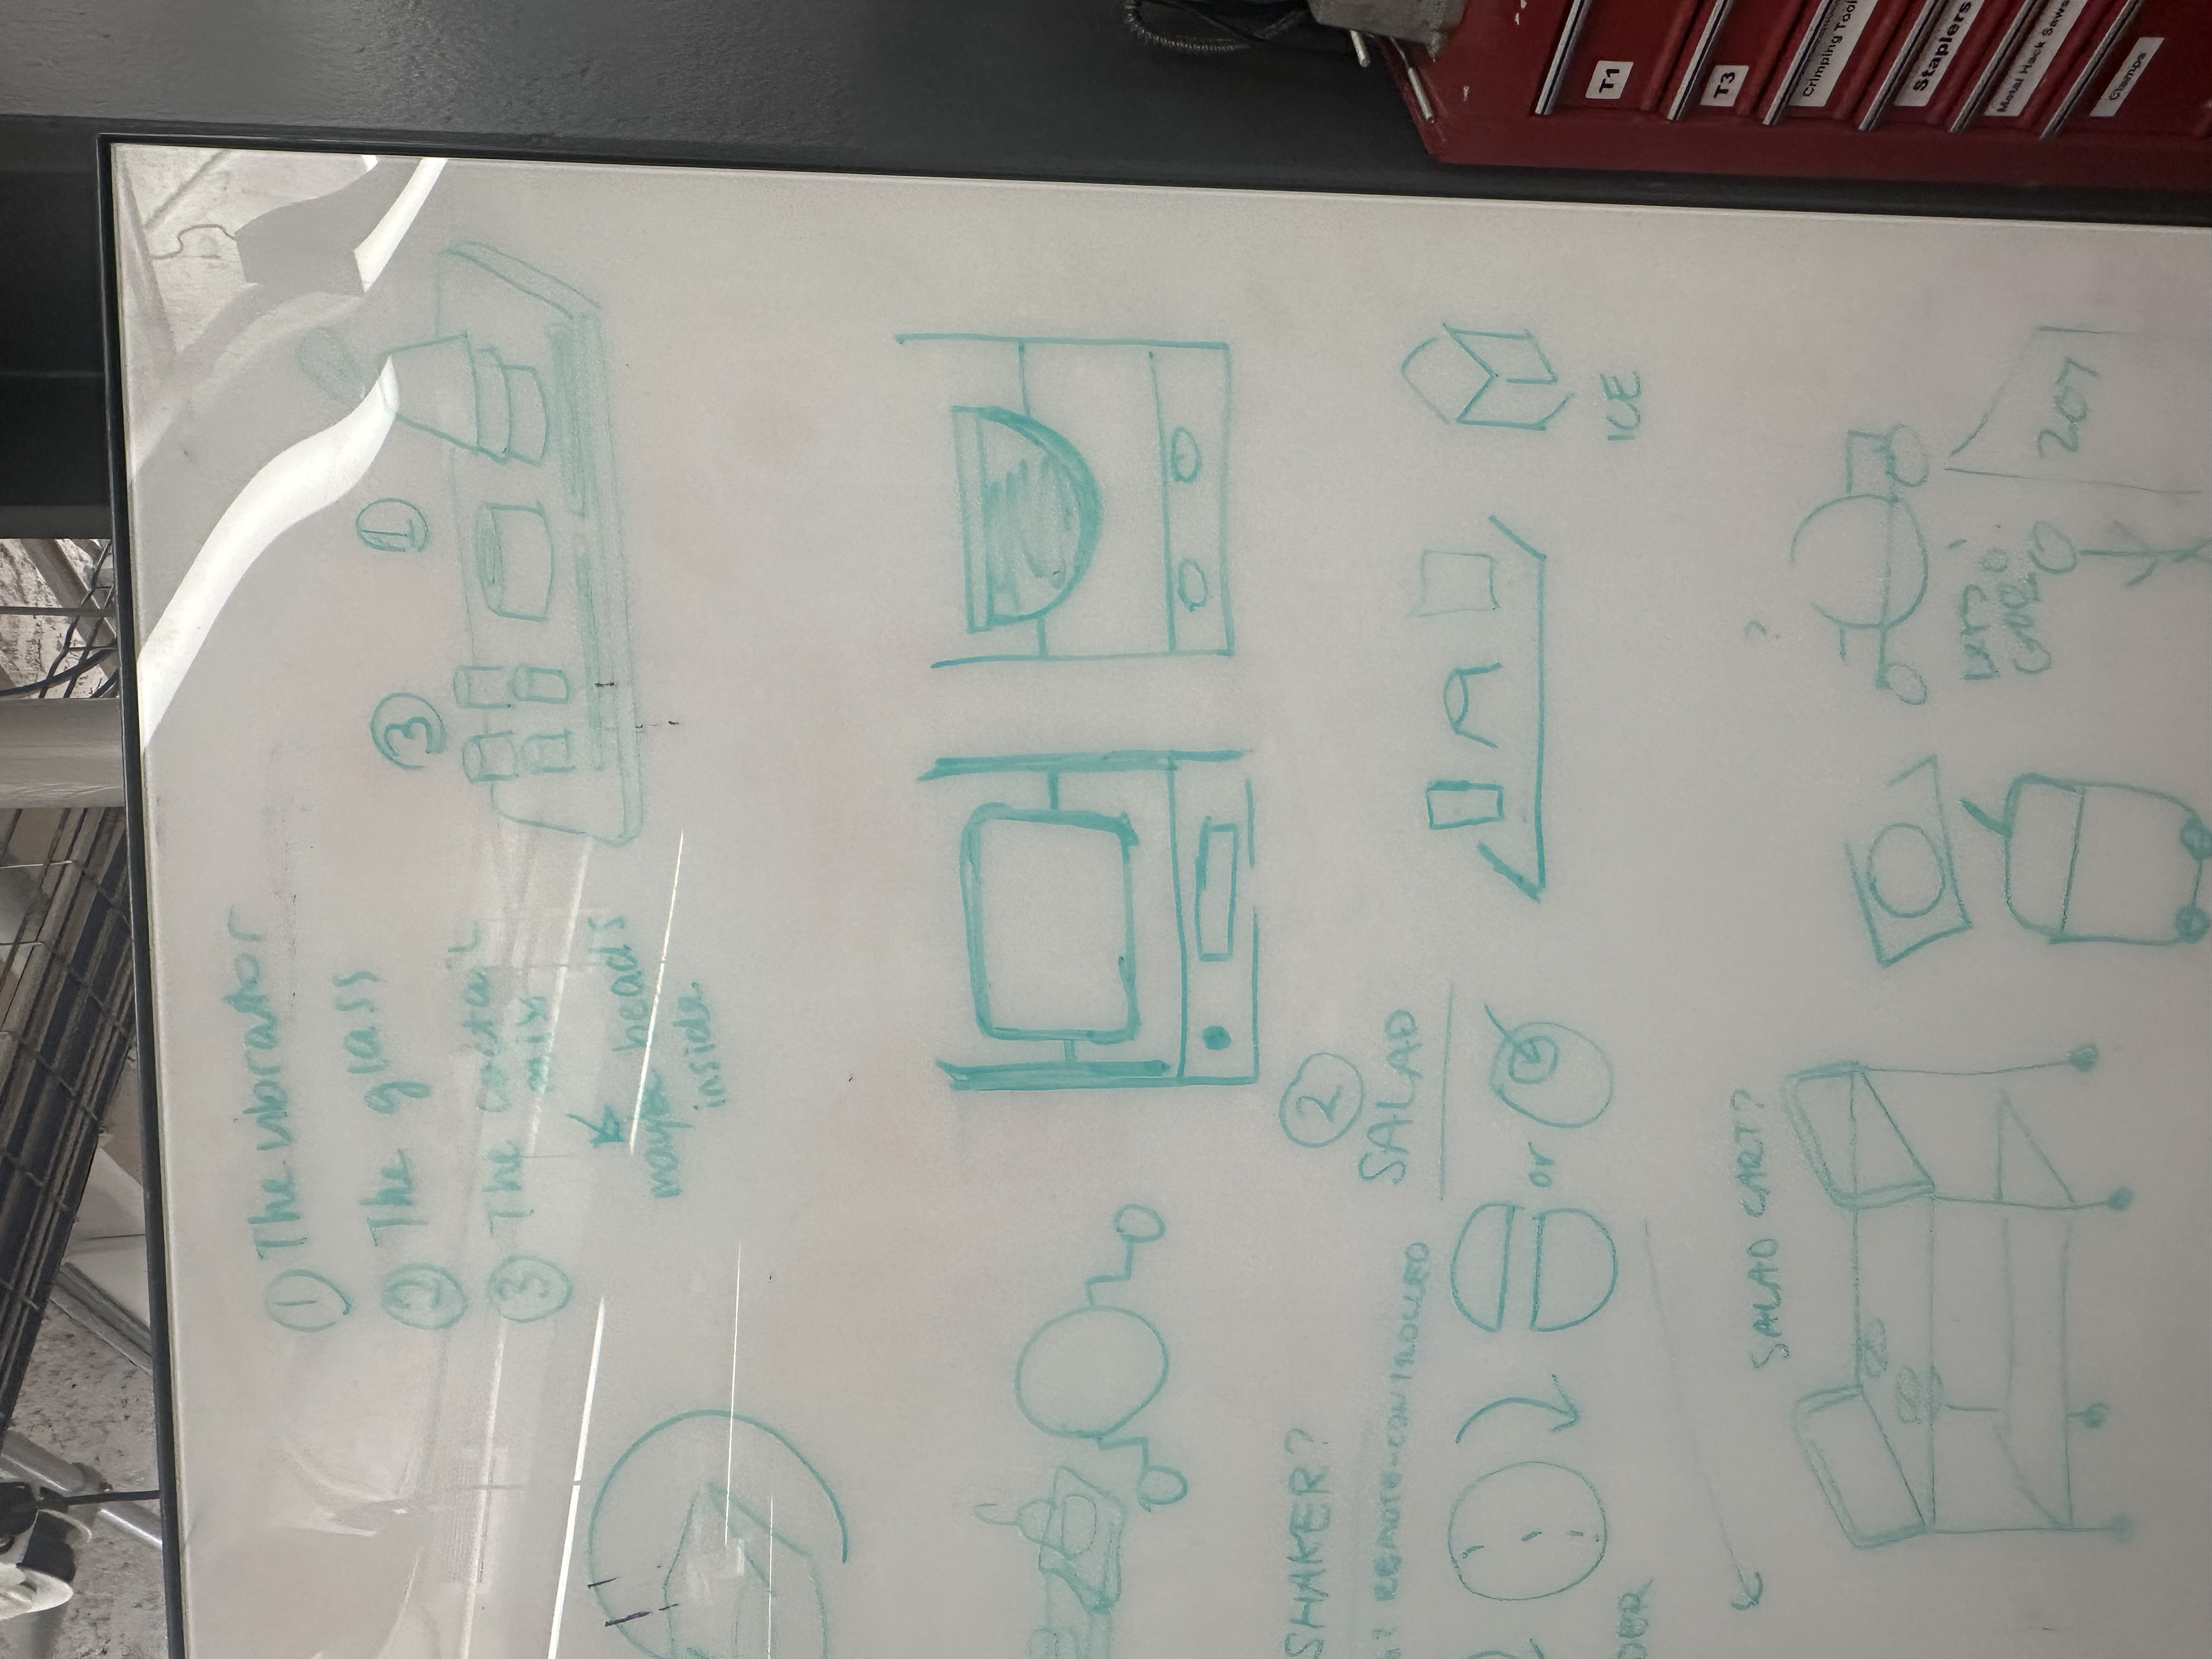
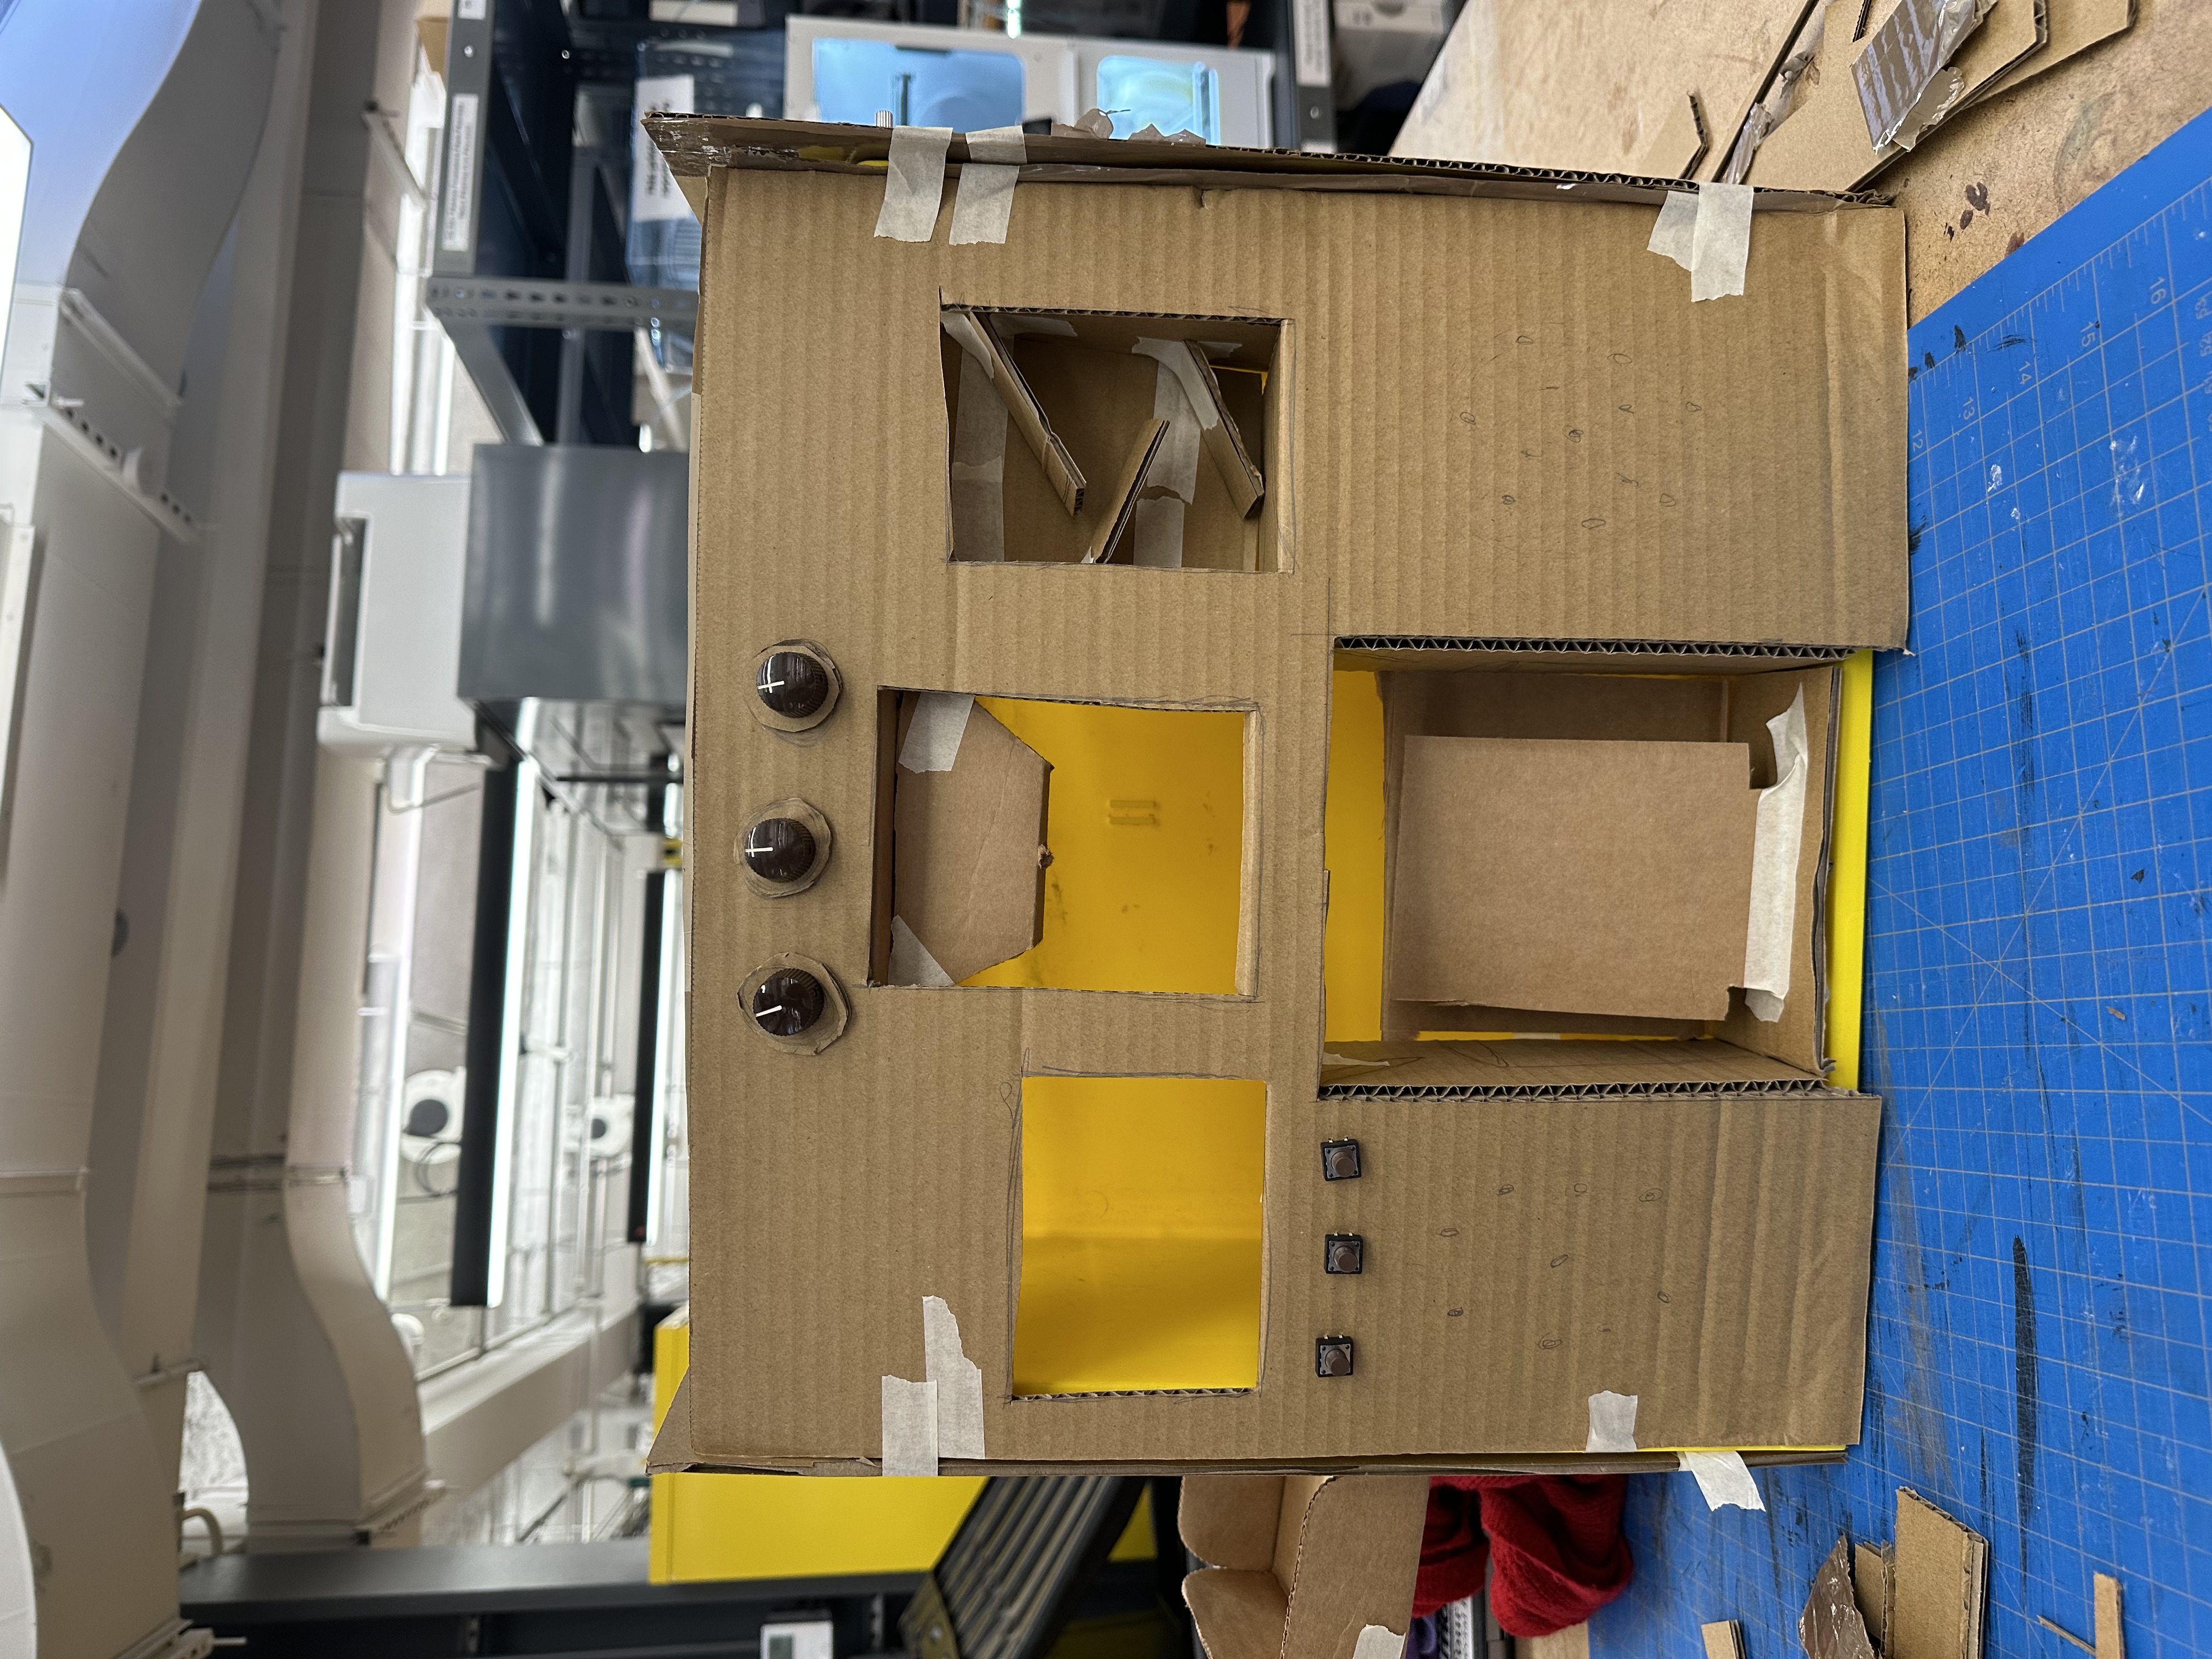
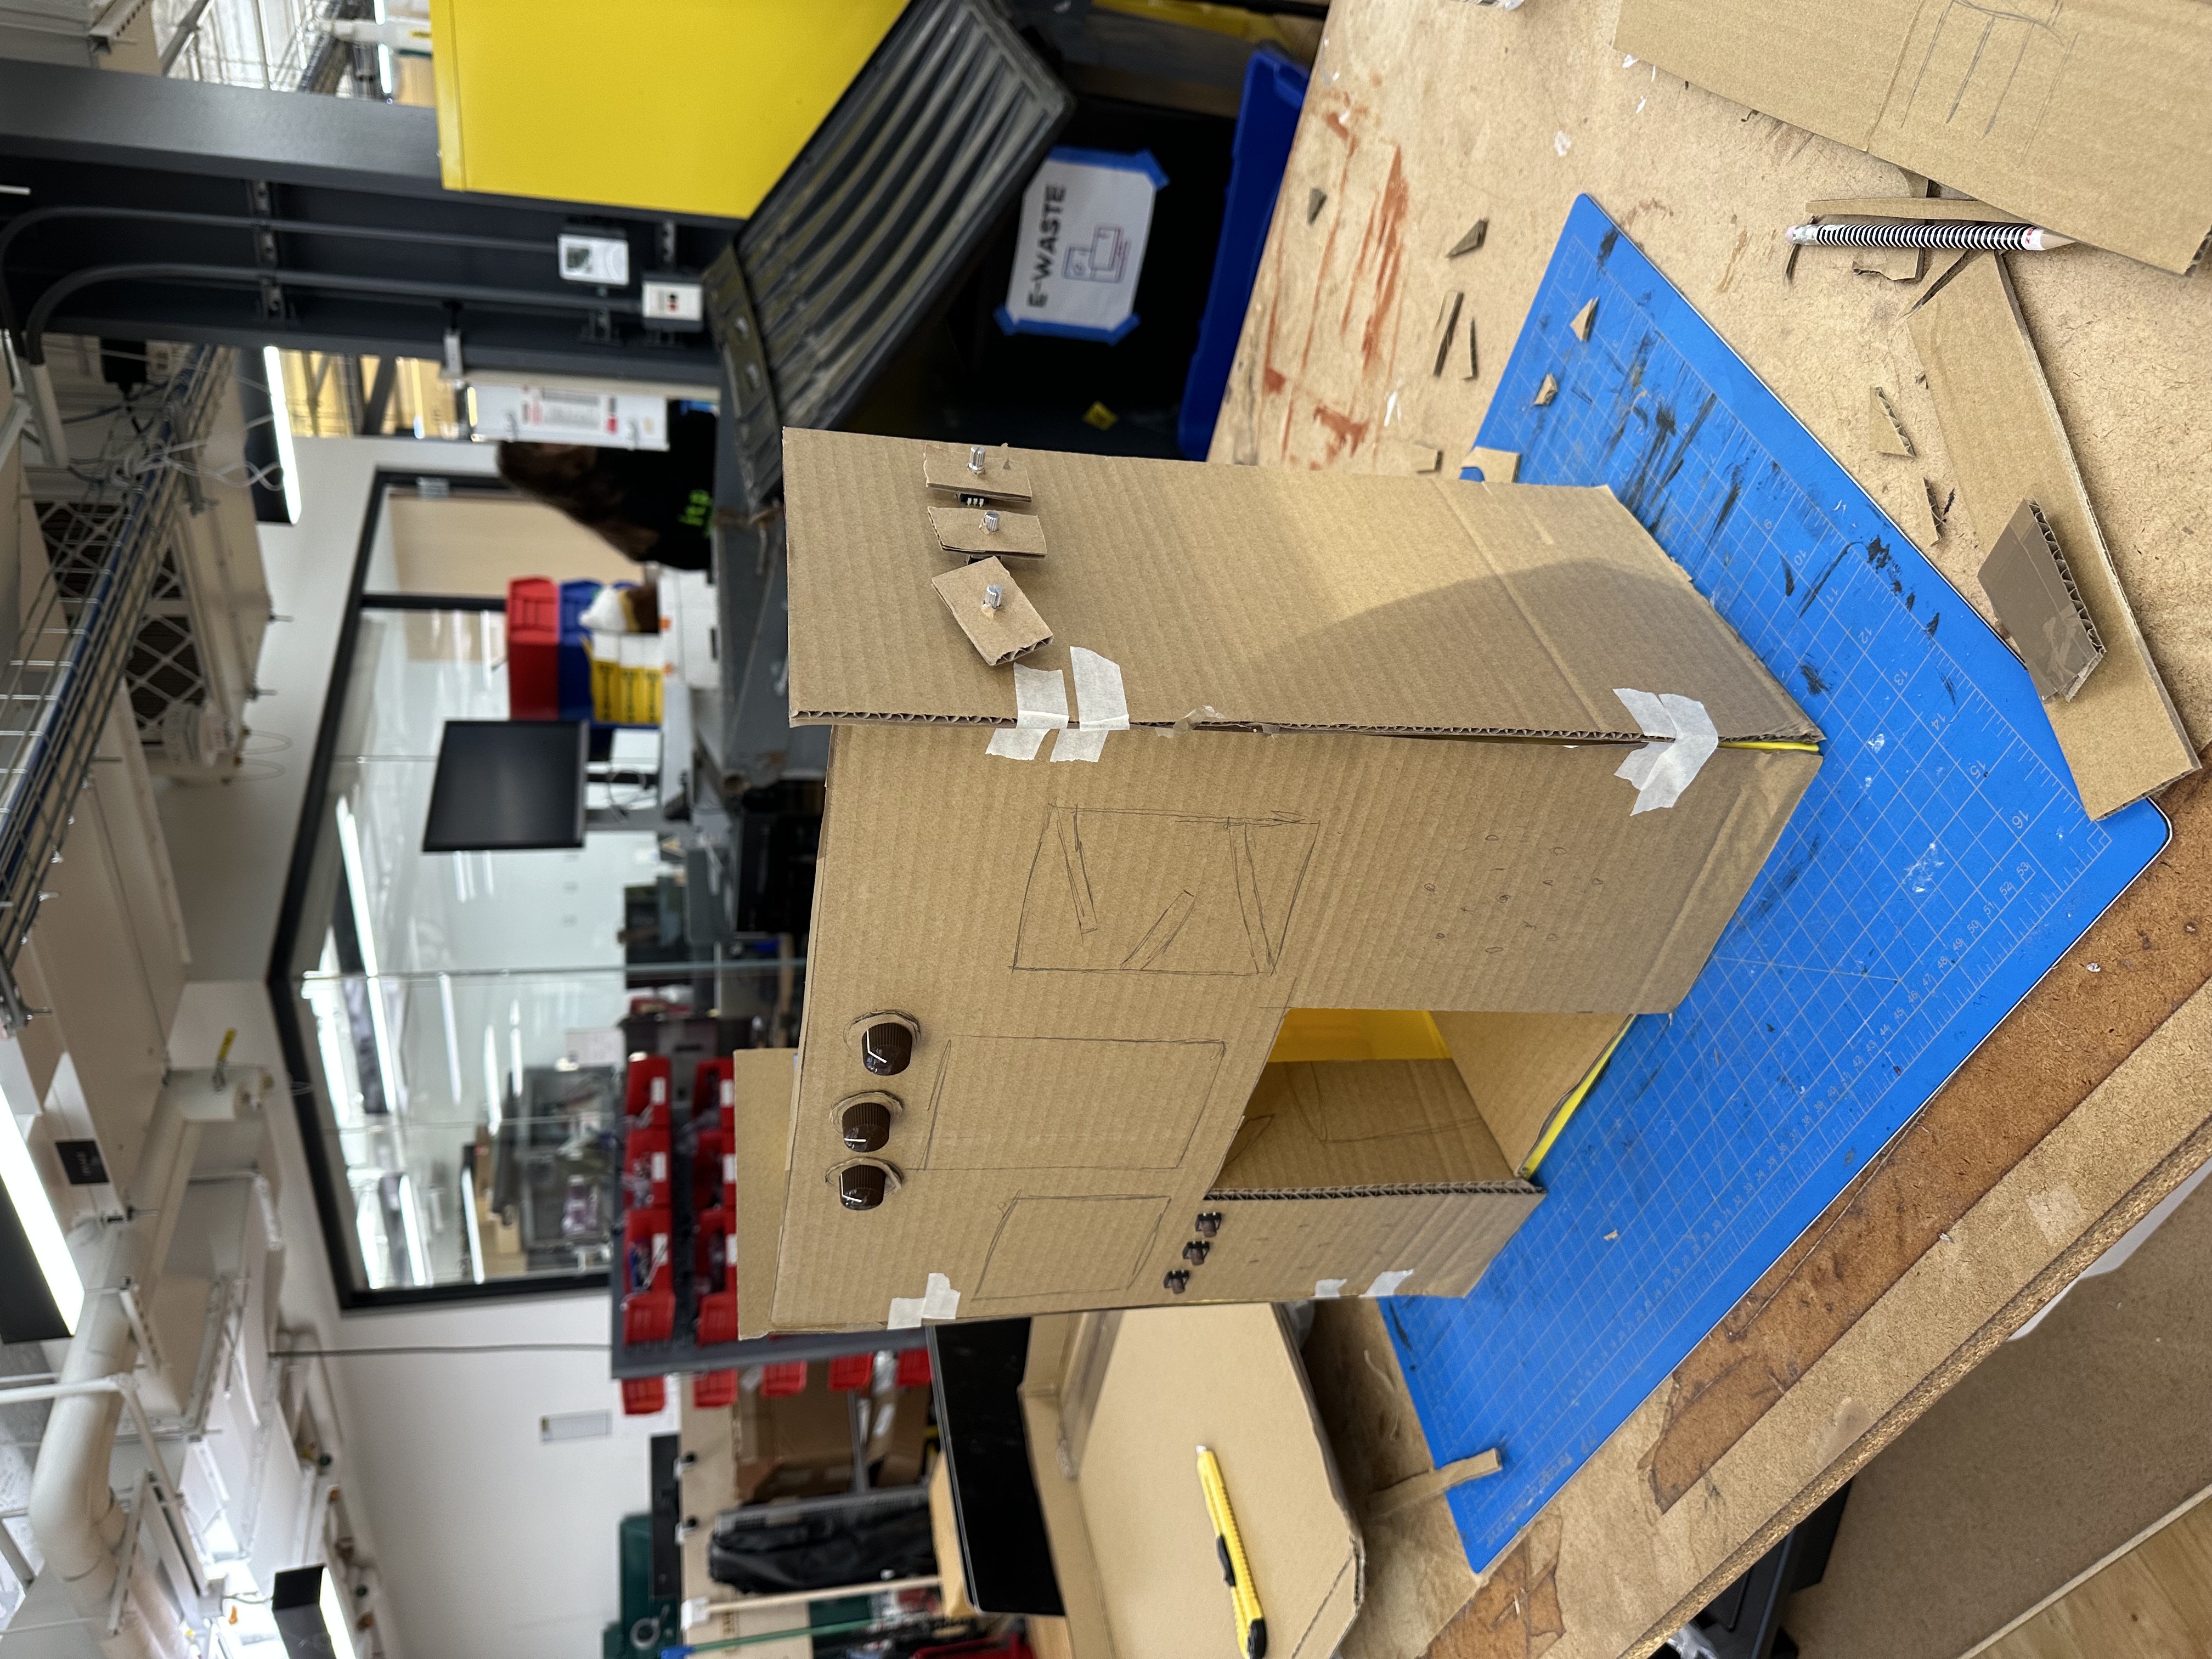
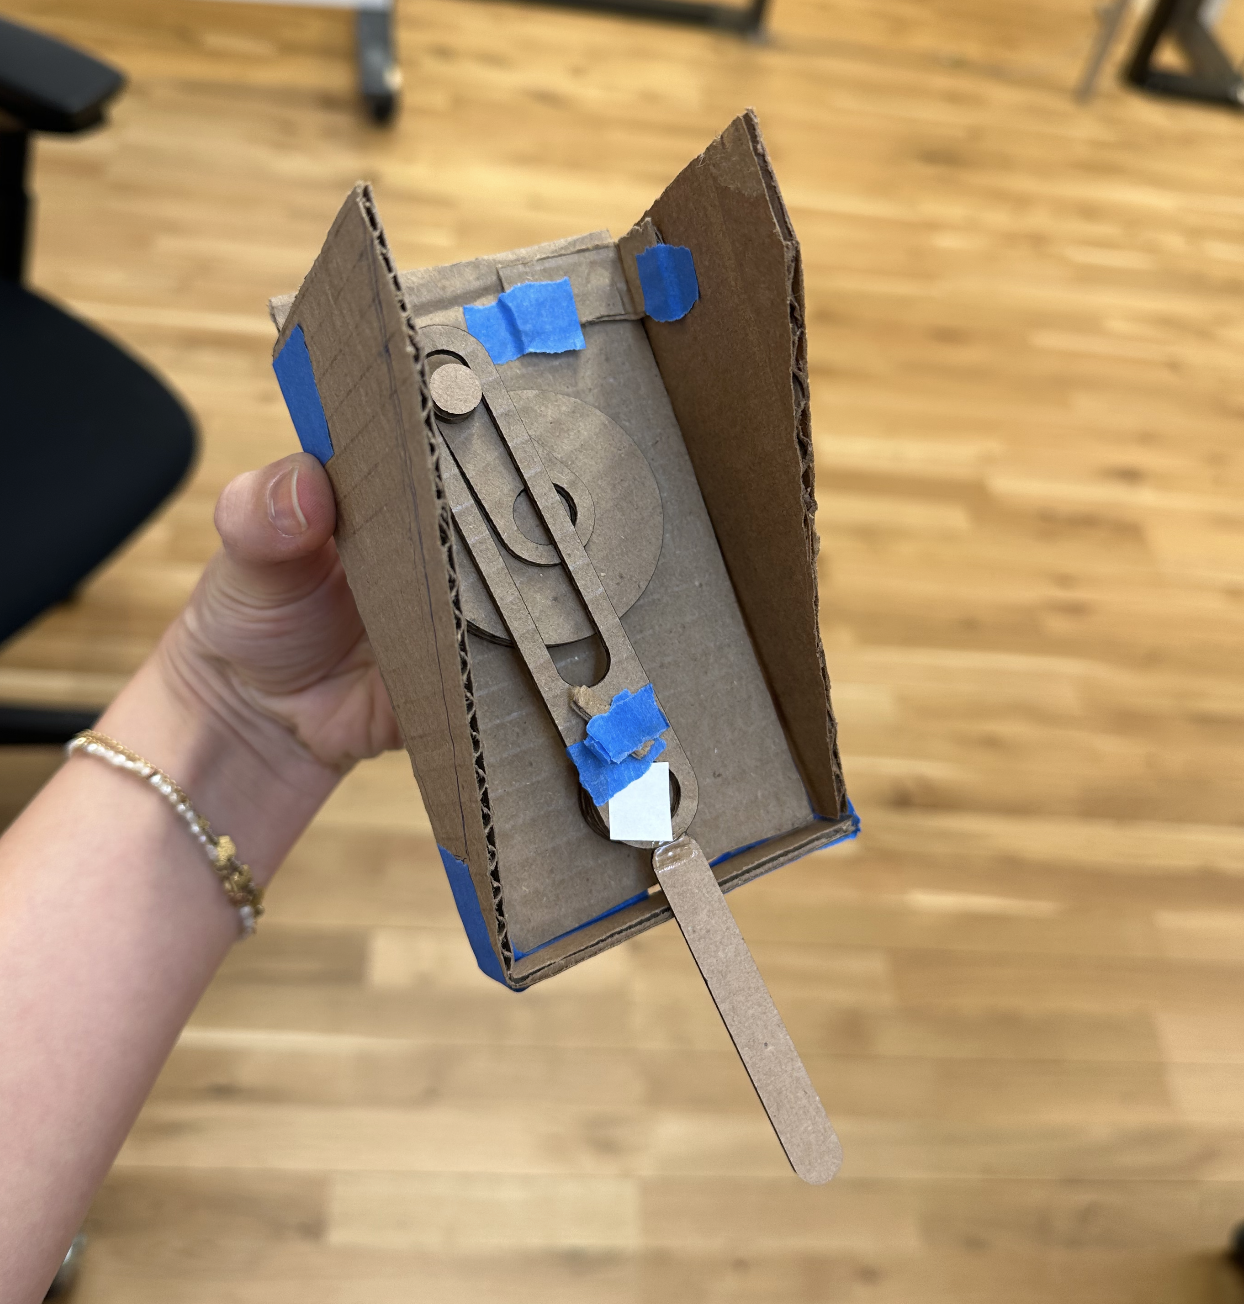
We simplied the design by placing the topping and syrup part on top of each other. Rather than three column style design, now it’s 2 and there’s space on the left or right for the cups.
![]()
![]()
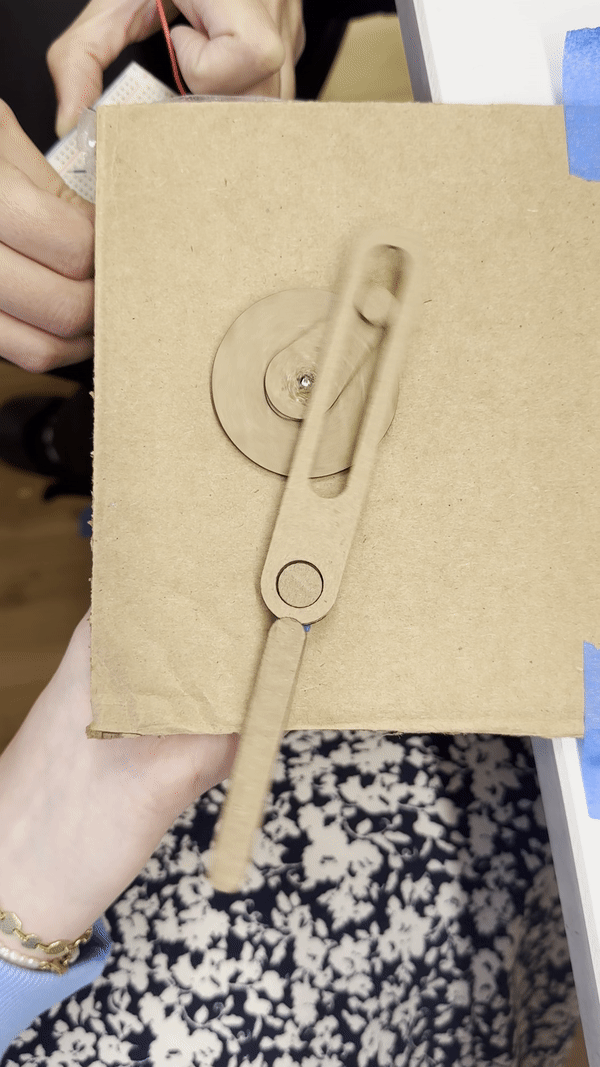
This is the prototype for the toppings part. The olives and etc can come out when you turn the nob.
--
Rube Goldberg Machine w/Alfonssette
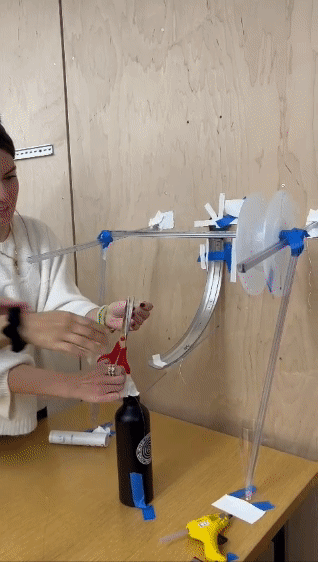
Fun but extremely complicated! Thinking about different forms (spiral, linear) of actions was really hard. I wish our idea worked better but oh well, we managed to get the paper to open up. We don’t have a full video but here’s a snippet!
![]()
![]()
![]()
Week 8 - CMF
Office Hour w/Phil
We realized that our first idea was to complicated to fabricate. Phil helped us turn it into a more 3D visual so that we can understand how the picking it up and letting it collapse would work.
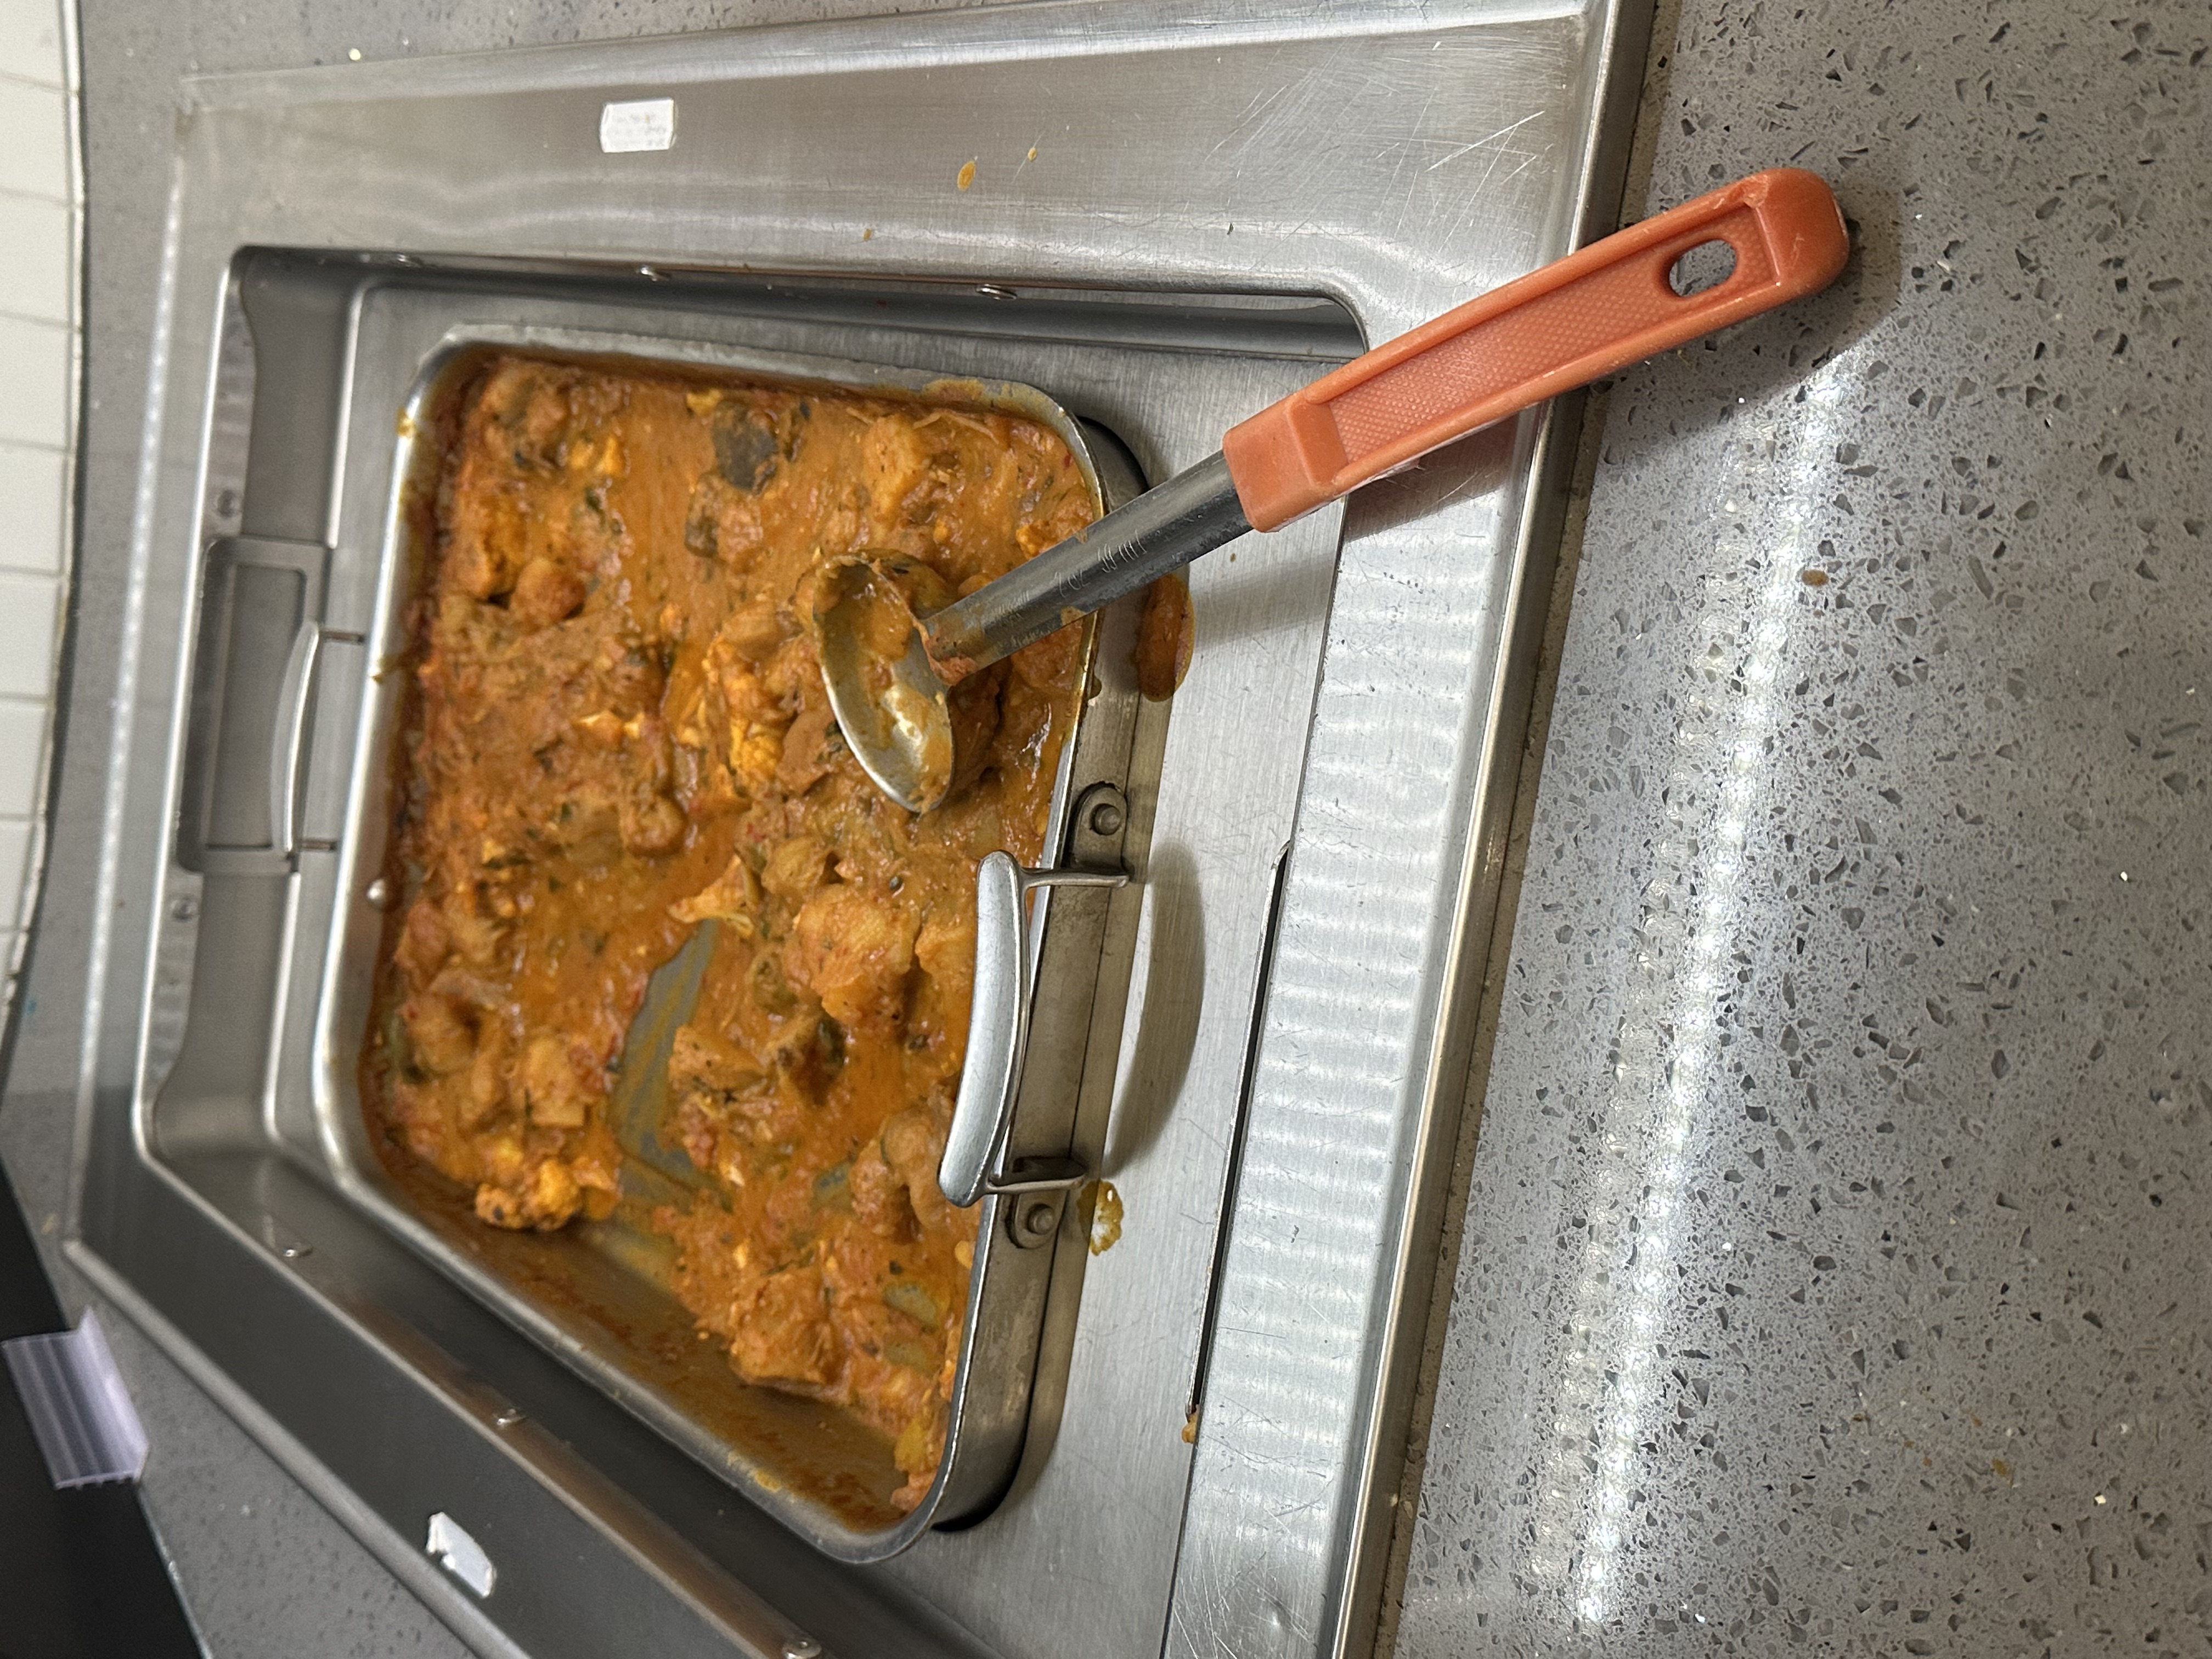
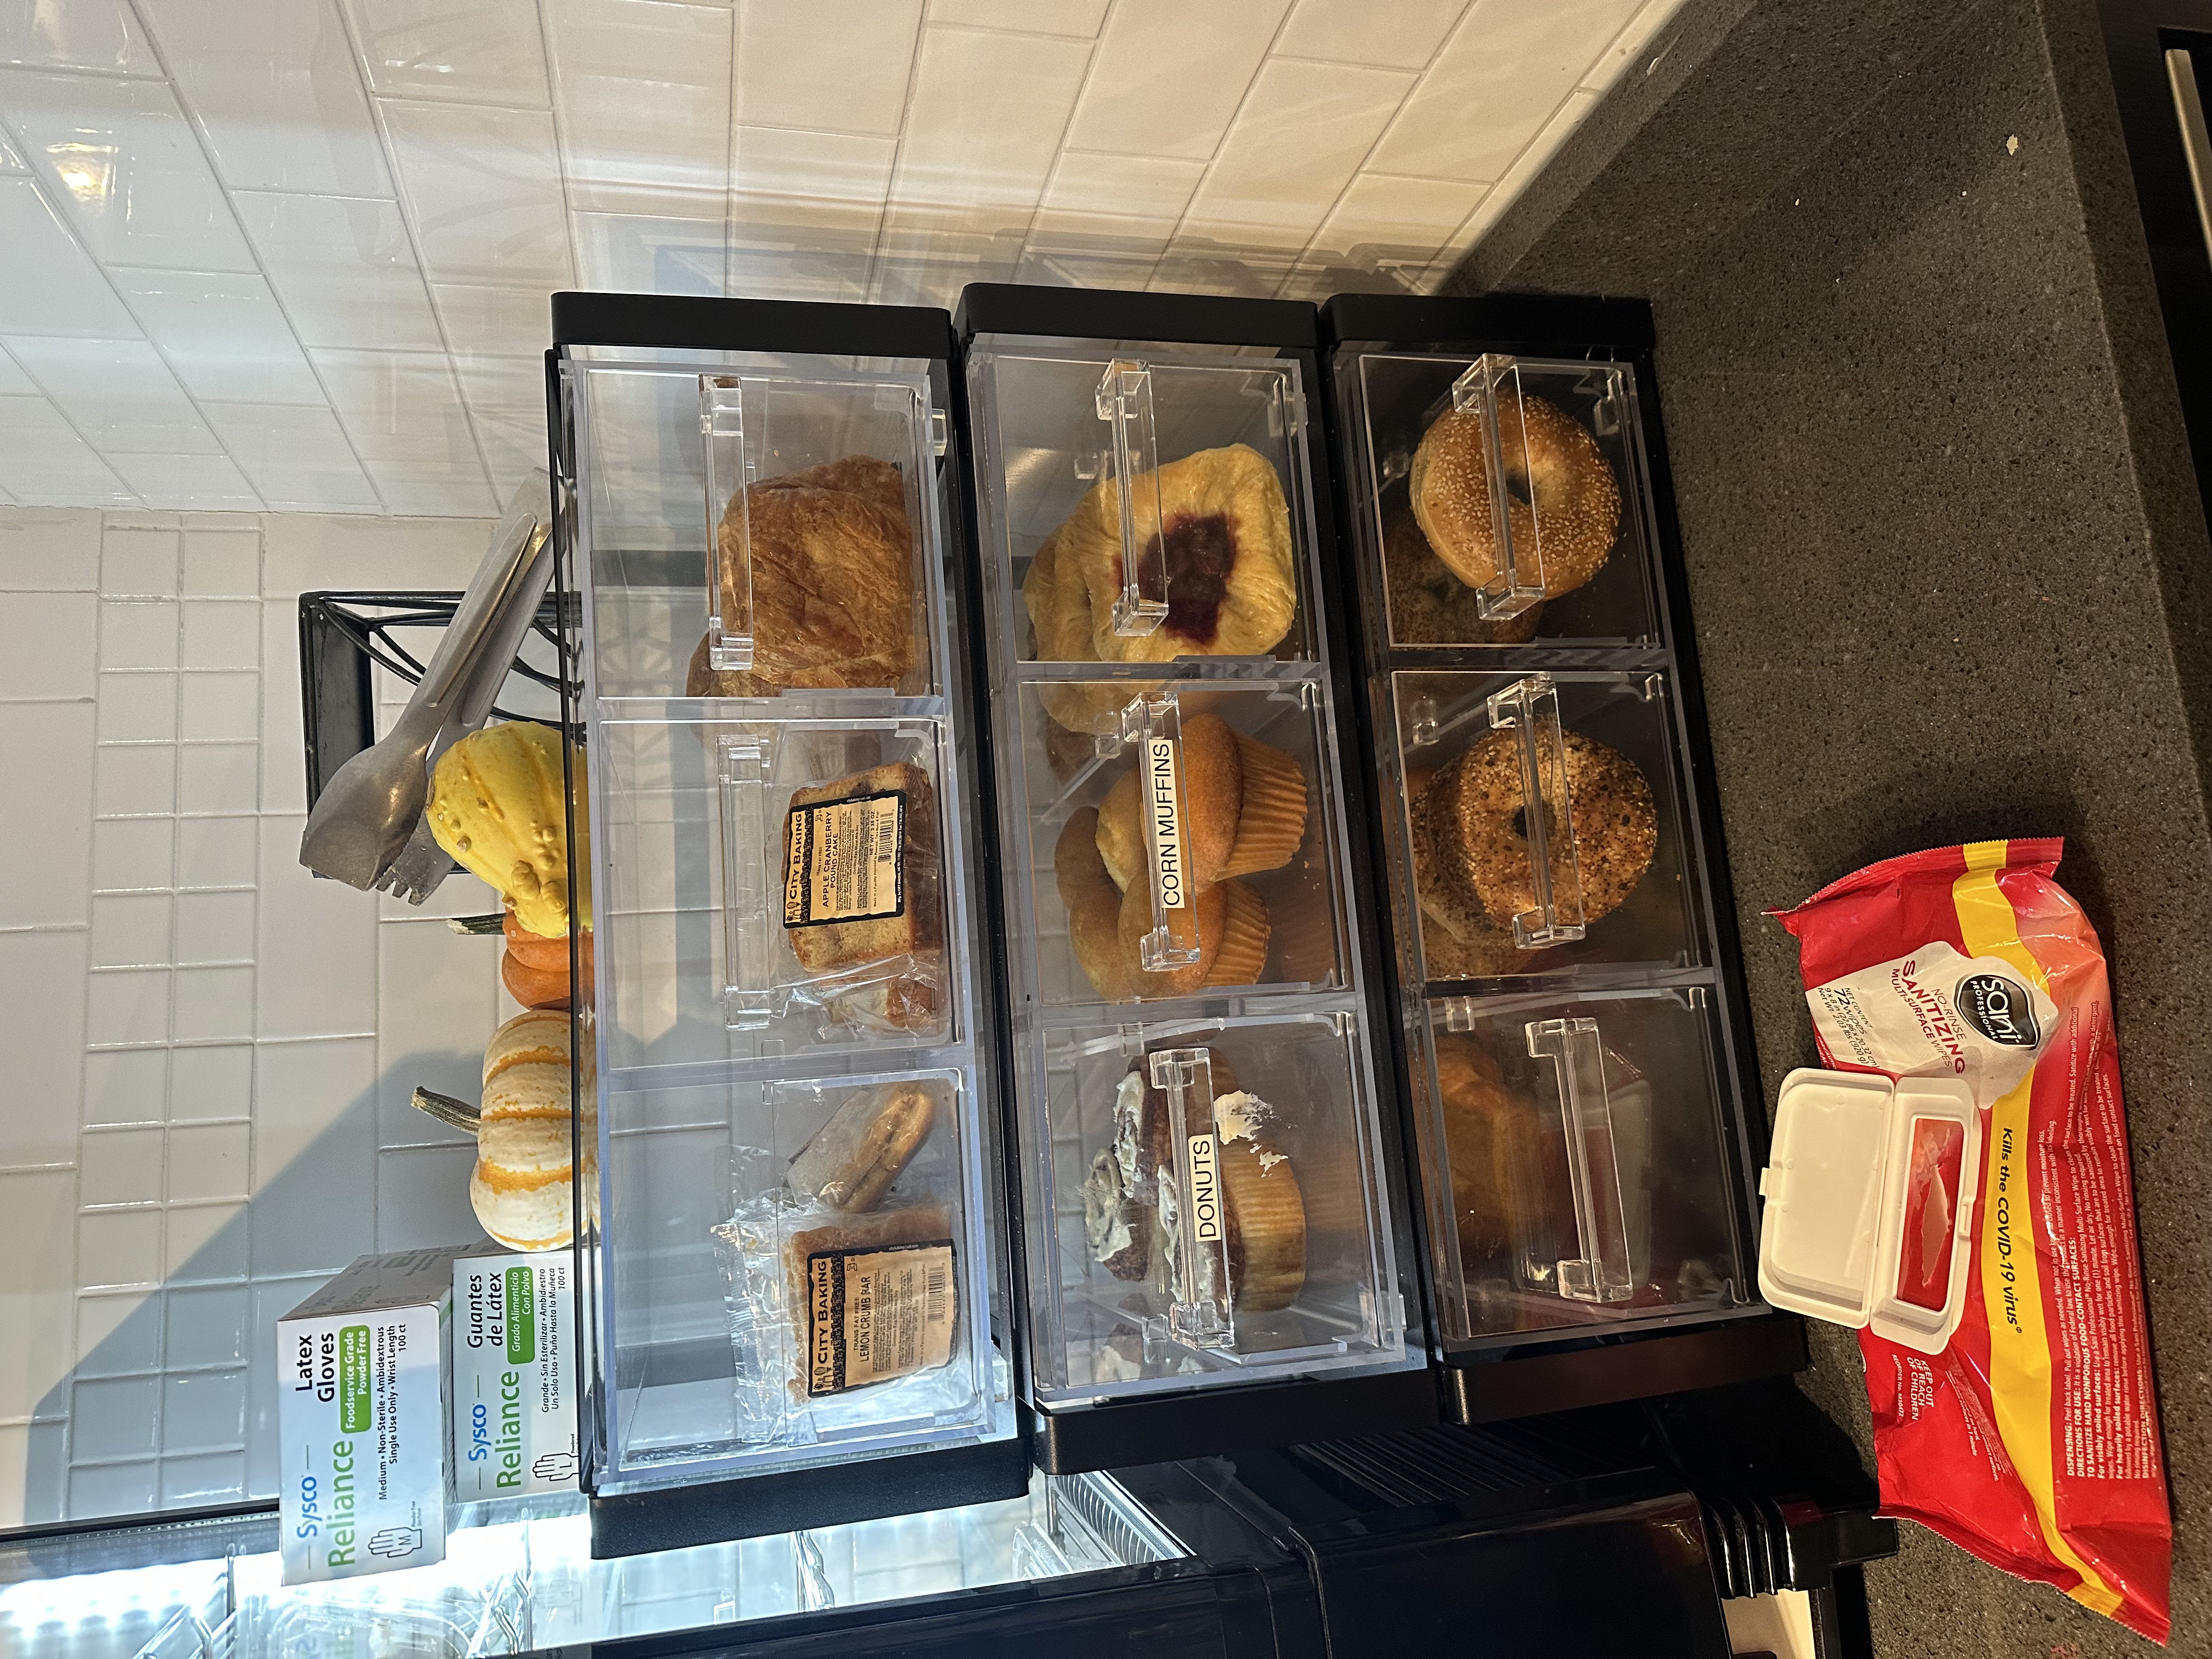
Field Trip to NYU Cafeteria w/ Sam
We realized that we haven’t been to a buffet in a while so we decided to visit the cateria to get some new ideas. After that we gave ourselves 1 min heads down and wrote down the problem areas.
![]()
![]()
![]()
![]() How to make something shake? Vibration sensors?
How to make something shake? Vibration sensors?
Week 7 - Critique
Ideation Process for the Absurd Hotel w/Sam
Sam and I went to Muji to get some inspiration for packaging / material / shapes & design (+ Sam hasn’t been to Muji before!). We both liked how objects were displayed in a neat and simple way. They had curves and looked minimal. The packaging designs were also simple and had nice illustrations for instructions. The brand name was not something that stood out but the name of the products and instructions did because it was hard to undertand the purpose of some products.
![]()
![]()
Then, we focused on our own hotel experiences. Sam spend one night in a hotel that previous week and talked about the condiment packaging in her room. Our other ideas were:
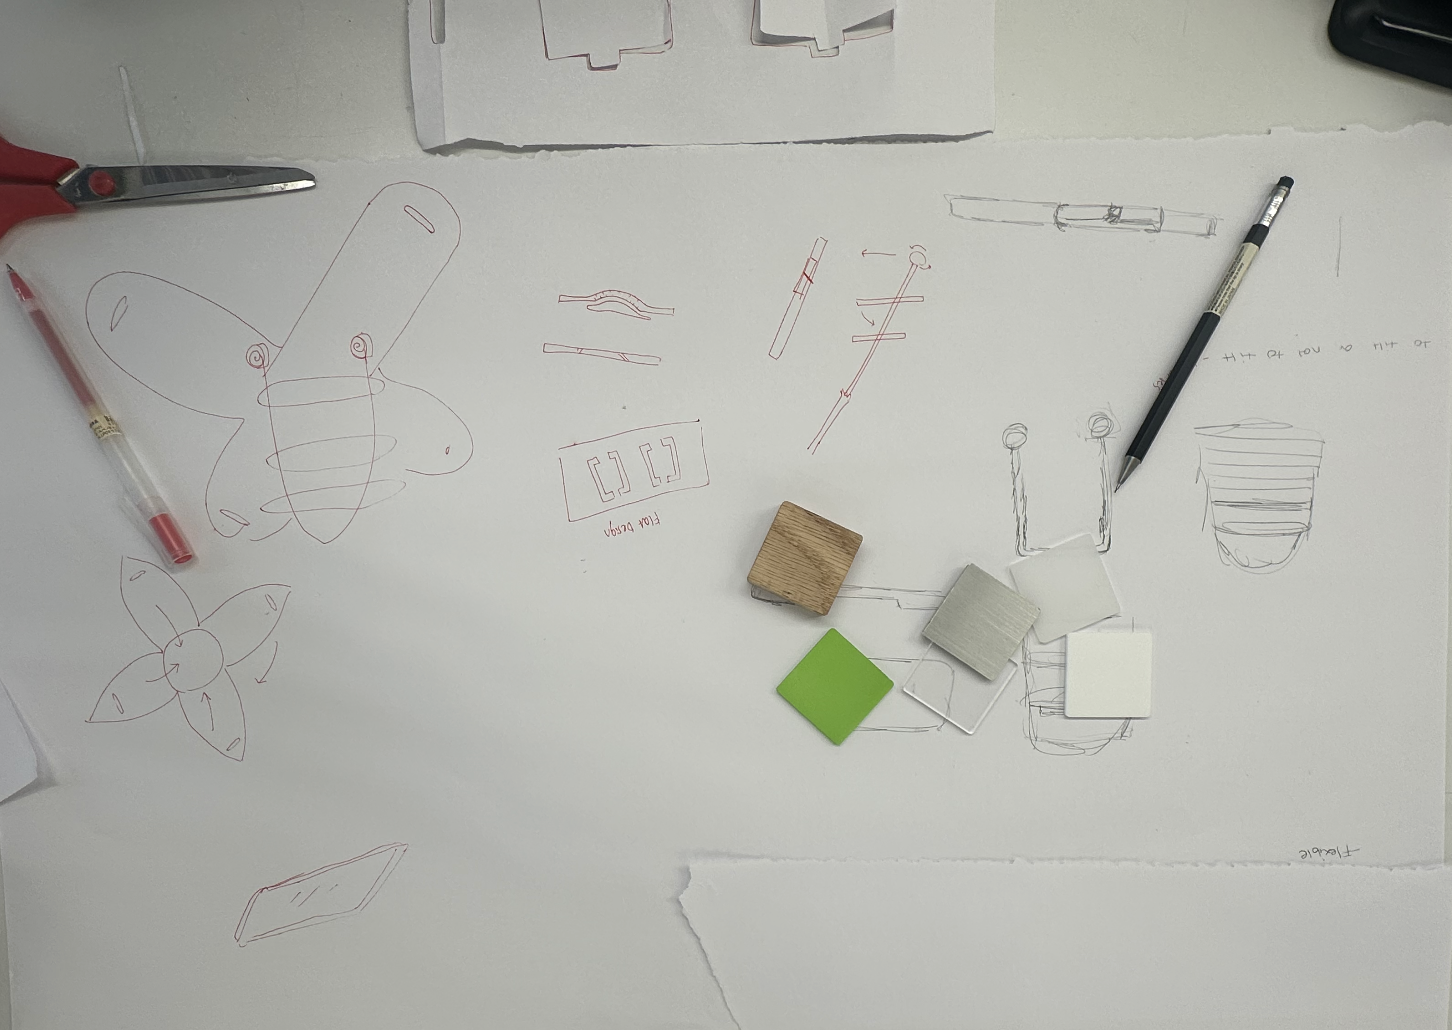
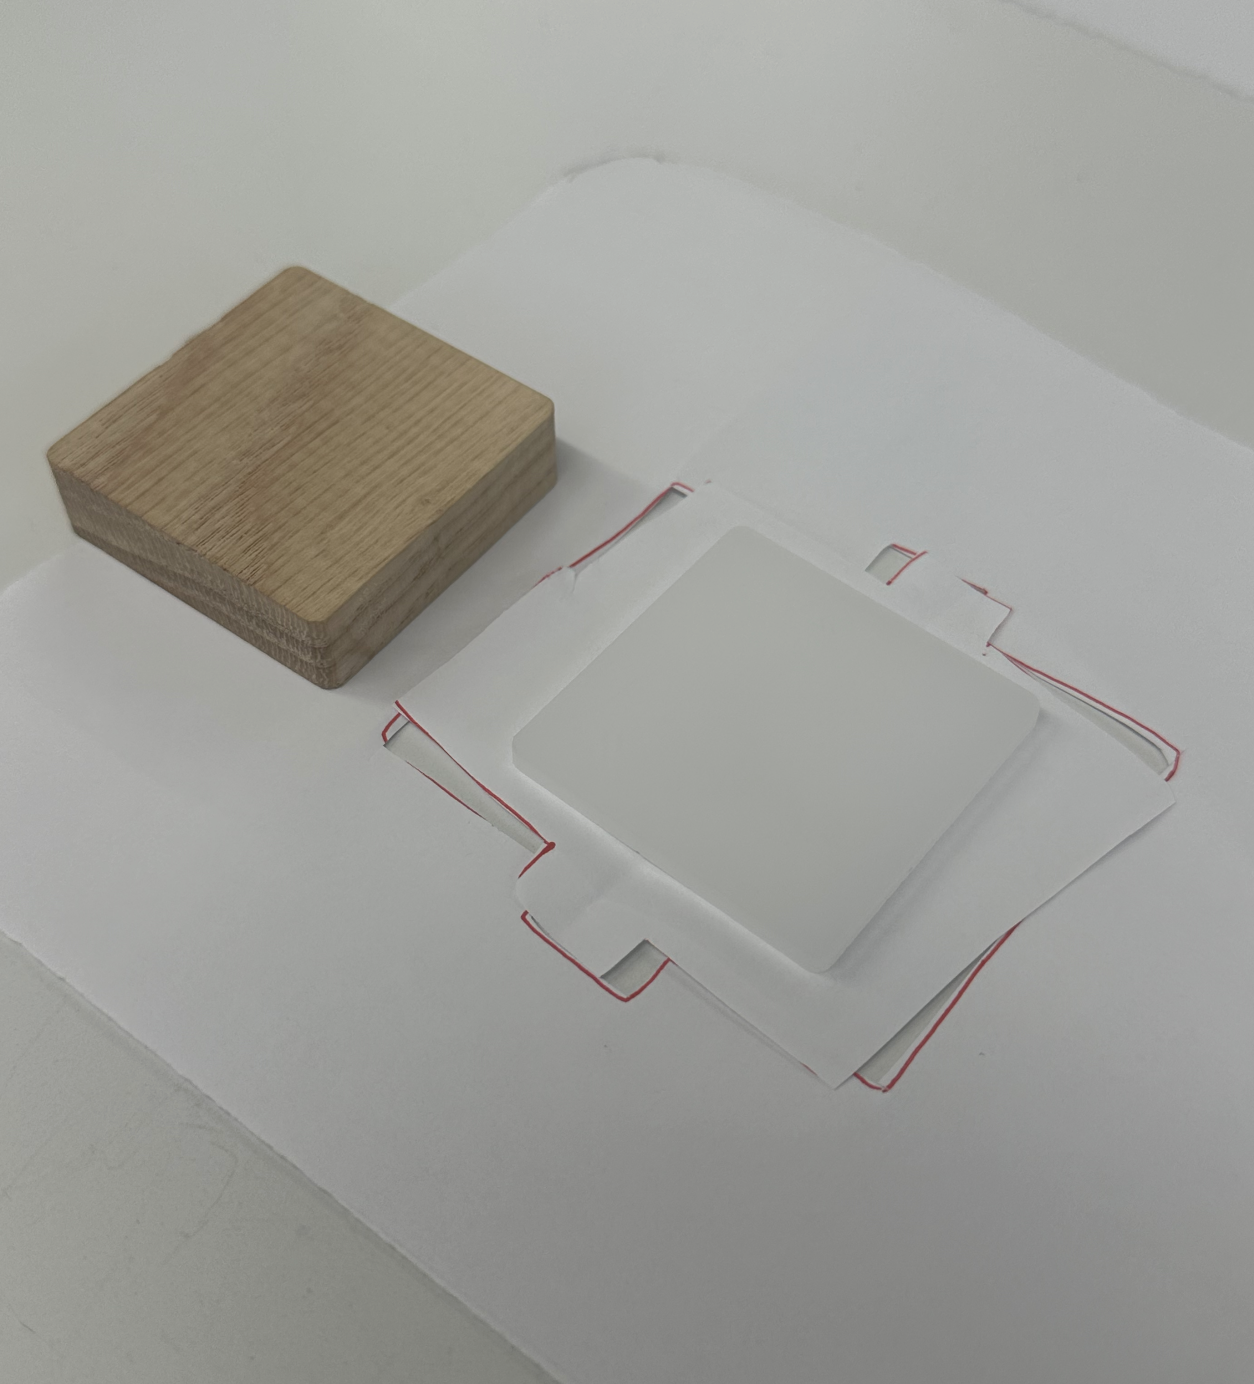
During our sketching phase, we came up with a collapsable tray. It works as the top part of your buffet table (maybe?) and your plates goes on top. If you want to eat your food in your room, you can easily carry it to your room! As for the material, we liked the wood and the half glossy half mat plastic.
![]()
![]()
![]()
![]()
![]()
--
Feedback after critique
Week 6 - Absurd Forms
![]()
![]()
![]() --
--
Remote controlled Chindogu
IR sender and receiver sounds like a reliable way to build the remote control. So, I decided to move forward with those. I started off with looking into their pin diagrams and tried to build my circuit.The IR-LED was being controlled by a single button. This is a simple fan and most hand-held fans that I’ve seen had only one button since you can only turn on/off. The IR receiver on the other hand would be controlling the DC motor. I had a servo so I started by testing my code with a micro servo. (Then realized that the servo was broken // somehow the gears shifted and was not turning properly)
I had to go back to my Pcomp Blog to remember how I was using buttons/resistors and connecting it to the Arduino. Overall, it went well. Then, I started with the sender and tried if I could get the “IR signal sent” message from the serial monitor. For some reason (might be update issues etc.) the code from our class website did not work and gave me tons of errors. Once I understood the logic, I did some debugging and it worked after almost 2 hours! Yay.
![]()
This for the sender and the button.
Then, I moved onto the receiver part which was more tricky since I had to use angles for my servo etc.
Since I was alone, I tried to plug both arduinos into my computer and tried if the signal was being sent. It didn’t work so I thought that there was a problem with the code. After realized that the code was working but the problem was the servo and plugging both into 1 computer. But finaly, I got the signal (thanks to Spencer for lending me his computer)!!
![]()
![]()
Well, the issue now is I won’t be using my computer so have to figure out what kind of a battery to use. Also, I was not sure how to write the logic for 1 click is on and the other click is off. I went to codinglab hours with Kai, and he helped me write that.
There was not a lot of documentation about the motor I have but this website helped me to understand what the pins are etc. Jess explained to me which pins to use because I thought that using only one the of M pins would work but it won’t. Will figure that out soon.
Also, bought Sryrene sheets from Blick. I enjoyed watching the vacuum former and want to test it out mysef!
--
TONS OF PROGRESS (Thanks to Pedro & Karina)
![]()
--
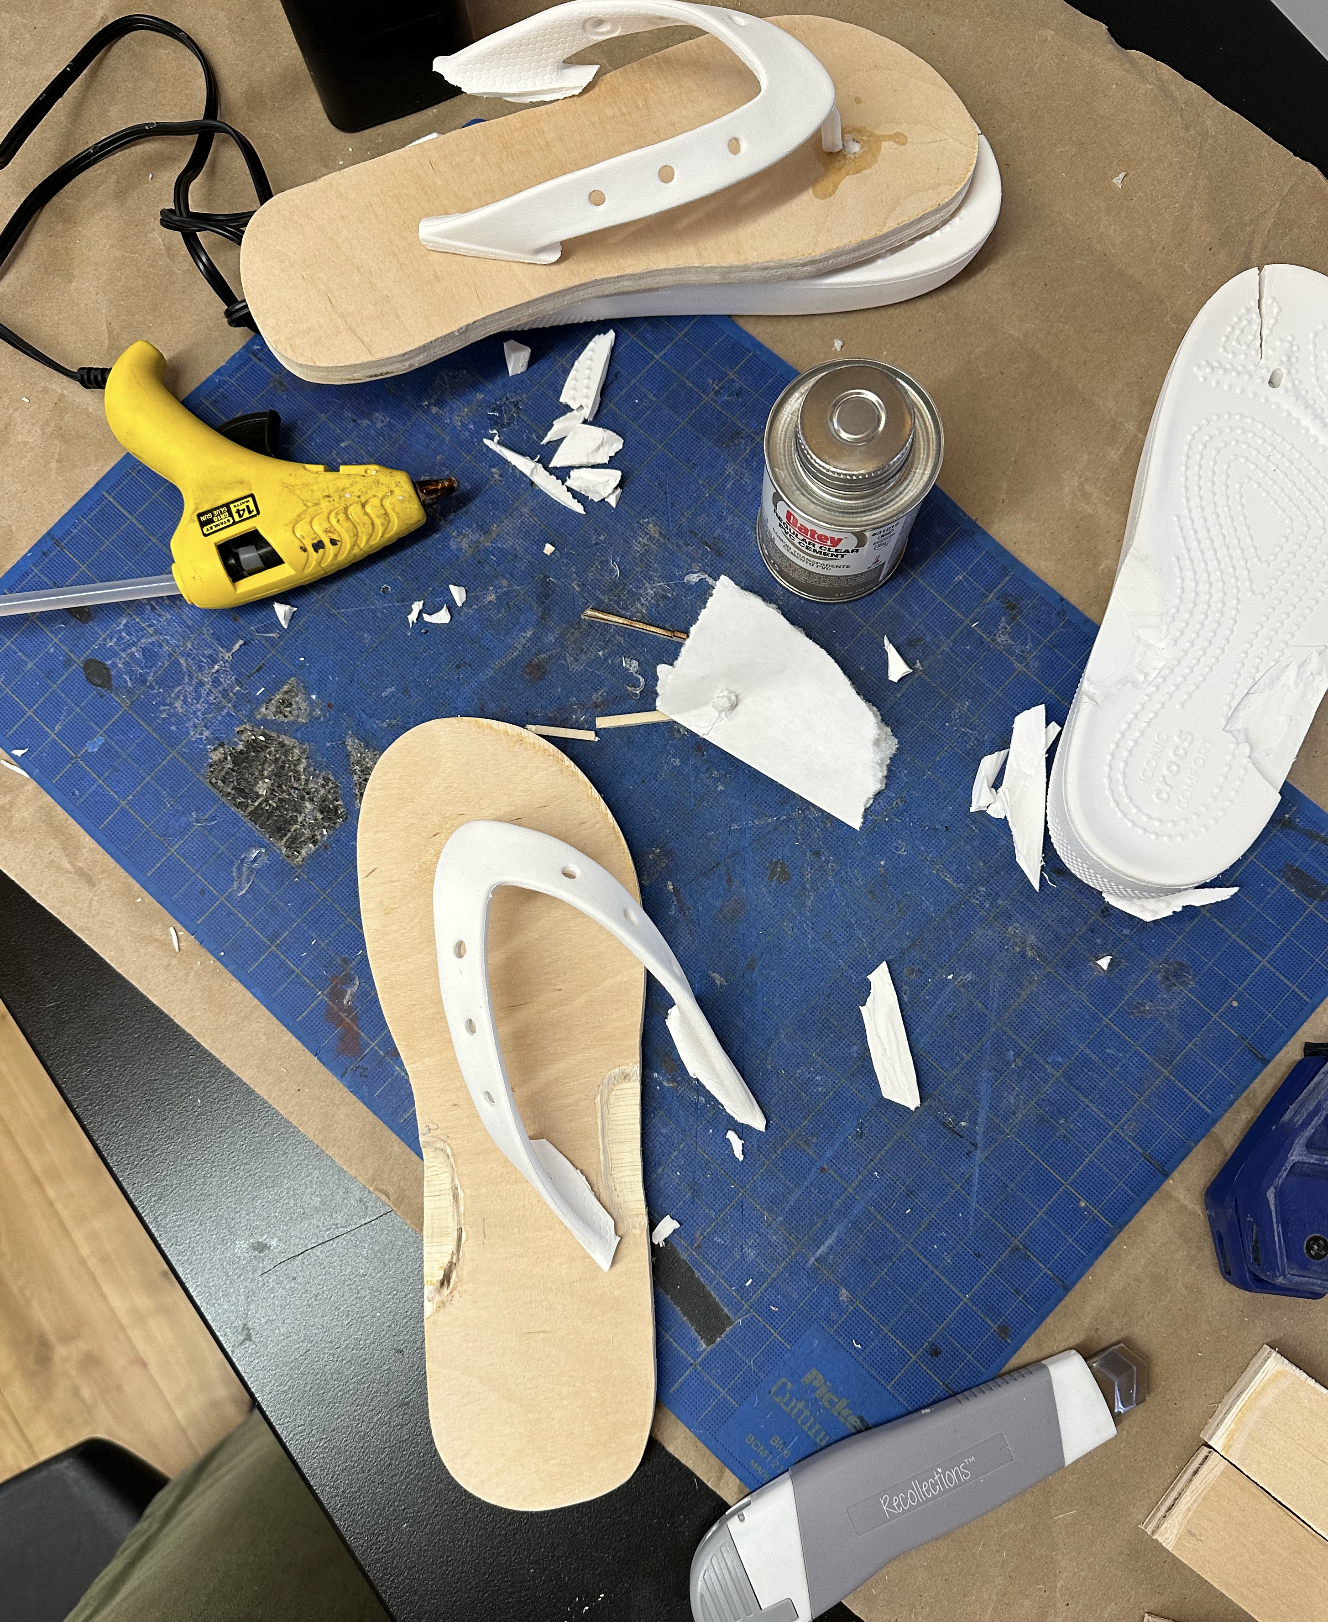
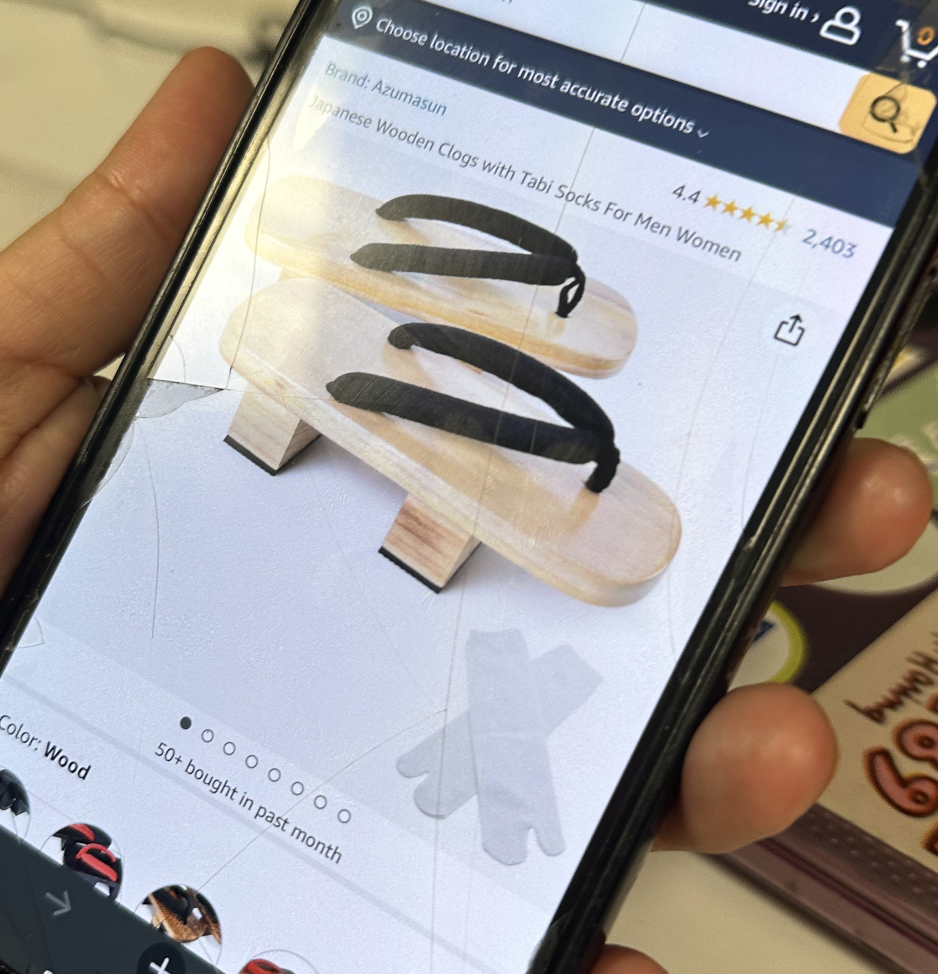
I bought two different flip flops. Experimented with the regular blue one and realized that it needs to be elavated or platform to hide the wires and arduino. First, I tried hallowing the platform flip flop but it was really hard and it was messy. Then, Lita came up with the idea of wooden clogs.
![]()
![]()
![]()
Week 5 - Design Foundation
Assignment for week 7 - Remote controlled Chindogu w/Lita
Chindogu’s are tools for everyday life, so during my time at home, I focused on my daily problems and ideated on possible “solutions” keeping in mind that they need to be remote-controlled.
![]()
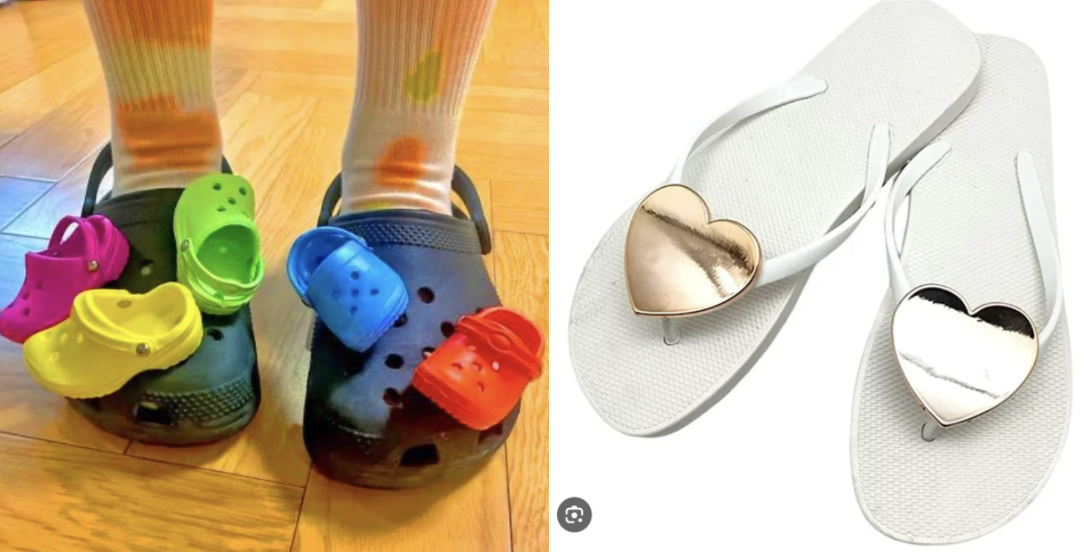
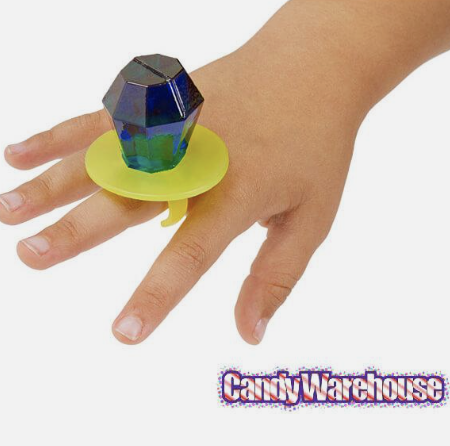
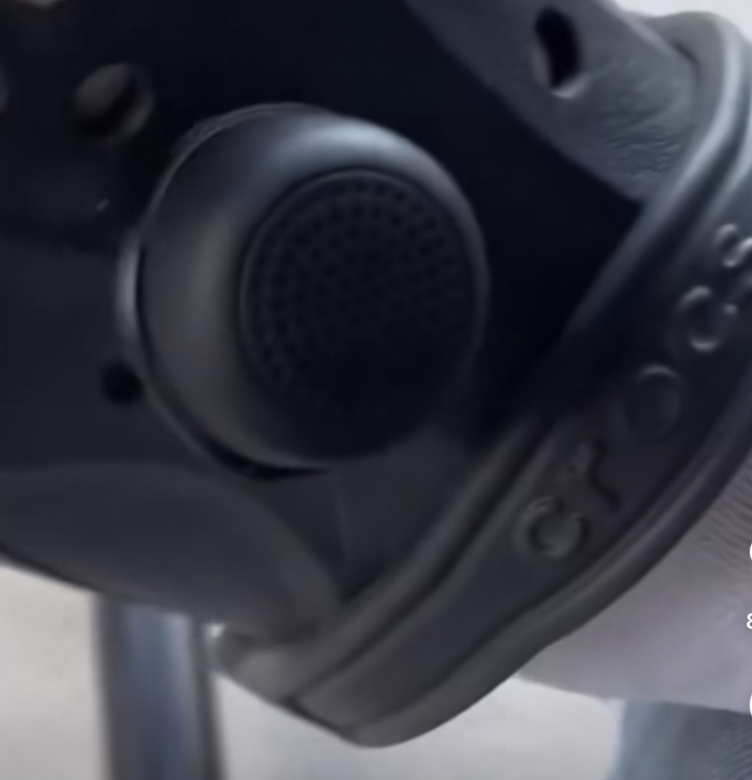
After I showed my ideas to Lita, we decided to move forward with the feet-fan -it can either be used for drying nail polish or keep your feet cold and breezy. Here’s our inspirations: (crocs, ring pops, speaker on crocs etc.)
We want it to be like a clip-on or a charm/gibit. It could be a fashion statement and once you start feeling hot you can turn it on // or you just put nail polish and you want it to dry faster -- could be used both ways.
![]()
![]()
![]()
--
Good Design (According to Dieter Rams)
Week 4 - Intro to Form & Pin-up
Notes // Office hour with Pedro
I couldn’t make sense of this diagram at first. Apparently, the interaction part means more absurd and according to others, our project seemed absurd which is also focusing on function. Interestingly there was one person who thought it focused on form and thinking. There is no right or wrong in that. It’s up to us where we want to be on the scope!
![]()
I’ve designed the pin-up material adding process images and references. But, I’ve learned that it should show the process rather than having text etc. Also, the letter size paper for all this information was quite insufficient. So, the feedback I got from Pedro is that the time we spend on presenting with the pin-up is to get feedback. It’s not about proving your decisions, your prototypes (photos, sketches or physical prototypes that you bring to class) are there for to defend your decision process. I will do that and bring cardboard prototypes next time!
Our project had different curvatures (sharp and curved edges) which didn’t work well together. It was not cohesive in general and the use of different materials and colors made it difficult to see the object as one. Yes, we have two filaments for the 3D printer but we might have spray painted the pieces etc, there are ways. Now, it looked raw! I’m glad the mechanism worked (partially I guess?) but for the next assignment I’ll focus more on the form and the look. Having similar shapes and using the same angles for curves will make something look more unified and cohesive.
For the next assignment, we have to make a Chindogu with a remote control, so it’s crucial that once you see the remote you guess which object it’s controlling. Form and repetition comes in handy.
![]()
![]() Design plus Morna
Design plus Morna
Tip #1: When creating a form, think about how you can repeat elements in the form. Similar lines, shapes and form will create harmony. -> Principle of repetition!
When you use multiple shapes it won’t look cohesize. You have to pay attention to rounded fillets and gaps. Then, she explains how you can improve any form with one simple design tweak.
I especially liked the chair example. The circular shape on the back and on the part where you sit is so subtle yet it looks harmonious. The cylindrical shapes on the sides and those circular shapes works well together. And going back to the class notes, they create a contrast with rectangular shapes.
The remote control example is a good one to think about for the next assignment for sure. The design of it has different shapes and forms; angles, curves etc.
The Demise of “Form Follows Function” - Alice Rawsthorn
- ... the style of architecture should reflect its purpose, made sense at the time, and continued to do so for much of the last century, not just for buildings, but objects too.
- That is why the appearance of most digital products bears no relation to what they do.
There are no clues to suggest that it might play music.
- In ye olden days when form did follow function, you could guess roughly how to use an object from its appearance.
- U.I. design has become more sophisticated, increasingly relating to our physical behavior, rather than objects.
-That is why the first wave of U.I. designs sought to reassure us by using visual references to familiar objects to help us to operate digital ones.
- ... g-speak, which is now being developed by Los Angeles-based Oblong Industries as a means of operating computers through physical movements and gestures, rather than keyboards and mice.
- Others are skeptical that voice recognition and brain sensor technology will ever be reliable enough to replace physical controls. “They work ‘sometimes,’ but ‘sometimes’ isn’t enough for most people.
Nowadays, I rely on my experience and intuition to understand that that object is and how it’s being used. I feel back when I cannot figure it out. As Alice also mentioned, we need visual references (it could be the shape, the icons being used, the buttons etc) to operate products. Since I was born to this wave of technology, I’m better at connecting dots and find similarities. But this cause problems to my parents etc. They didn’t develop any intuition on how to use that product at all since they’re coming from a more “form follows fuction” standpoint where the appearence of things was a clue to what they were doing.
I agree with how “sometimes isn!t enough for most people” argument. I struggle a lot with voice recognition. It’s hard to find the exact technological terms when you try to tell something to Google-home etc. It’s easiler to follow a couple of steps in the setting on your phone and find whatever your problem is. Another problem is that, yes they don’t have clues to what they’re doing, but they also don’t offer tactica feedback! Take google-home for ex, to lower the sound you have to tap a part of the object and you’re not sure which side. So it becomes a try-and-error type of interaction. This absurdity of “let’s make things look cool / don’t have buttons” etc is clearly and issue and UI designers should look more deep into it.
Week 3 - Ideation
Class Notes
Scope - is about understanding the range. When you’re designing you have to choose which end of the spectrum you want to be. ( obvious/crazy, traditional/modern etc.) Or you can design something that is at the middle of both. You have to ask yourself where do you want to be on that line.
--
In-class Ideation Workshop - prototyping absurd futures
The two words that I got were: tactical and mobile.
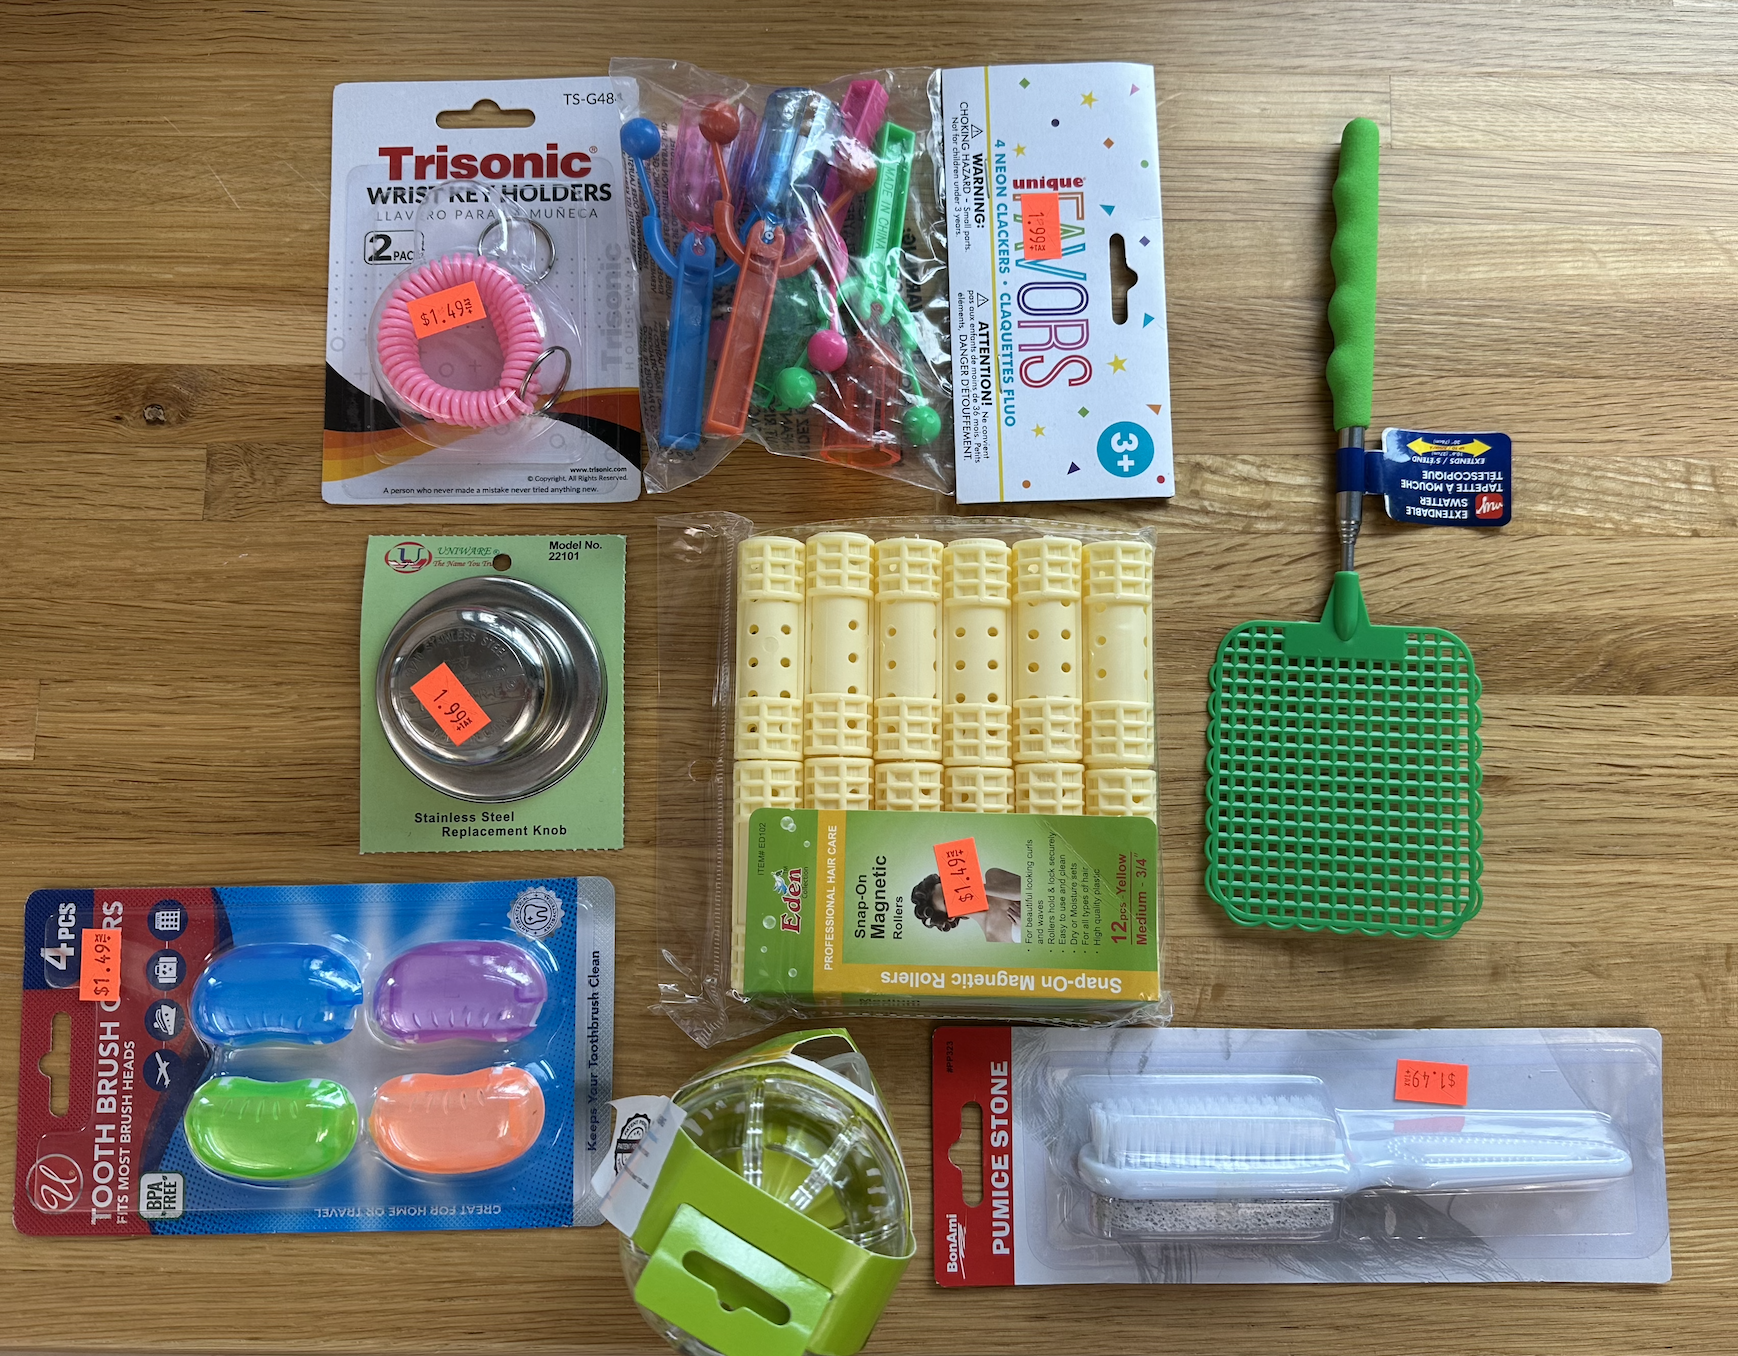
I first started with the word “tactical” because it was a new word for me. While experimenting I came up with somesort of a wearable for kids where guns became a common object in everyday life. The rollers can be used as storage for bullets and the knob works as a protection for the heart. The colander-ish thing can store other daily objects. I really enjoyed working on the packaging. The tools to curve the edges of the paper and open the hole on the top center was interesting, I liked it! I found military-ish looking photos.
![]()
![]()
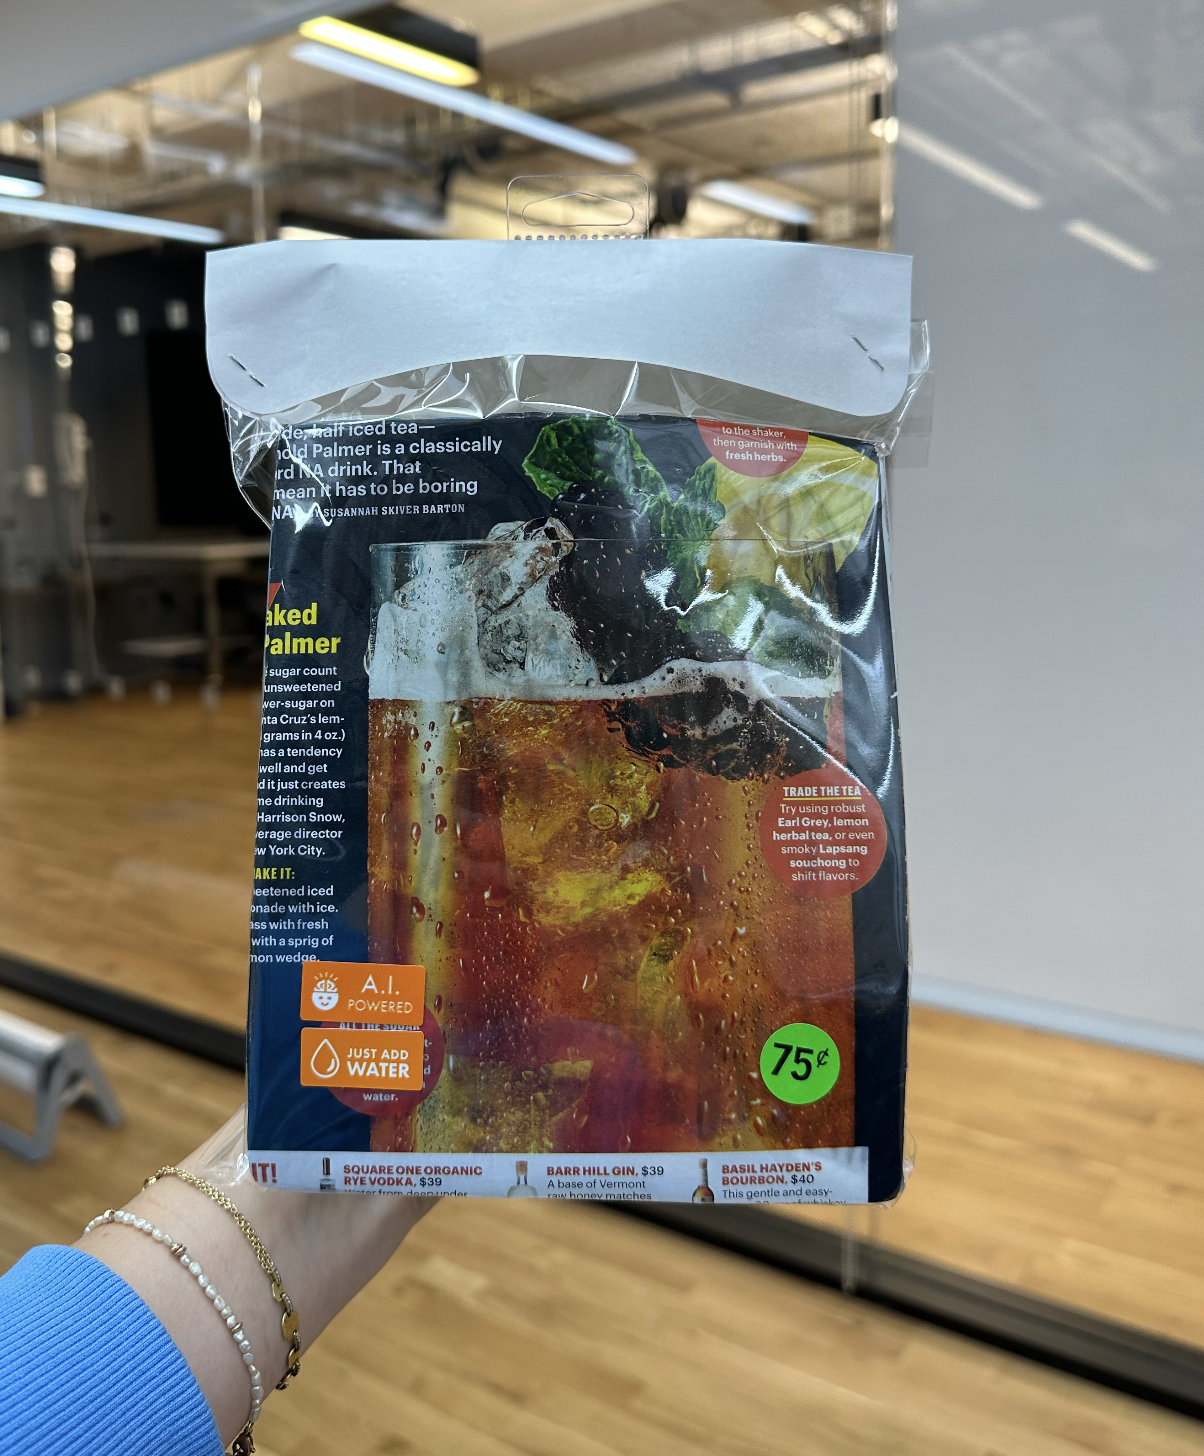
The second prototype is an ai-powered coctail maker. It can be carried anywhere and can be used whenever. It needs water only. The bean shape thing is for flavors (there was only 1 of those left, so I only put 1). From the front screen thing you choose your preference and the ai comes up with the perfect coctail recipee. For the packaging, I used photos of beverages and coctails.
![]()
![]()
--
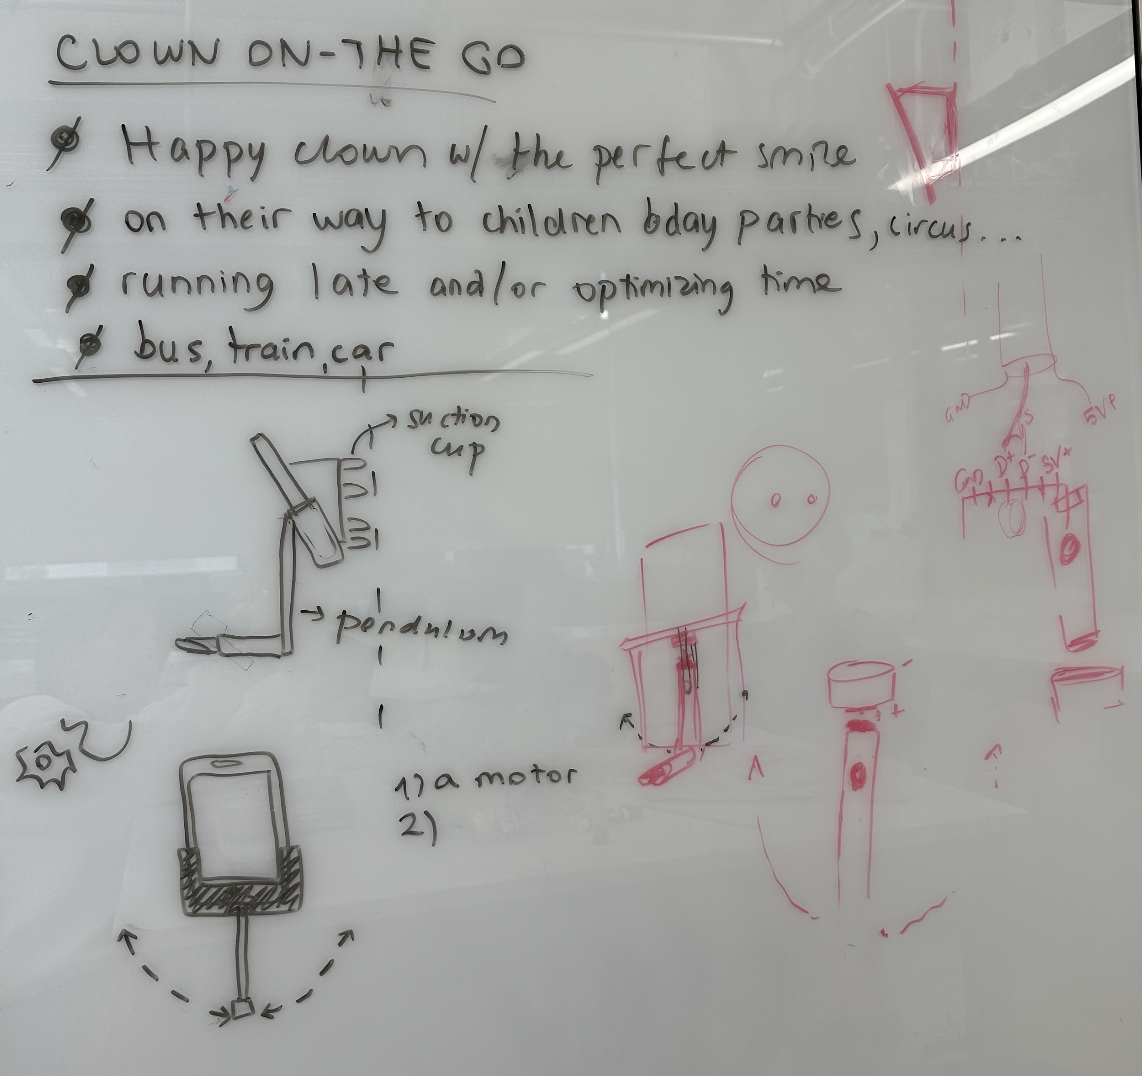
Clown on-the-go
Week 2 - Chindogu
99% Invisible - Mini Stories w/ Vivian Le
Chindogu (chin = “weird or strange”, dogu = “tools) (strange tool)
“Chindogu” is the art of designing nearly useless gadgets. It started in Japan, with a man named Kenji Kawakami. They are a specific type of invention that sets out to solve one particular problem but it actually ends up causing so much more of an inconvenience that it’s almost entirely useless.
Vivian adds that we, as humansi tend to marry utility and design. But they don’t have to be like this. In the spirit of Chindogu, the chindogu represents the freedom to challenge the suffocating historical dominance of conservative utility. And so, the spirit of nonconformity and anti-consumerism is something that’s rooted in its concept. So, they are suppose to be like a design without the restrictive threat of materalism.
![]()
The website also displayed videos and this invention was my favorite one. It’s so funny and absurd and looks extremely useless. But it serves a purpose that you probably don’t have to wear it everyday and that makes it a Chindogu. I wonder how it would feel to walk in such shoe.
--
Hackable/Transformable Objects
This what I found on my treasure hunt! Most of the objects are made out of a mix of different materials, which struck me the most. I like that some of them are extendable or can elongate.
![]()
--
Updates on Clown-on-the-go
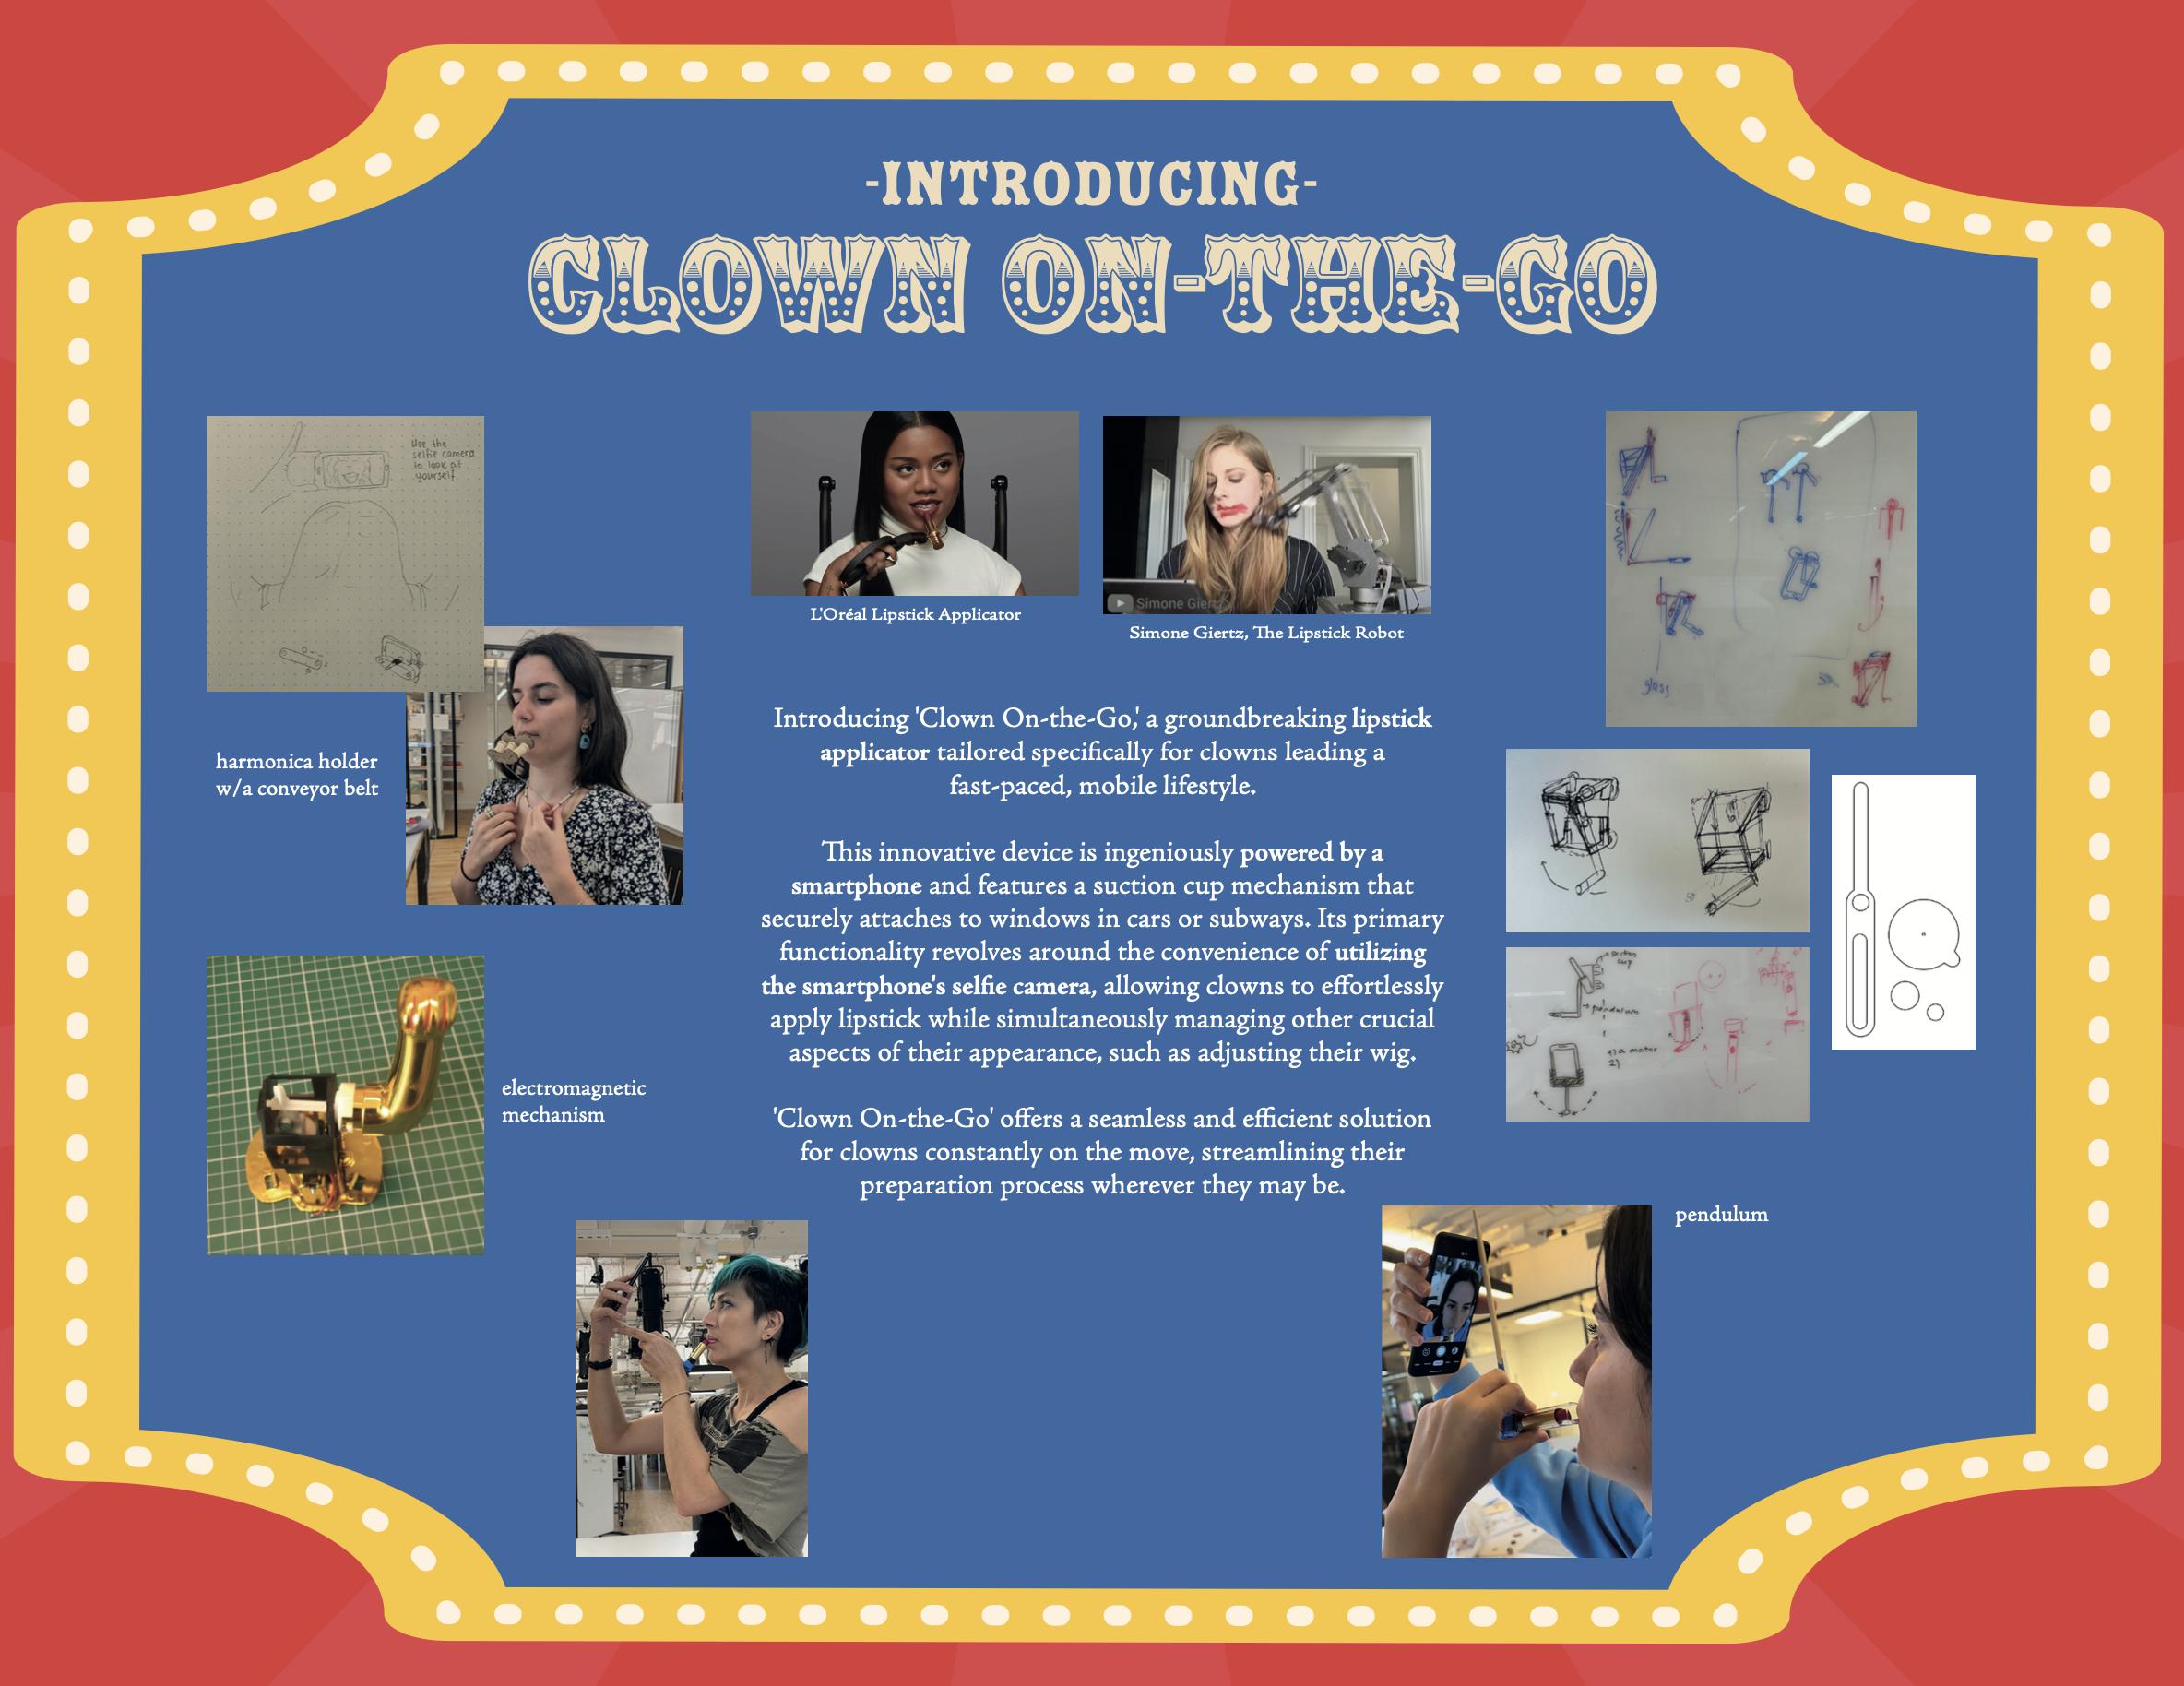
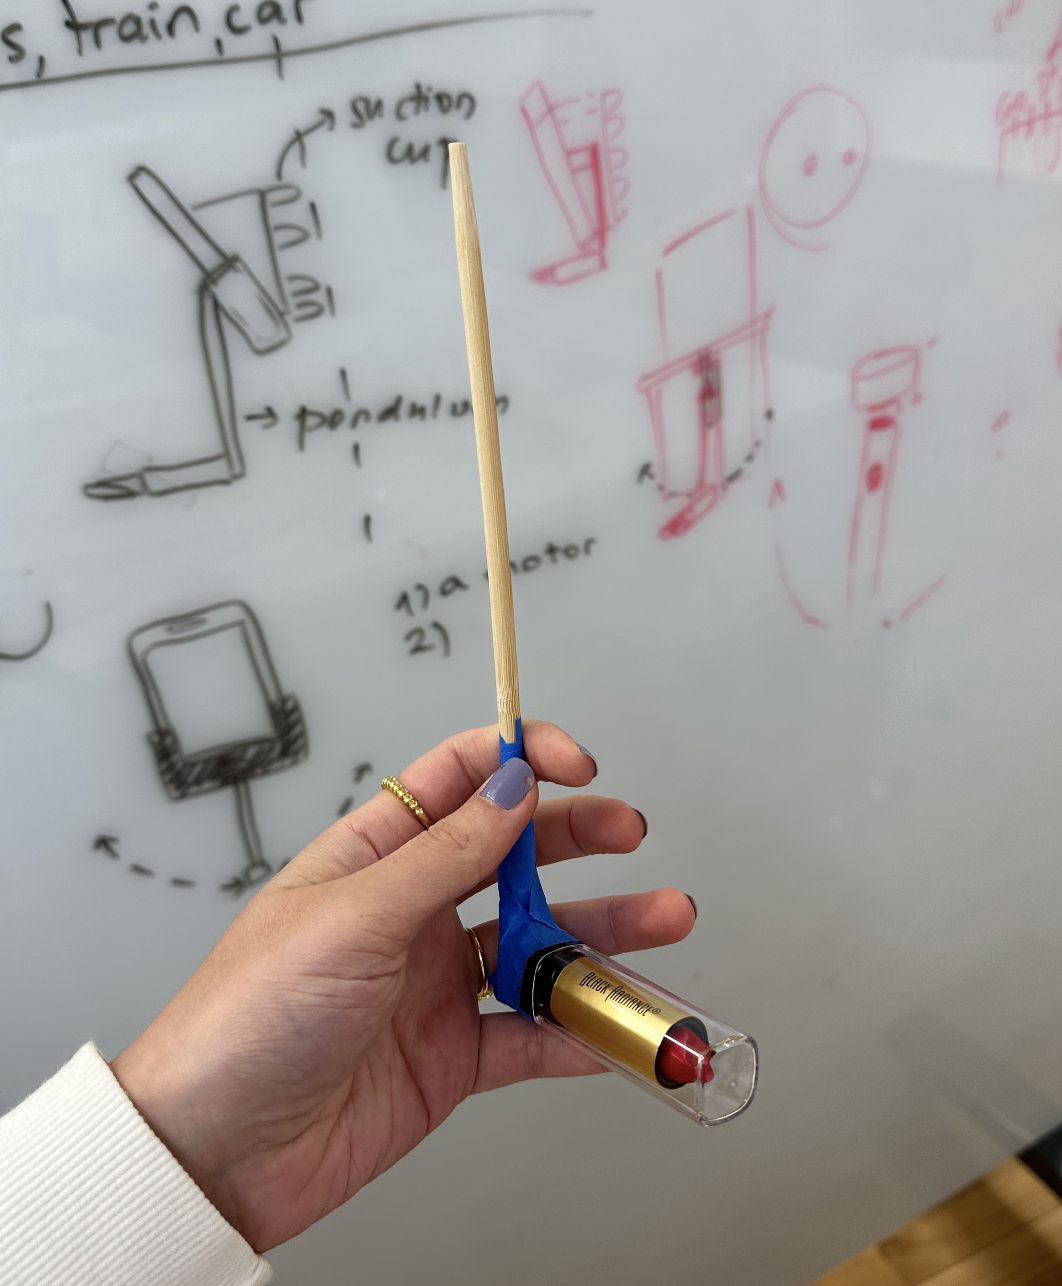
We’re having troubles finding the best way to create the motion of applying the lipstick. We looked at pendulums, magnetic fields and now looking more into mechanical movements. After prototyping and giving it a try, we realized that the thing will not turn 360 degrees, the motor will have to move back after it reached that certain point. Since we also want the camera screen to be used, we’re trying to figure out what’s the best way to position the motor and the suction cup.
![]()
![]()
![]()
Somebody mentioned this website, and we found movements that can help us. #92 is a straight motion, the clown will have to make their lips purse. #100 is something that best suits are idea!
![]()
![]()
Also, love how the Lucky Cat works. I found about it last year during my Art Toy Design class, so simple and so cheap. - The original mechanism inside a lucky cat uses an electromagnetic coil coupled with a small controller circuit powered by a single 1.5V battery. -
![]()
Updates #2
We liked the example of mechanical movements and decided to prototype it out of cardboard. The half oval curve at the tip was what we needed! We didn’t wanted to program arduino or use it because we thought it would take too much space. So, with this movement, the motor will keep turning 360 degrees, we won’t be changing the angle. First we made it bit big to understand the movement better. Then, we made everthing smaller so that it can fit at the back of the phone.
![]()
![]()
![]()
We did a bunch of sketches to figure out how to place the mechanism. Since we want to see the lipstick while it’s being applied, we dested out different angles and placements for the tip of the pendulum. We figured that it’s for the best to place it at the back and make the pendulum long enough that the lipstick can be seen from the selfie camera.
The electronics we ordered from Adafruit came right on time and we started testing out the motor. We figured out how to get the power out from the phone to the motor! Karina had to solder things and break a usb-c to usb connector thingy. The pendulum on the right is being powered from the phone! The first motor we used was working really fast. So, we decided to go with the other gear ratio. Honestly, I’m glad it all worked!
![]()
![]()
![]()
The first version of the cardboard prototype was the one above. After playing with it, we saw that the light and right edges should be open because the rotating disk needs much more space. The other challenge was to find the right angle and the area to fix the pendulum and to make it tight enought that everything is in place. It also needed to be good enought to carry all this + the lipstick.
![]()
![]()
![]()
![]()
We’ll make some small tweaks but overall the case hold the phone in place.
Week 1 - Introduction to Absurd Design
Initial Ideas for project #1
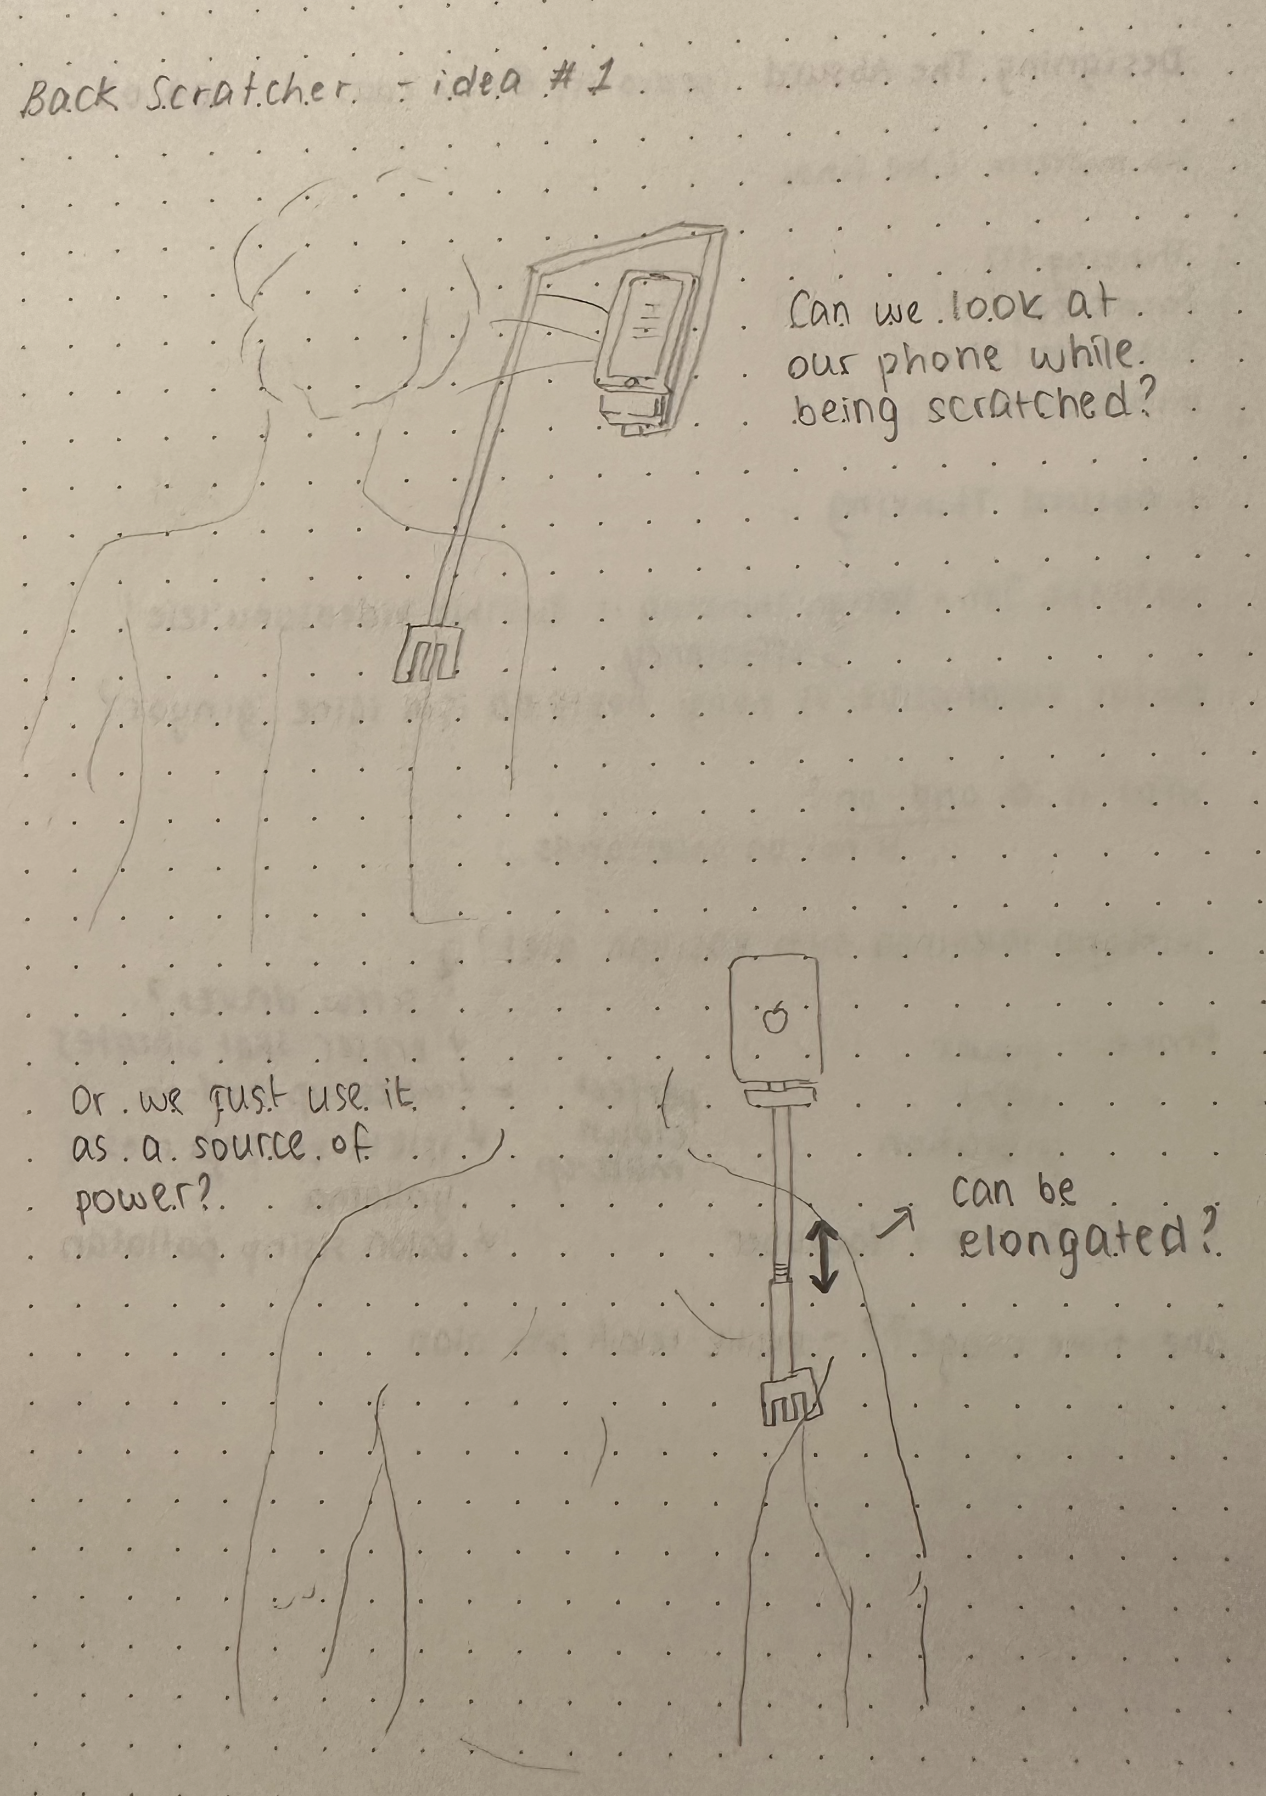
- Back scratcher
- Eraser that vibrates
- Make-up add on -- perfect clown make-up
![]()
![]()
![]()
For the fabrication, we’ll look more into the small gear motors. And we’ll continue working on the final idea.
--
Closing note: Turkish artist Irfan Sayar created numerous ideas/projects/inventions using his artist name Zihni Sinir and this was one of my favorite one as a kid. I don’t quite remember why but out of all those ideas, this one stuck. It’s fun! (Link for his other projects)
![]()
--
Natasha Jen - Design Thinking is Bullshit
The steps are not always straight-forward.// The main issue is that the process lacks freedom and risks. Even if you repeat the steps, you can’t control the outcomes nor scale it in the way you want it. Trying to follow steps turns the process into a business-oriented way of thinking.
Allan Wexler
Try/Find different ways of thinking or use different materials etc to get different outcomes. Otherwise, you can’t think outside the box since you’re basically in the box. This idea goes well with how Natasha says that the process lacks risks. Without risks, you can’t create something new or different.
Cocktail Machine - (from collapsible tray to salad shaker to cocktail mixer to cocktail vending machine(?))
Inspiration Links:
My Soft Office
Hotel Mini Bar Ideas
Asteroid City
Water Dispenser Basics
DIY Cardboard Box
We tested out the vortex mixer thinking that we might use that technology. Below, you can find our initial sketches for different ideas.
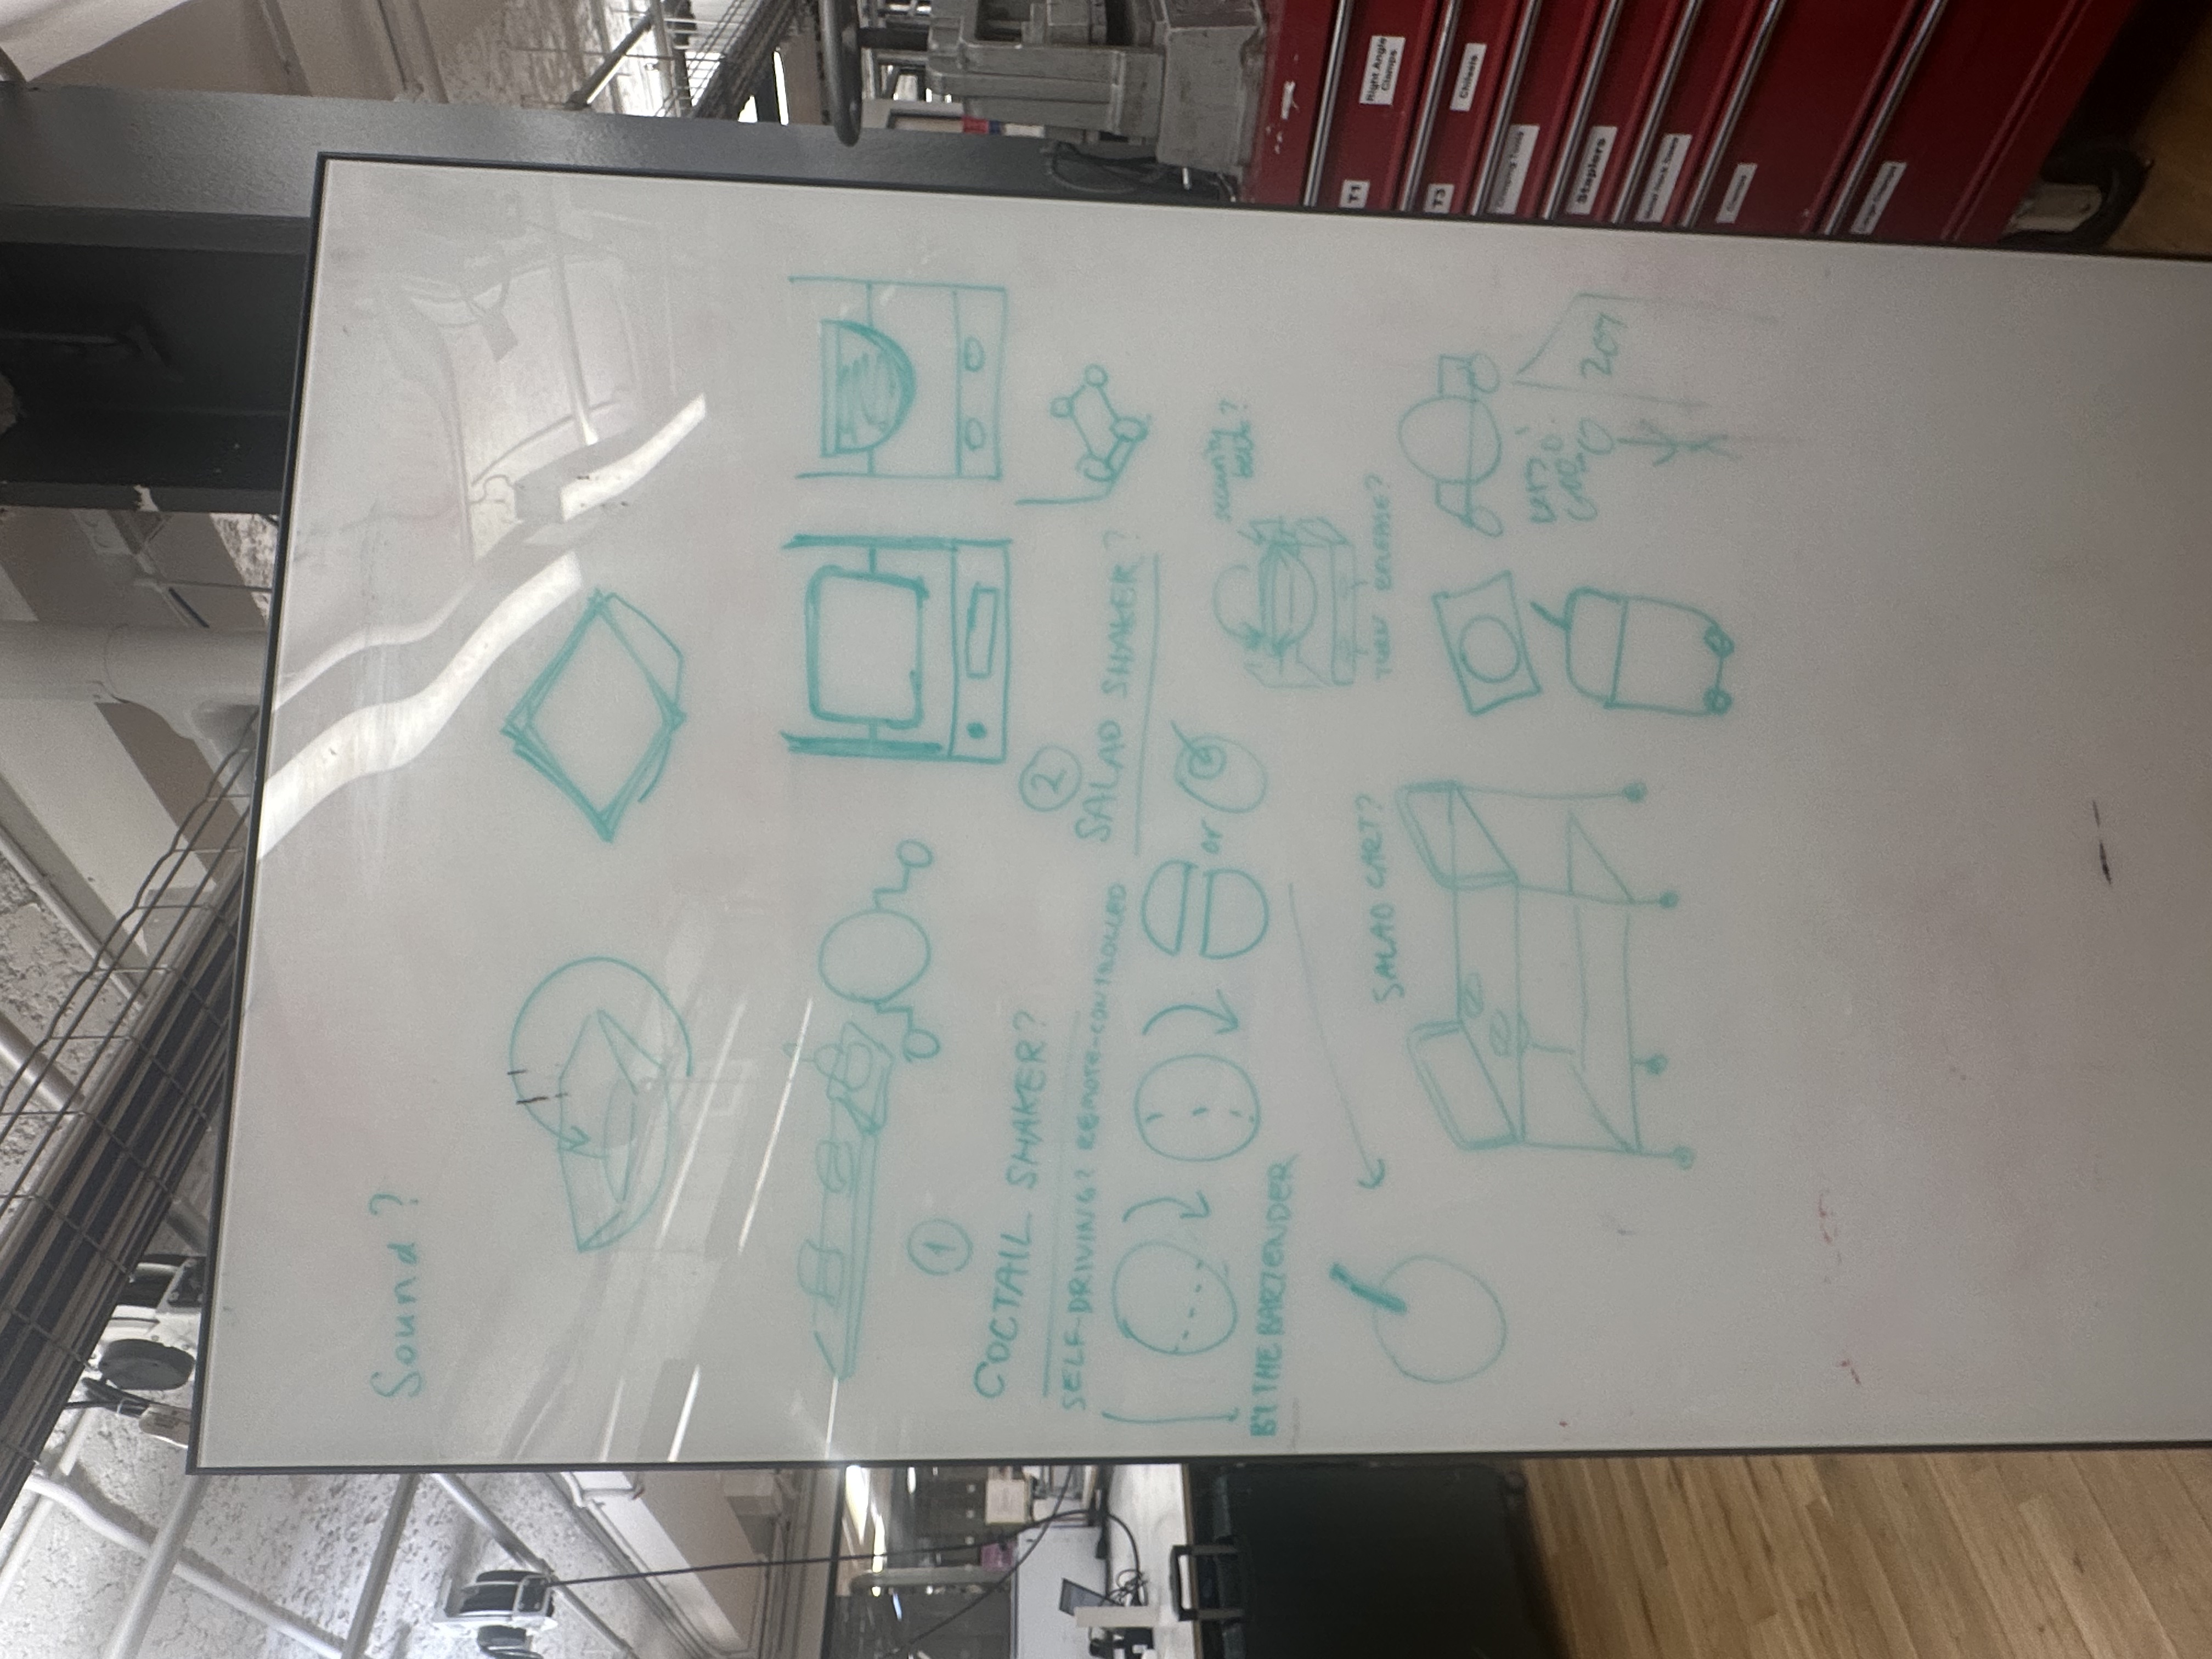
Now, we are going to create a cocktail vending machine with mechanics. So it’s an absurd way of making a cocktail. It will be placed in the guests room and could be sold in the gift shop. Sam and I sketched and Sam built the cardboard prototype. Then, I created a moodboard for it’s look&feel which helped us finalize which materials to use.
On the left, here are some close up screenshots from Muji products to see how they use color/and buttons. On the right are some Japanese style objects and machines. They helped us understand how to mix and match different materials and incorporate the green apple color.

There will be three main parts to the design: the liqueur, the toppings and the cocktail mixes. The japanese vending machines use sound (music or it talking), so hopefully we’ll have a spot for the speaker too. So a mix of mechanics and electronics. The sounds will be triggered when the user puts their glass on where the glass goes. Below, is our CMF details.
We simplied the design by placing the topping and syrup part on top of each other. Rather than three column style design, now it’s 2 and there’s space on the left or right for the cups.
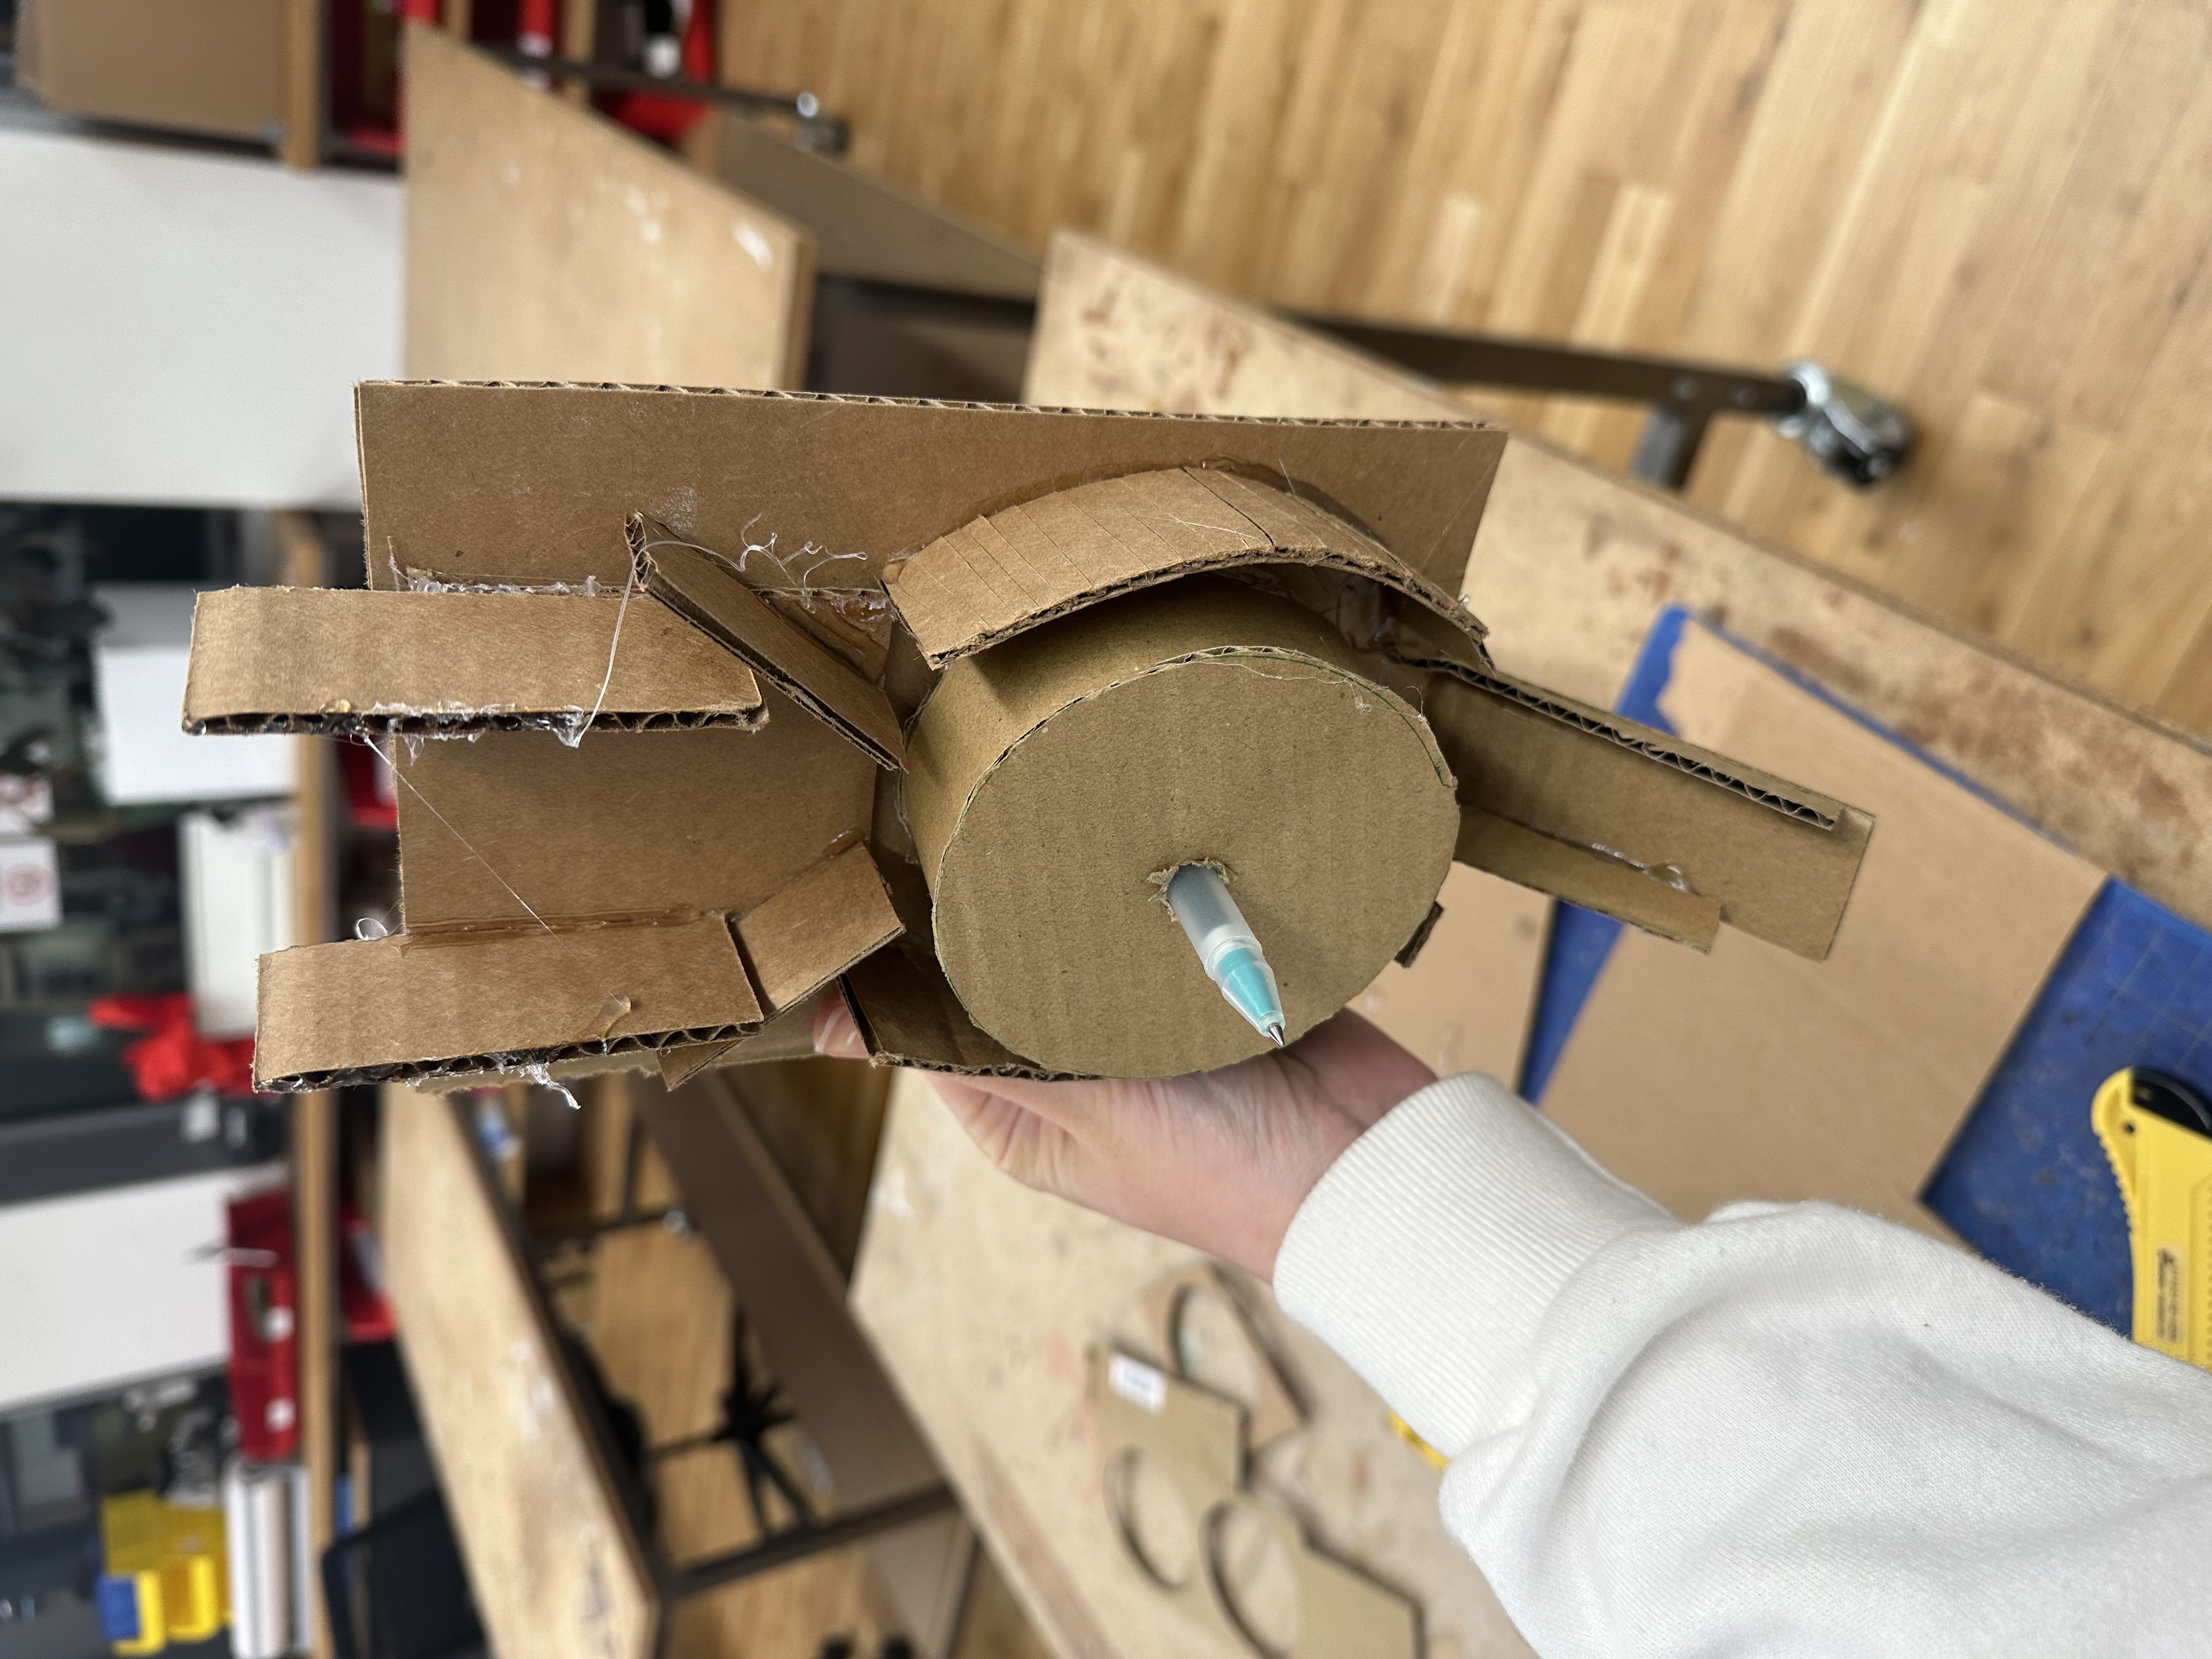
This is the prototype for the toppings part. The olives and etc can come out when you turn the nob.
Tutorials for DIY Gumball Machine
Video 1
Video 2
Video 3
--
Rube Goldberg Machine w/Alfonssette
Fun but extremely complicated! Thinking about different forms (spiral, linear) of actions was really hard. I wish our idea worked better but oh well, we managed to get the paper to open up. We don’t have a full video but here’s a snippet!
Week 8 - CMF
Office Hour w/Phil
We realized that our first idea was to complicated to fabricate. Phil helped us turn it into a more 3D visual so that we can understand how the picking it up and letting it collapse would work.
Field Trip to NYU Cafeteria w/ Sam
We realized that we haven’t been to a buffet in a while so we decided to visit the cateria to get some new ideas. After that we gave ourselves 1 min heads down and wrote down the problem areas.
1. You need to cary multiple boxes because they don’t serve in plates anymore.
2. The serving utencils are dirty and the food dries on them.
3. You have to interact with someone when ordering food.
4. Keeping the food warm?
5. They ask you if you want your salad to be shaken. (can turn into a chindogu? bcz you don’t need this everyday and it’s so unuseless.)

Week 7 - Critique
Ideation Process for the Absurd Hotel w/Sam
Sam and I went to Muji to get some inspiration for packaging / material / shapes & design (+ Sam hasn’t been to Muji before!). We both liked how objects were displayed in a neat and simple way. They had curves and looked minimal. The packaging designs were also simple and had nice illustrations for instructions. The brand name was not something that stood out but the name of the products and instructions did because it was hard to undertand the purpose of some products.

Then, we focused on our own hotel experiences. Sam spend one night in a hotel that previous week and talked about the condiment packaging in her room. Our other ideas were:
Objects that you can interact with during the elevator ride (since there’s nothing else to do then just wait)
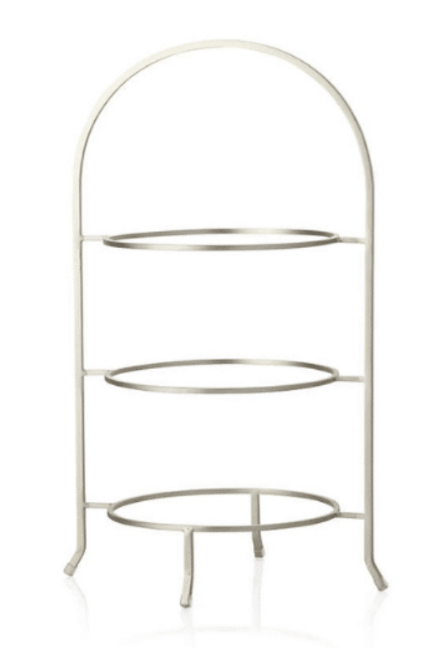
Buffet (tray stands)
Things that would make you stay in bed
Bellboy trolley
During our sketching phase, we came up with a collapsable tray. It works as the top part of your buffet table (maybe?) and your plates goes on top. If you want to eat your food in your room, you can easily carry it to your room! As for the material, we liked the wood and the half glossy half mat plastic.
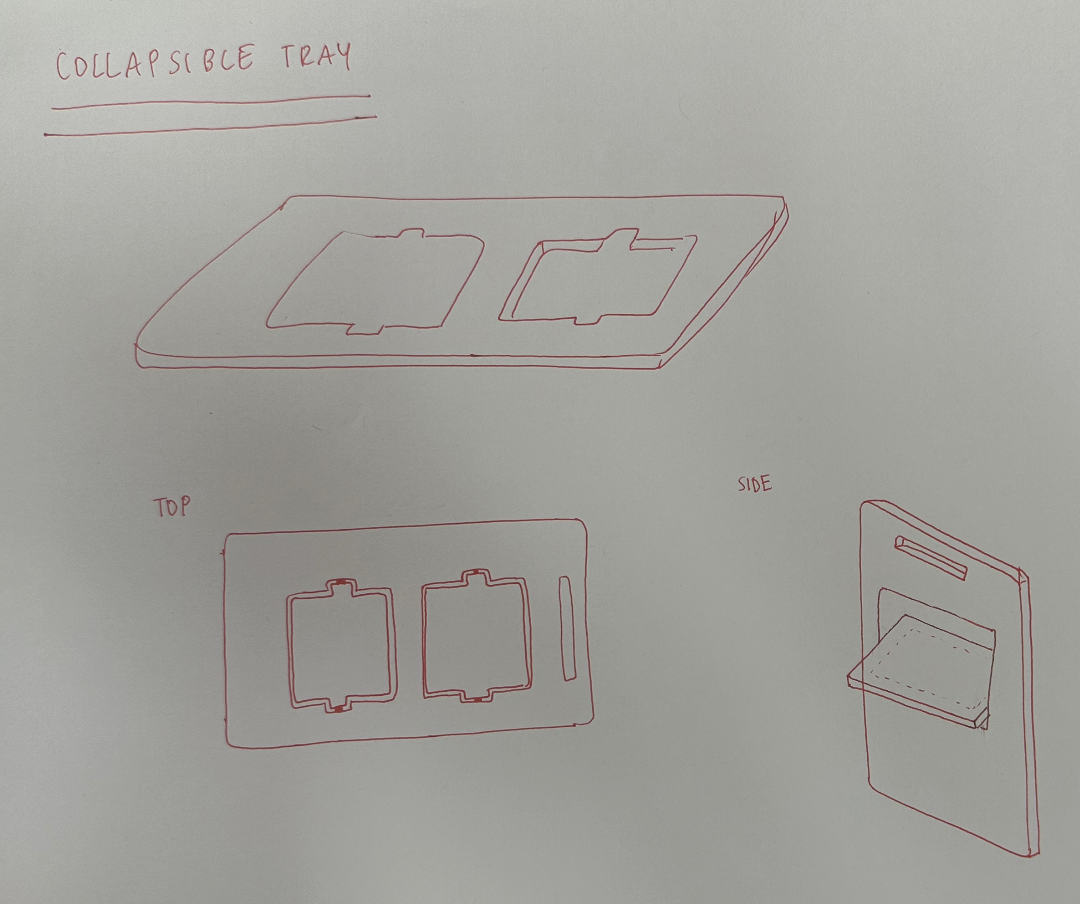
We’re not sure how the mechanism works (yet), will talk about more with Phil during our office hour. But basically, once you lift it up the part for the plates will stay parallel to the floor and your carry the tray. So - an absurd form?
--
Feedback after critique
A toenail polish dryer in the format of a sandal was presented with a handheld remote. Normal nail polish takes ages to dry, acrylics are bad for nails. Croc japanese sandal combo, attempted Gibbitz, one working - Elif and Lita
- “I like white, but I’d like to see a more fun color.” Chumou
- Pedro:
- Form factor of the remote does not match the sandals.
- “Feels a bit prototyping phase still”;
- “There was room to experiment with form more, and should have been pushed more in the direction of form .. in ways that are more than MacGyver-y”.
- “There could have been design clues, like Jaxon’s suggestion w/ toe separators, to indicate the purpose more with the design.”
- “Use the prototyping phase to work around constraints like the battery.”
- “I like that you have touches of modernity; caters to one’s own culture and time; such as envisioning this for yourselves or for a spa.”
- “Maybe you can have a downdraft for the air, like an air hockey table.” Josh
- “I would’ve thought about chunky platform sandals, not necessarily Japanese sandals. In that case you’d have room to hide electronics. [Jaxon]” Sam
Q: Chumou - why do i need a remote if i can reach my toes anyways?
A Elif - you dont have to wait at home, can do other things while out, and also multifunction to keep feet cool
Q Jaxon - what if toe separators they give you at salons already are built into the shoe, also gives visual language that it’s for nail polish purpose, could be weirder with the extra element
A Elif - would affect angle but still would be a good idea
Q Michelle - for controller there is more room for the two to come together, a little generic, want to hear other ideas you had for the formfactor
A Elif - ran out of time, but had intention to tie in together
Jaxon - the heel is screaming to have electronics stuck into it with the gap that is there. Box looks like a sake holder, tie in?
Week 6 - Absurd Forms
In-class activity: Design two objects in an absurd form that its function already exists w/Alfonsette
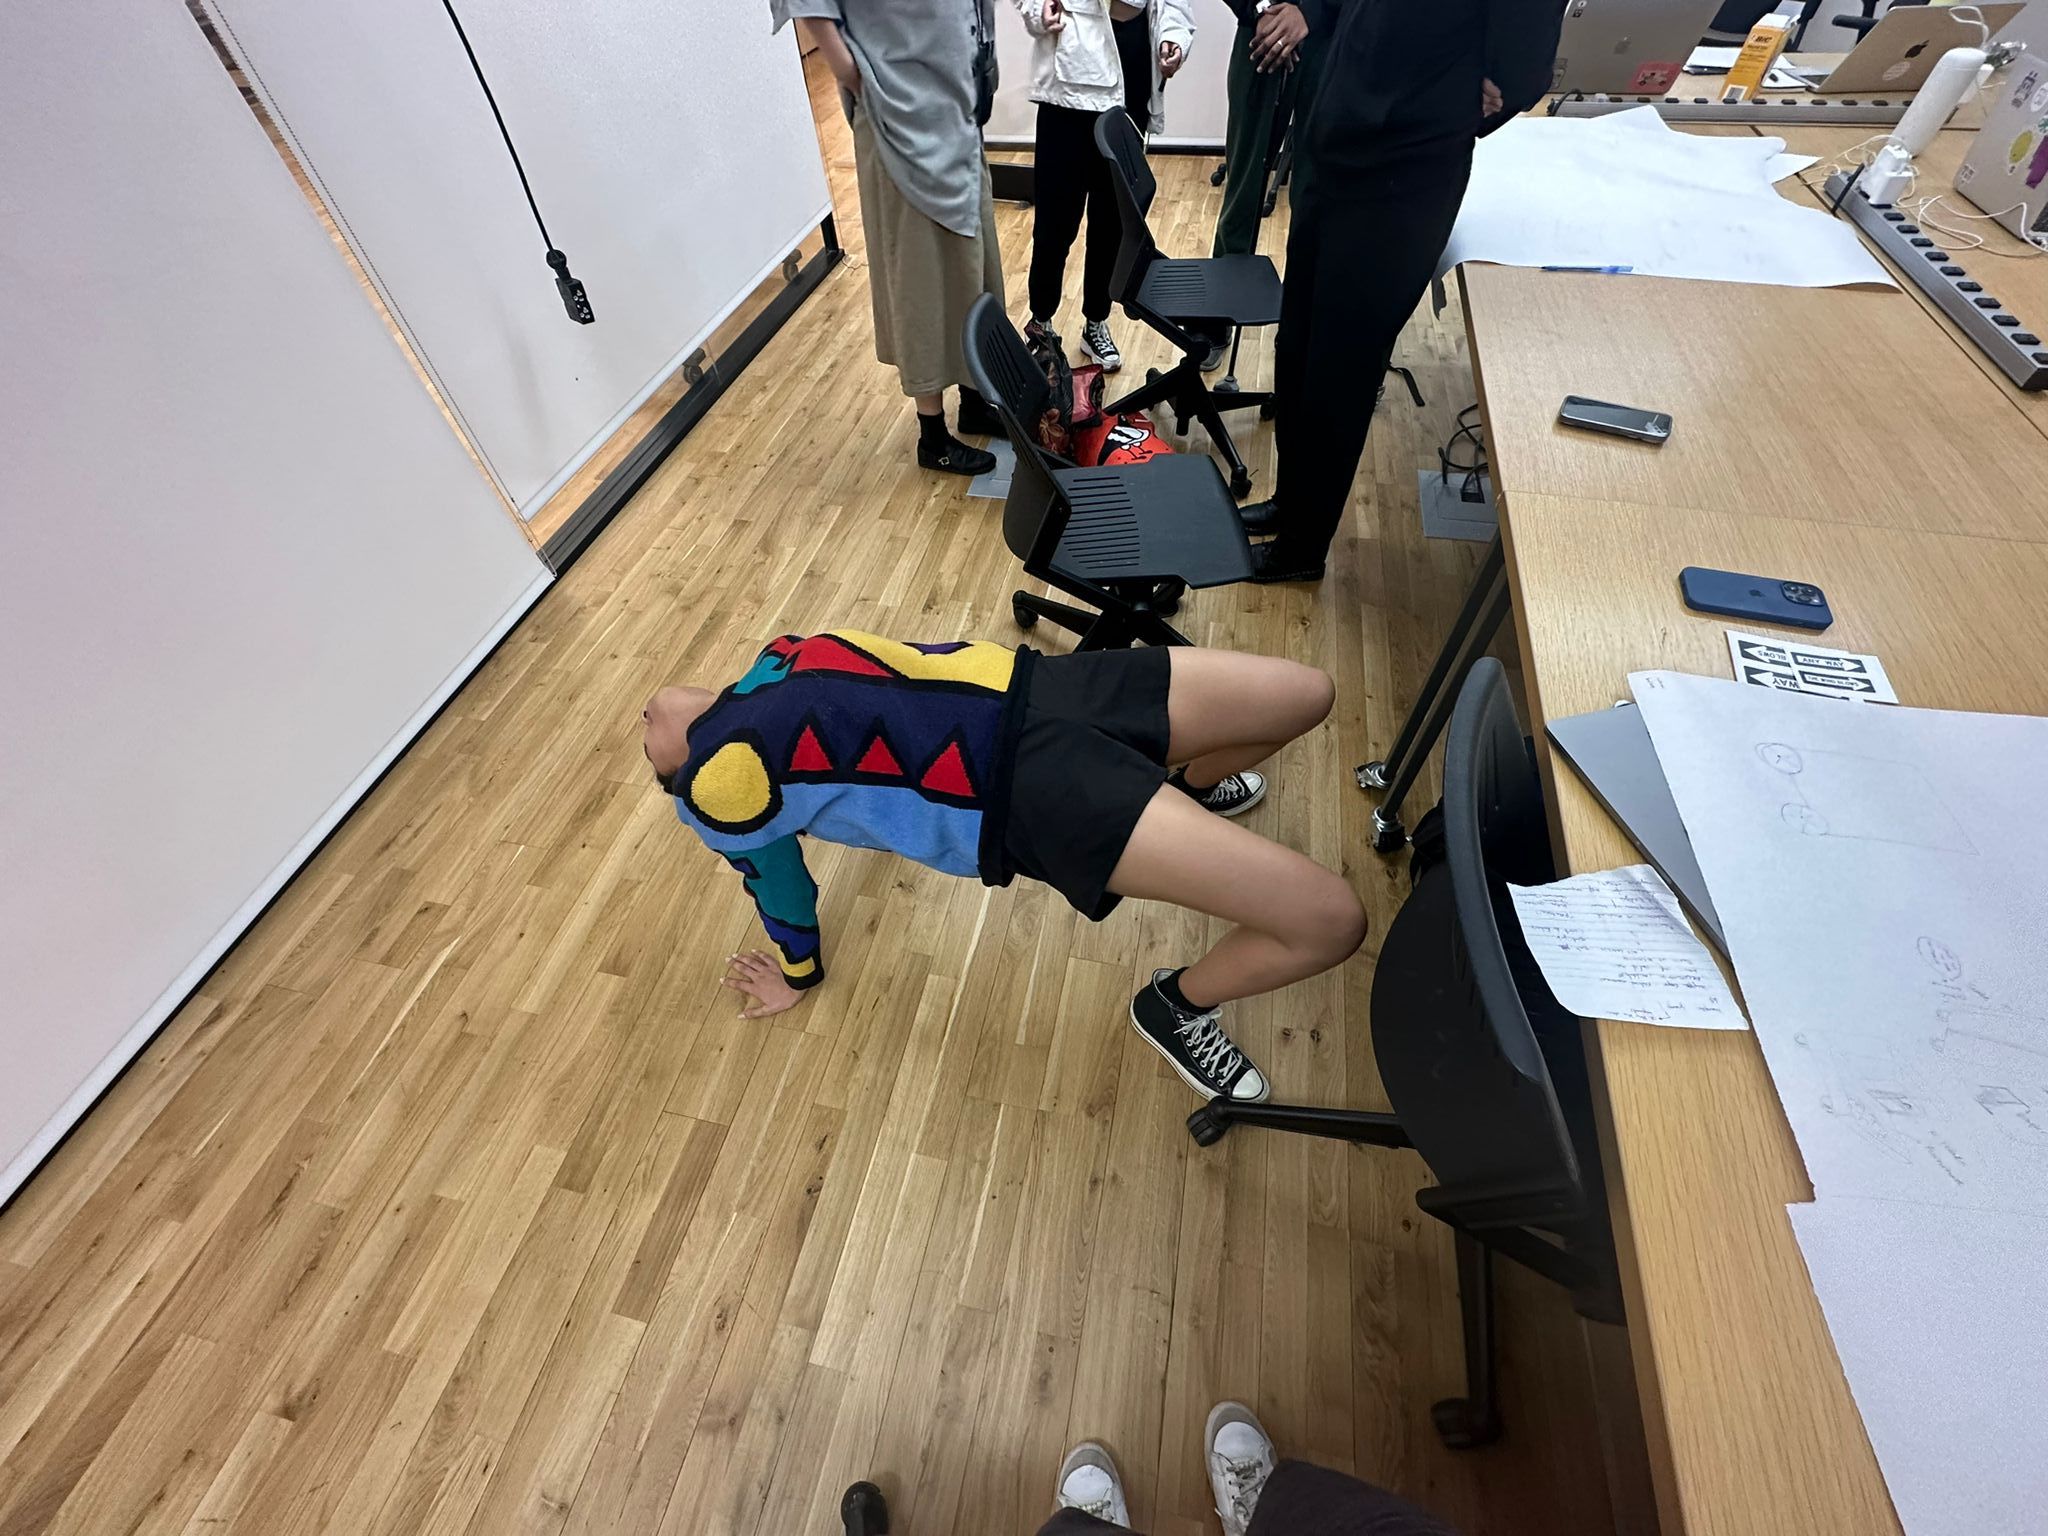
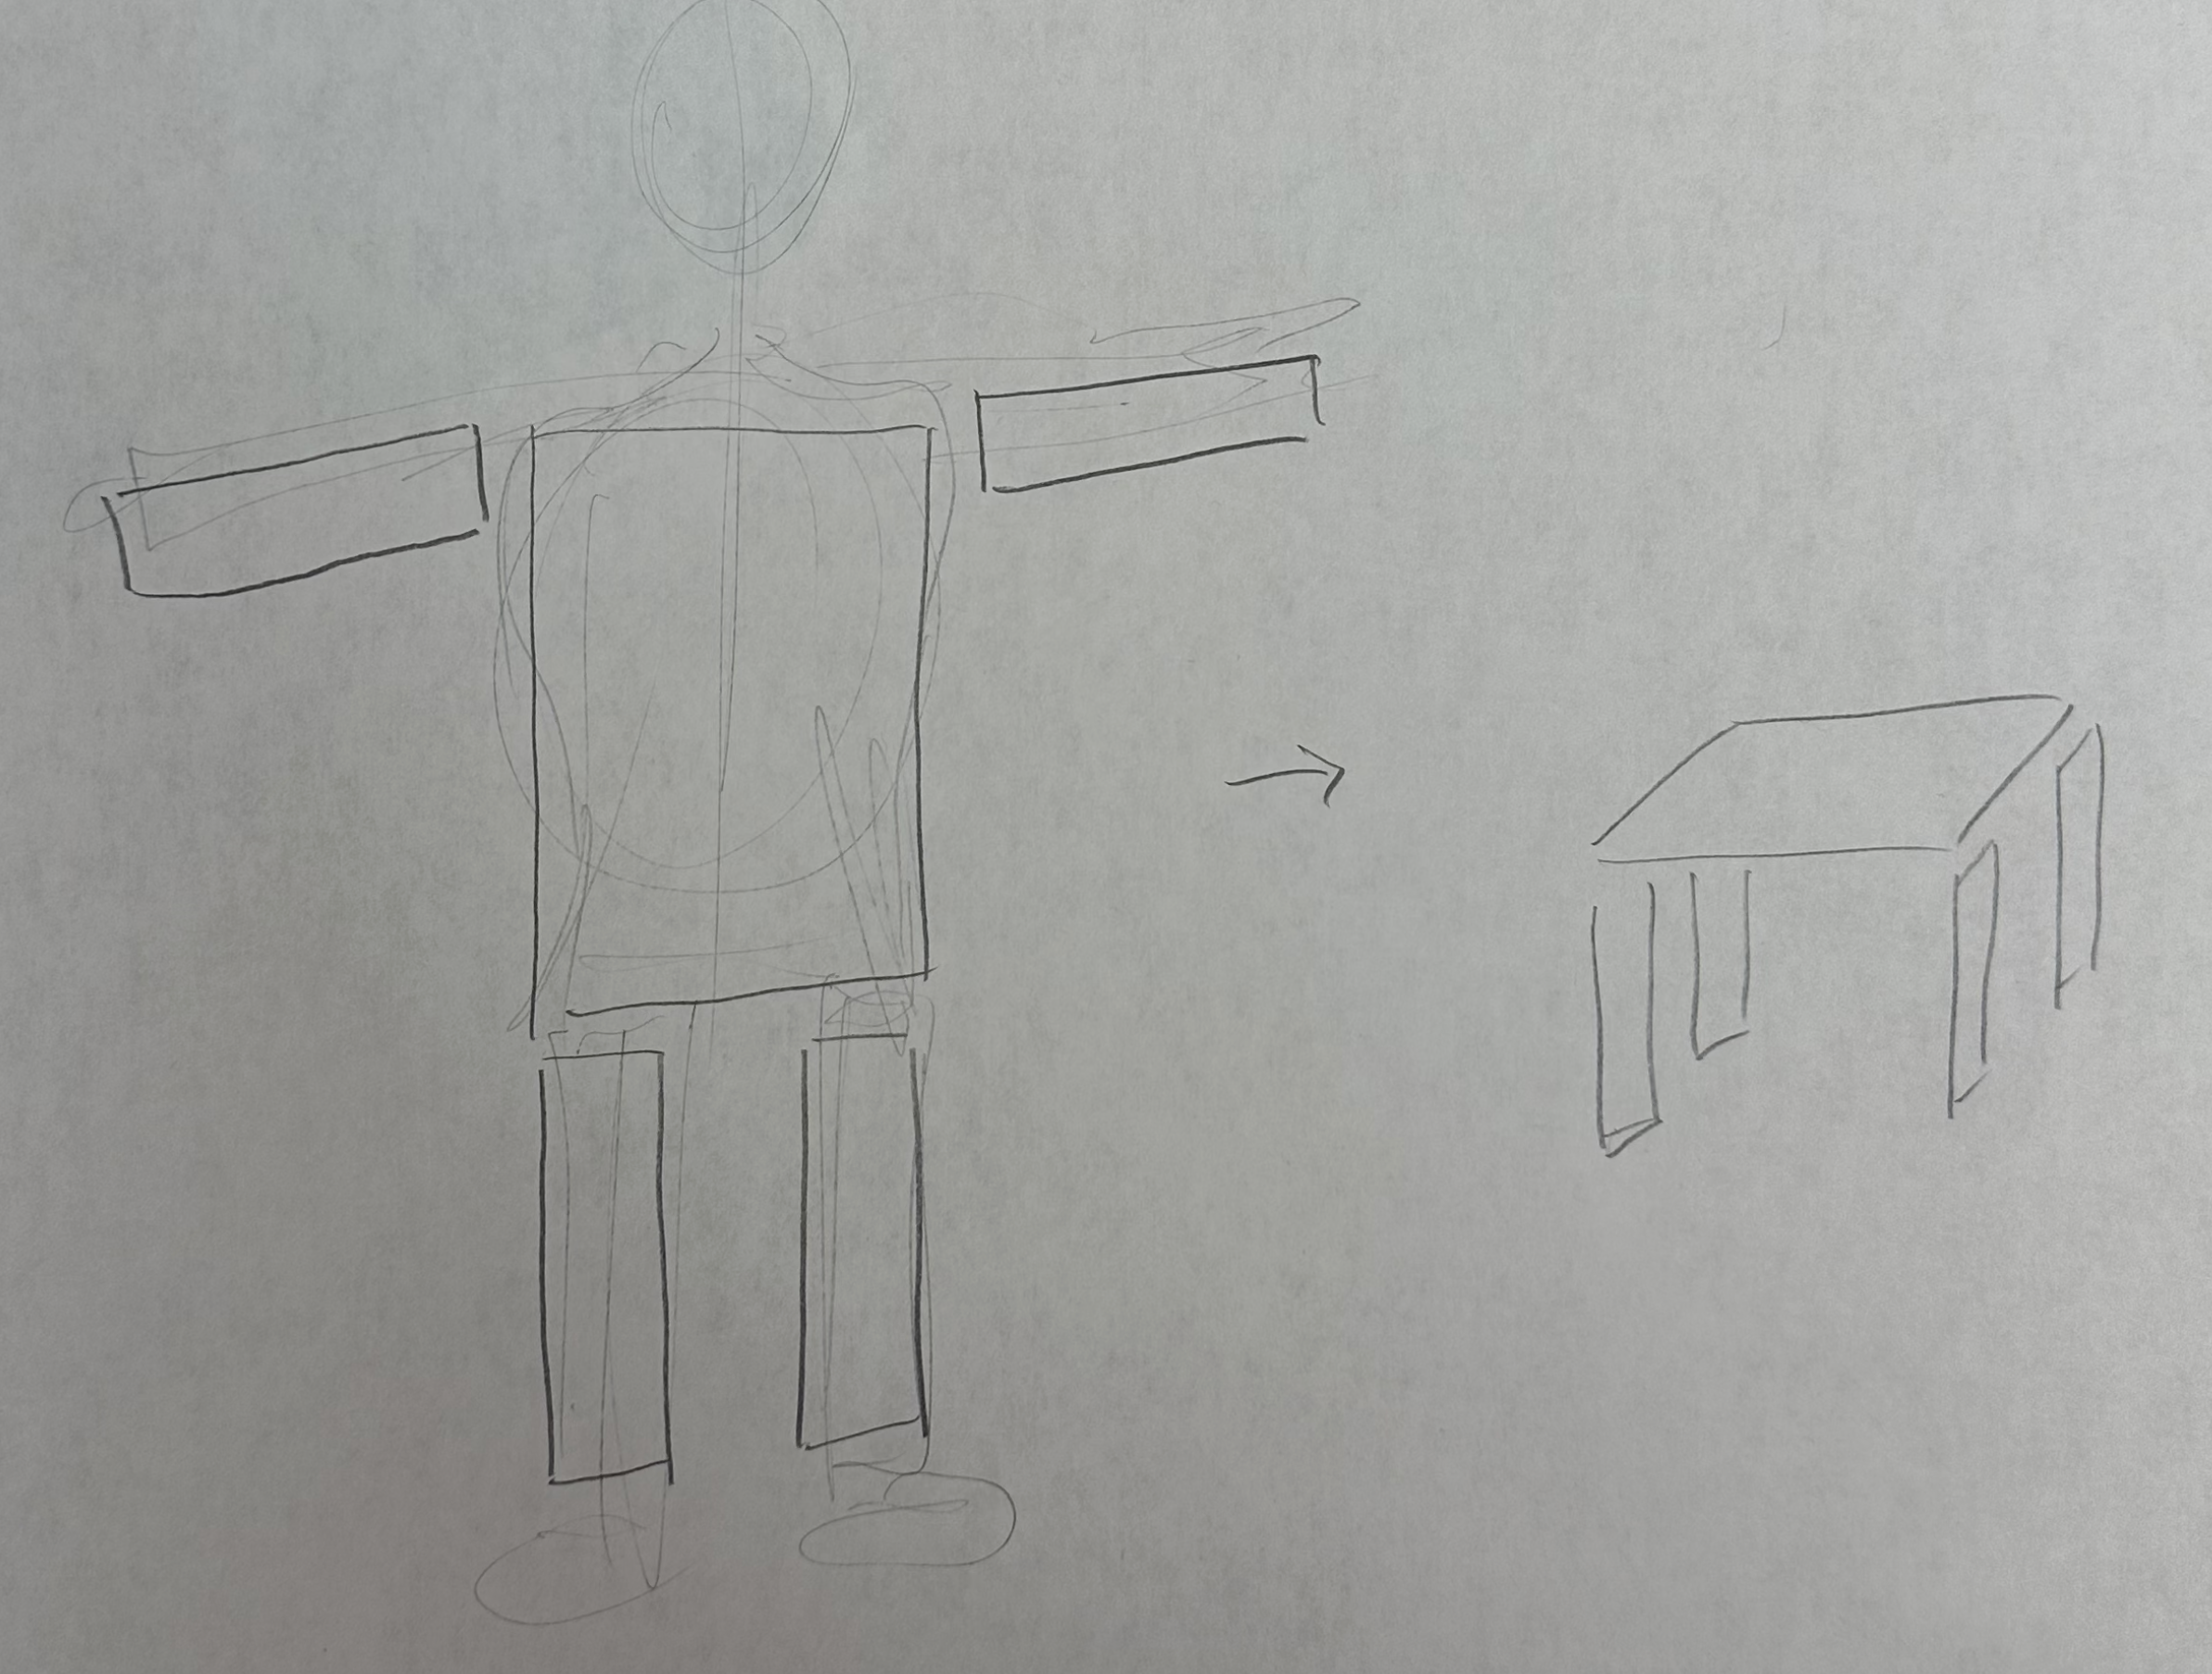
The human table was inspired by the example where people were carrying flat-packed chairs on their backs. It’s hard to find tables outside when you’re eating smtg so this person turns into a table when they get into that awkward position (can be seen in the photo gallery)
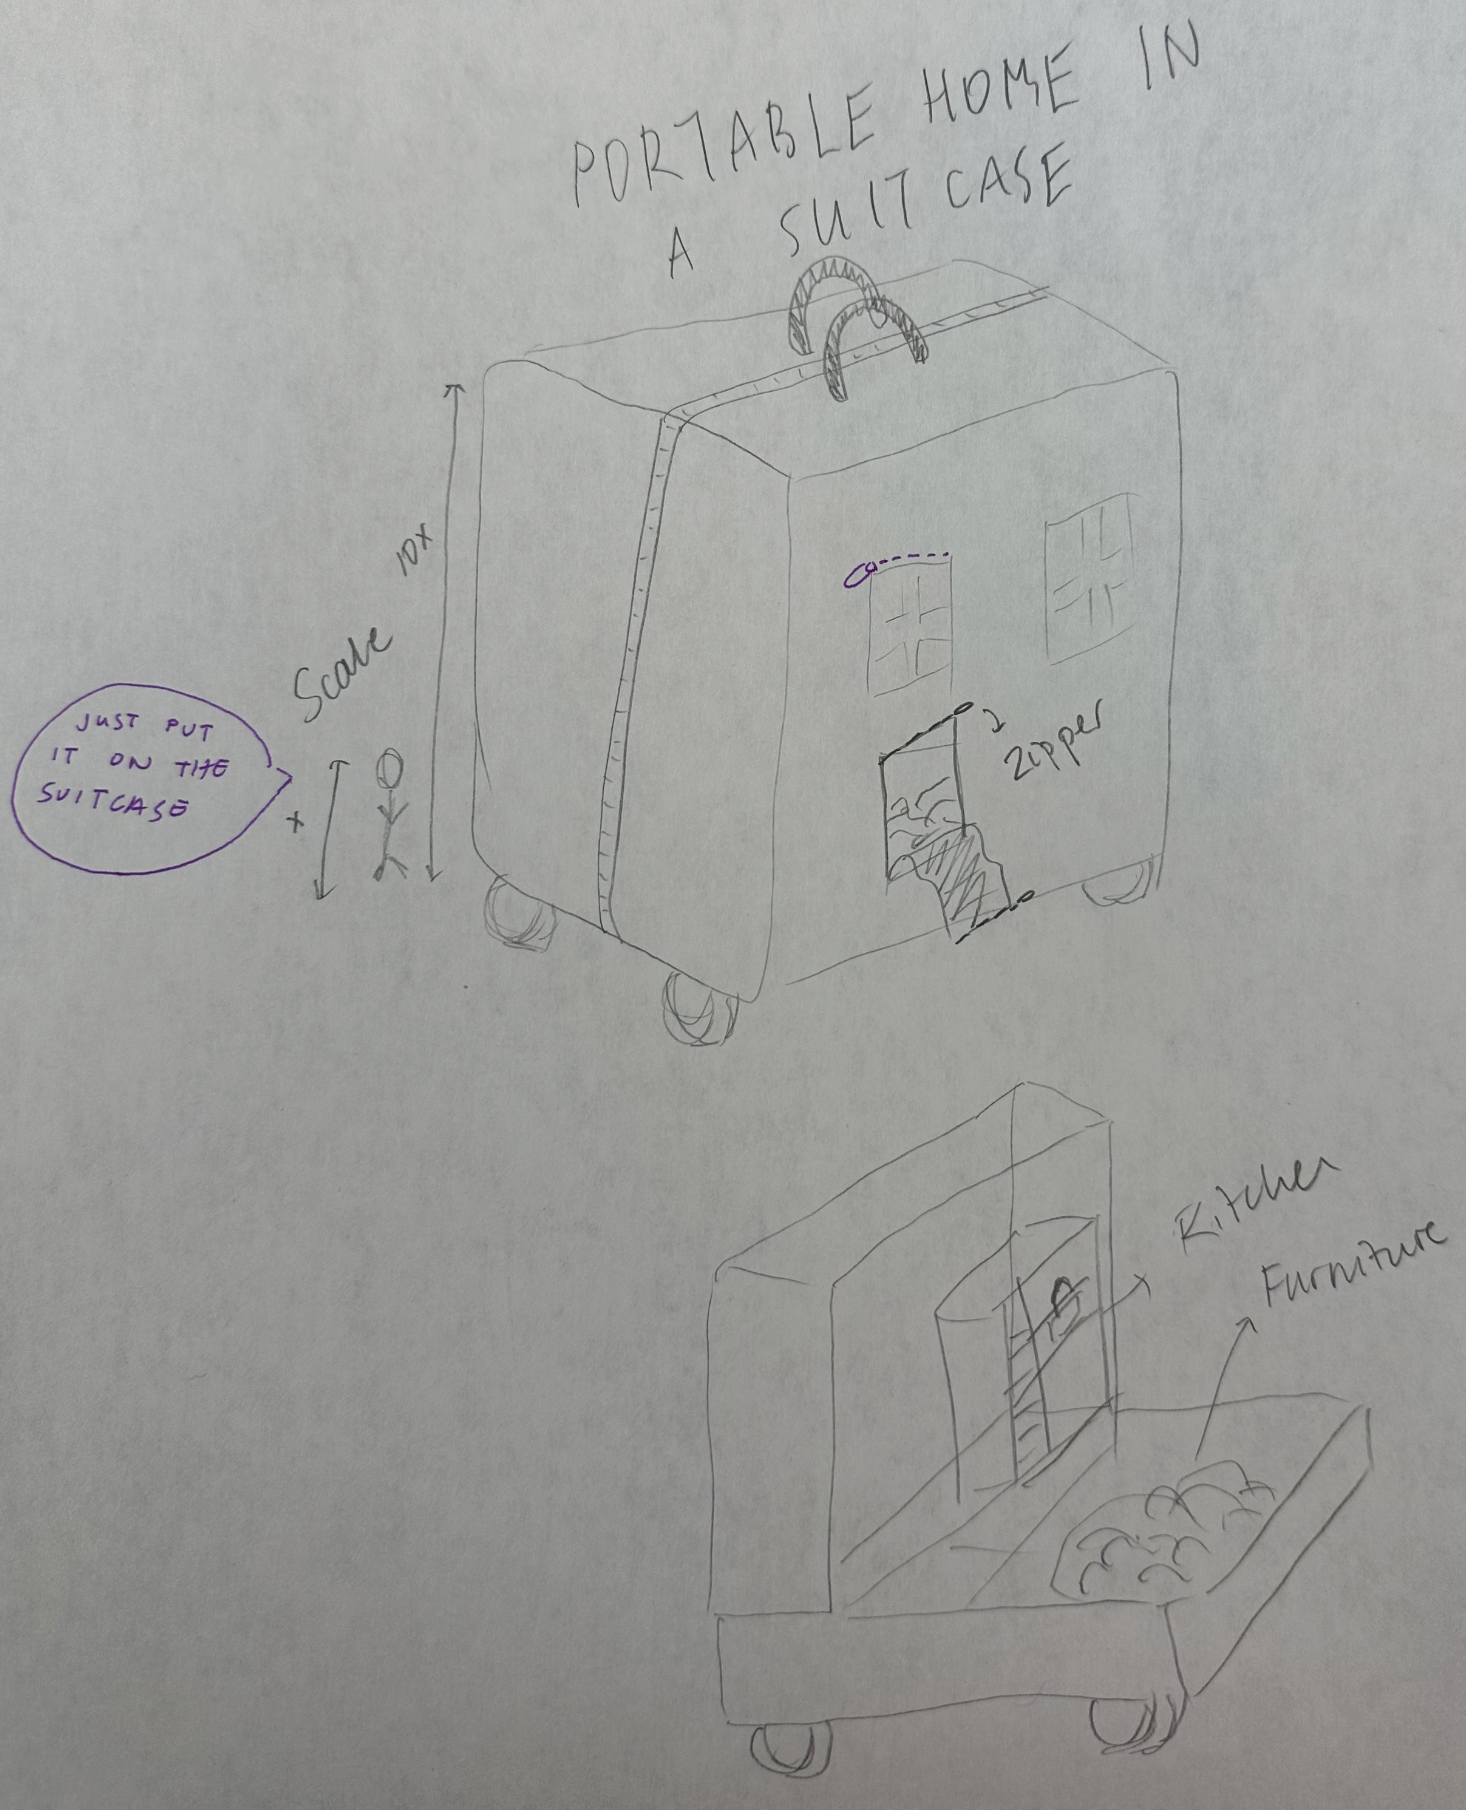
The second one is a portable home which comes in the form of a giant suitcase and the person can push. The pockets of the suitcase works as the windows.
The human table was inspired by the example where people were carrying flat-packed chairs on their backs. It’s hard to find tables outside when you’re eating smtg so this person turns into a table when they get into that awkward position (can be seen in the photo gallery)
The second one is a portable home which comes in the form of a giant suitcase and the person can push. The pockets of the suitcase works as the windows.
Remote controlled Chindogu
Something to keep in mind: Your object can get as smaller as your biggest component.
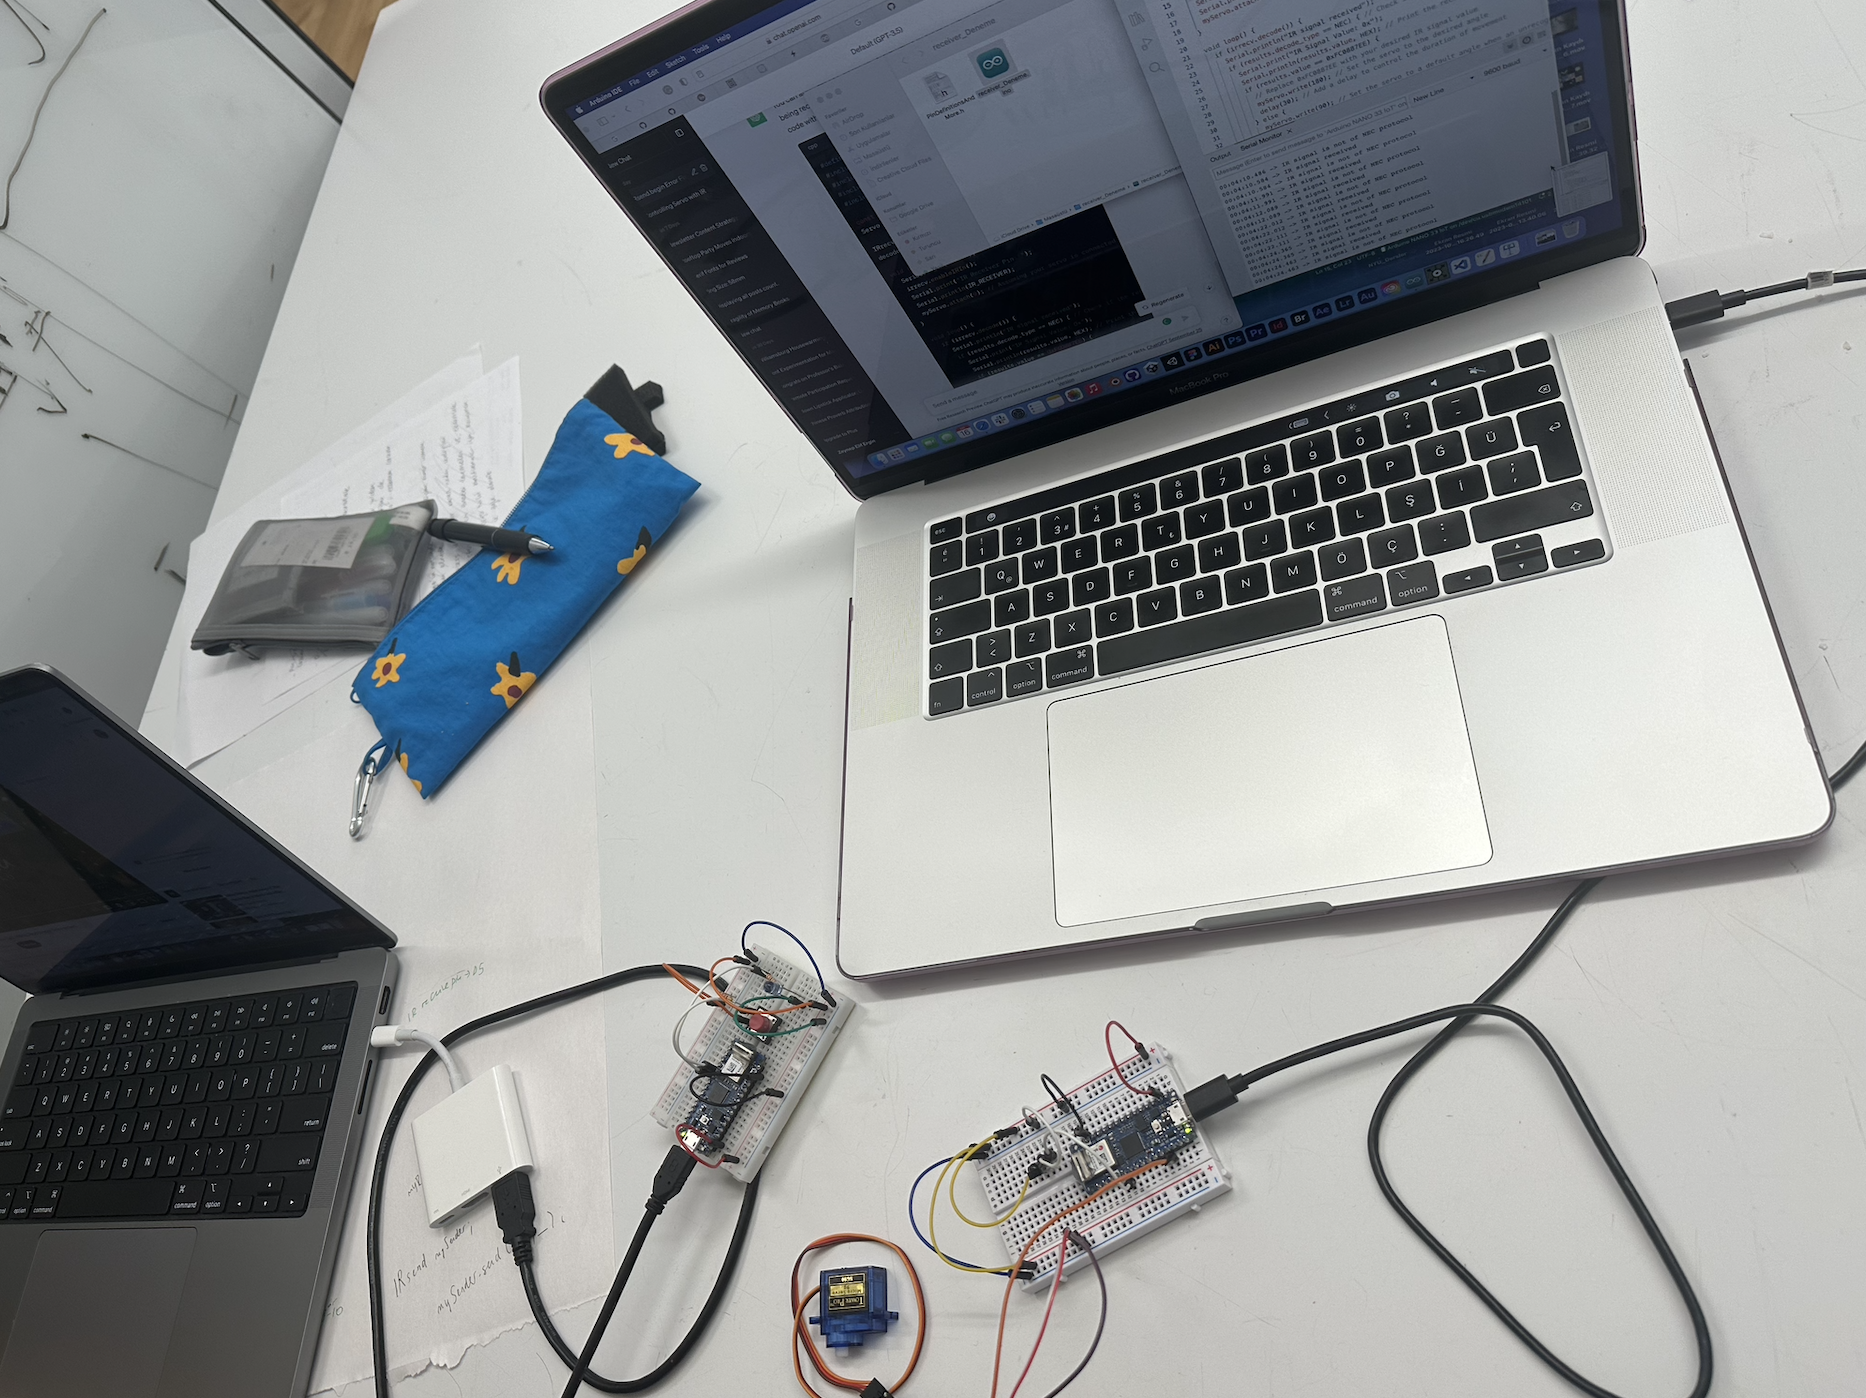
IR sender and receiver sounds like a reliable way to build the remote control. So, I decided to move forward with those. I started off with looking into their pin diagrams and tried to build my circuit.The IR-LED was being controlled by a single button. This is a simple fan and most hand-held fans that I’ve seen had only one button since you can only turn on/off. The IR receiver on the other hand would be controlling the DC motor. I had a servo so I started by testing my code with a micro servo. (Then realized that the servo was broken // somehow the gears shifted and was not turning properly)
I had to go back to my Pcomp Blog to remember how I was using buttons/resistors and connecting it to the Arduino. Overall, it went well. Then, I started with the sender and tried if I could get the “IR signal sent” message from the serial monitor. For some reason (might be update issues etc.) the code from our class website did not work and gave me tons of errors. Once I understood the logic, I did some debugging and it worked after almost 2 hours! Yay.
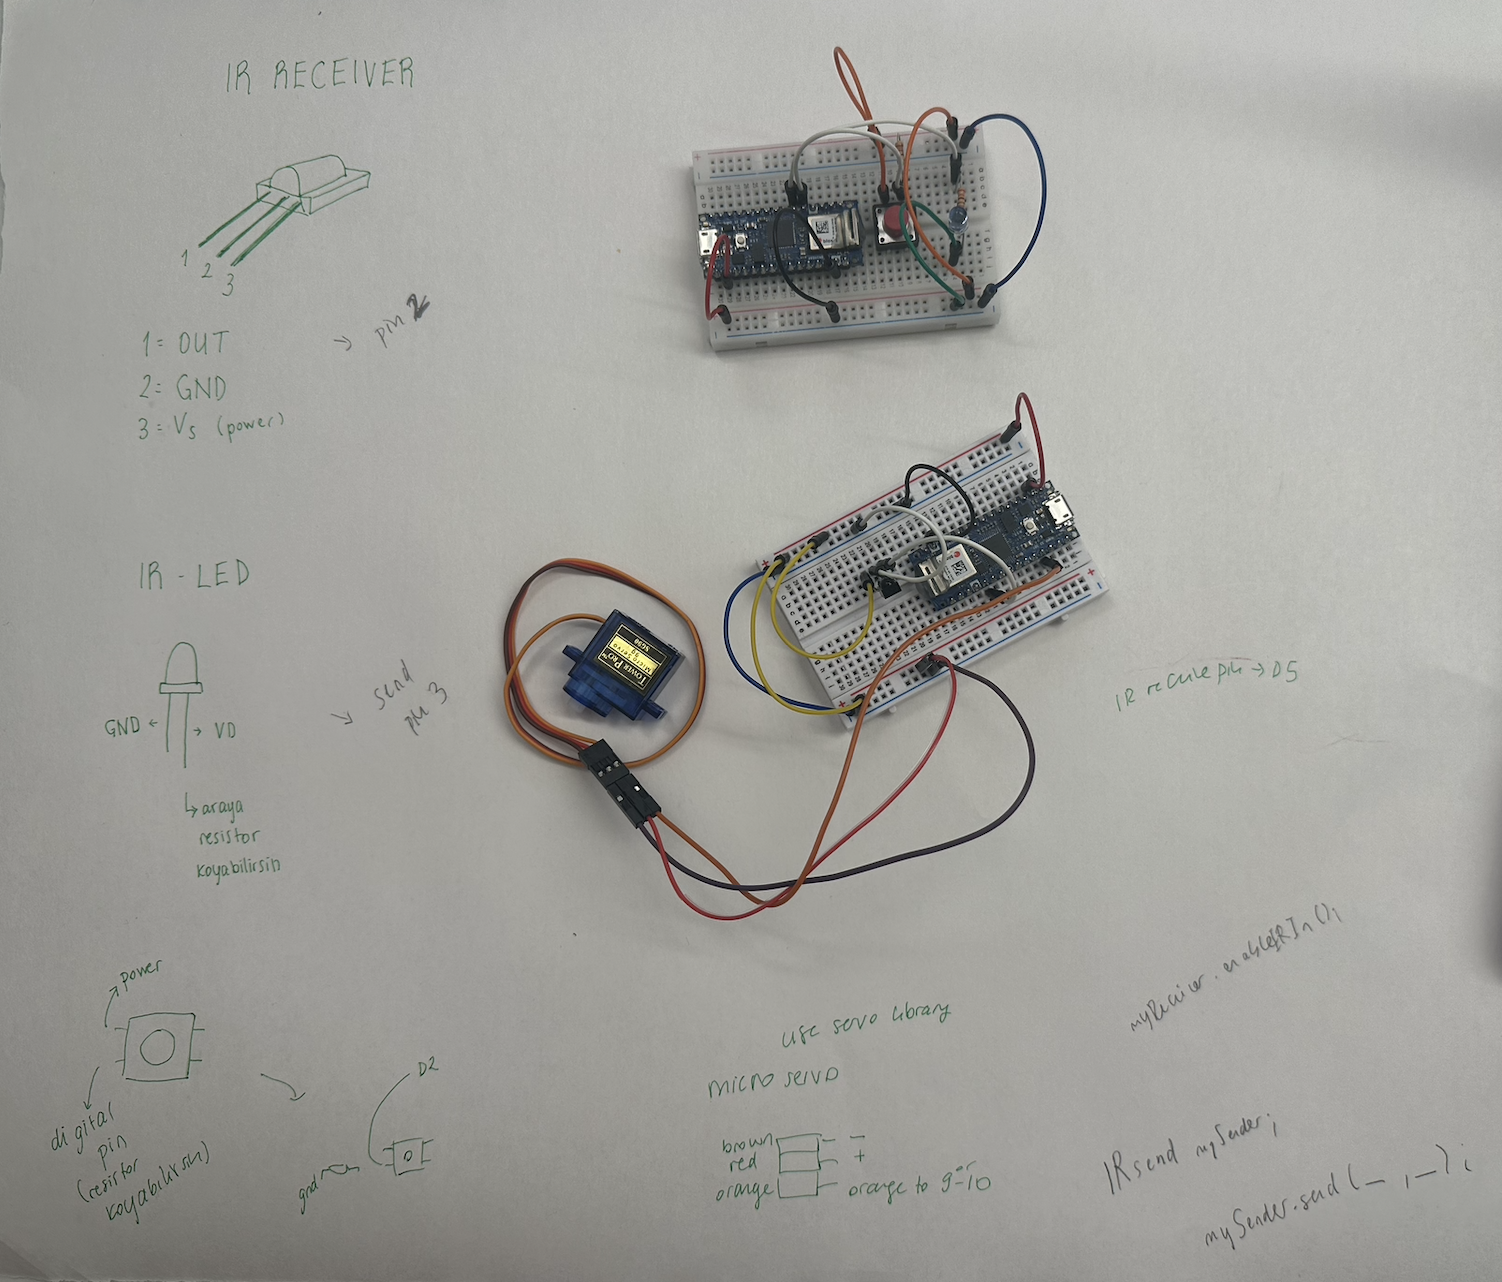
This for the sender and the button.
#include <Arduino.h>
#include <IRremote.h>
#include "PinDefinitionsAndMore.h"
#define IR_SEND_PIN 3
const int buttonPin = 2; // Define the button pin
IRsend irsend(IR_SEND_PIN); // Create an instance of the IRsend class
void setup() {
Serial.begin(115200);
pinMode(buttonPin, INPUT);}
void loop() {
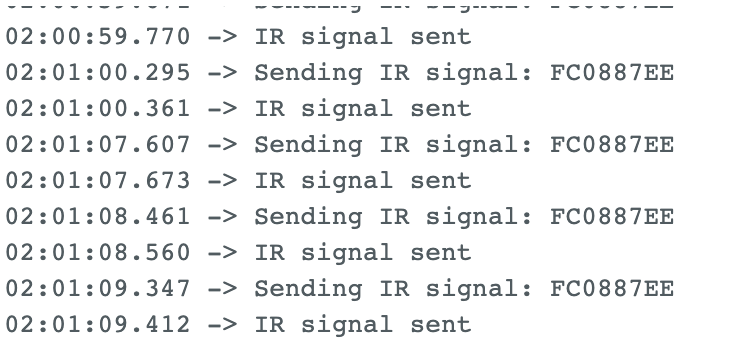
if (digitalRead(buttonPin) == HIGH) { unsigned long irCode = 0xFC0887EE; // Replace with your desired IR signal int bits = 32; // Replace with the number of bits in your IR signal
Serial.print("Sending IR signal: ");
Serial.println(irCode, HEX); // Print the signal number in hexadecimal
irsend.sendNEC(irCode, bits); // Send the specified raw IR signal Serial.println("IR signal sent"); delay(40); }}
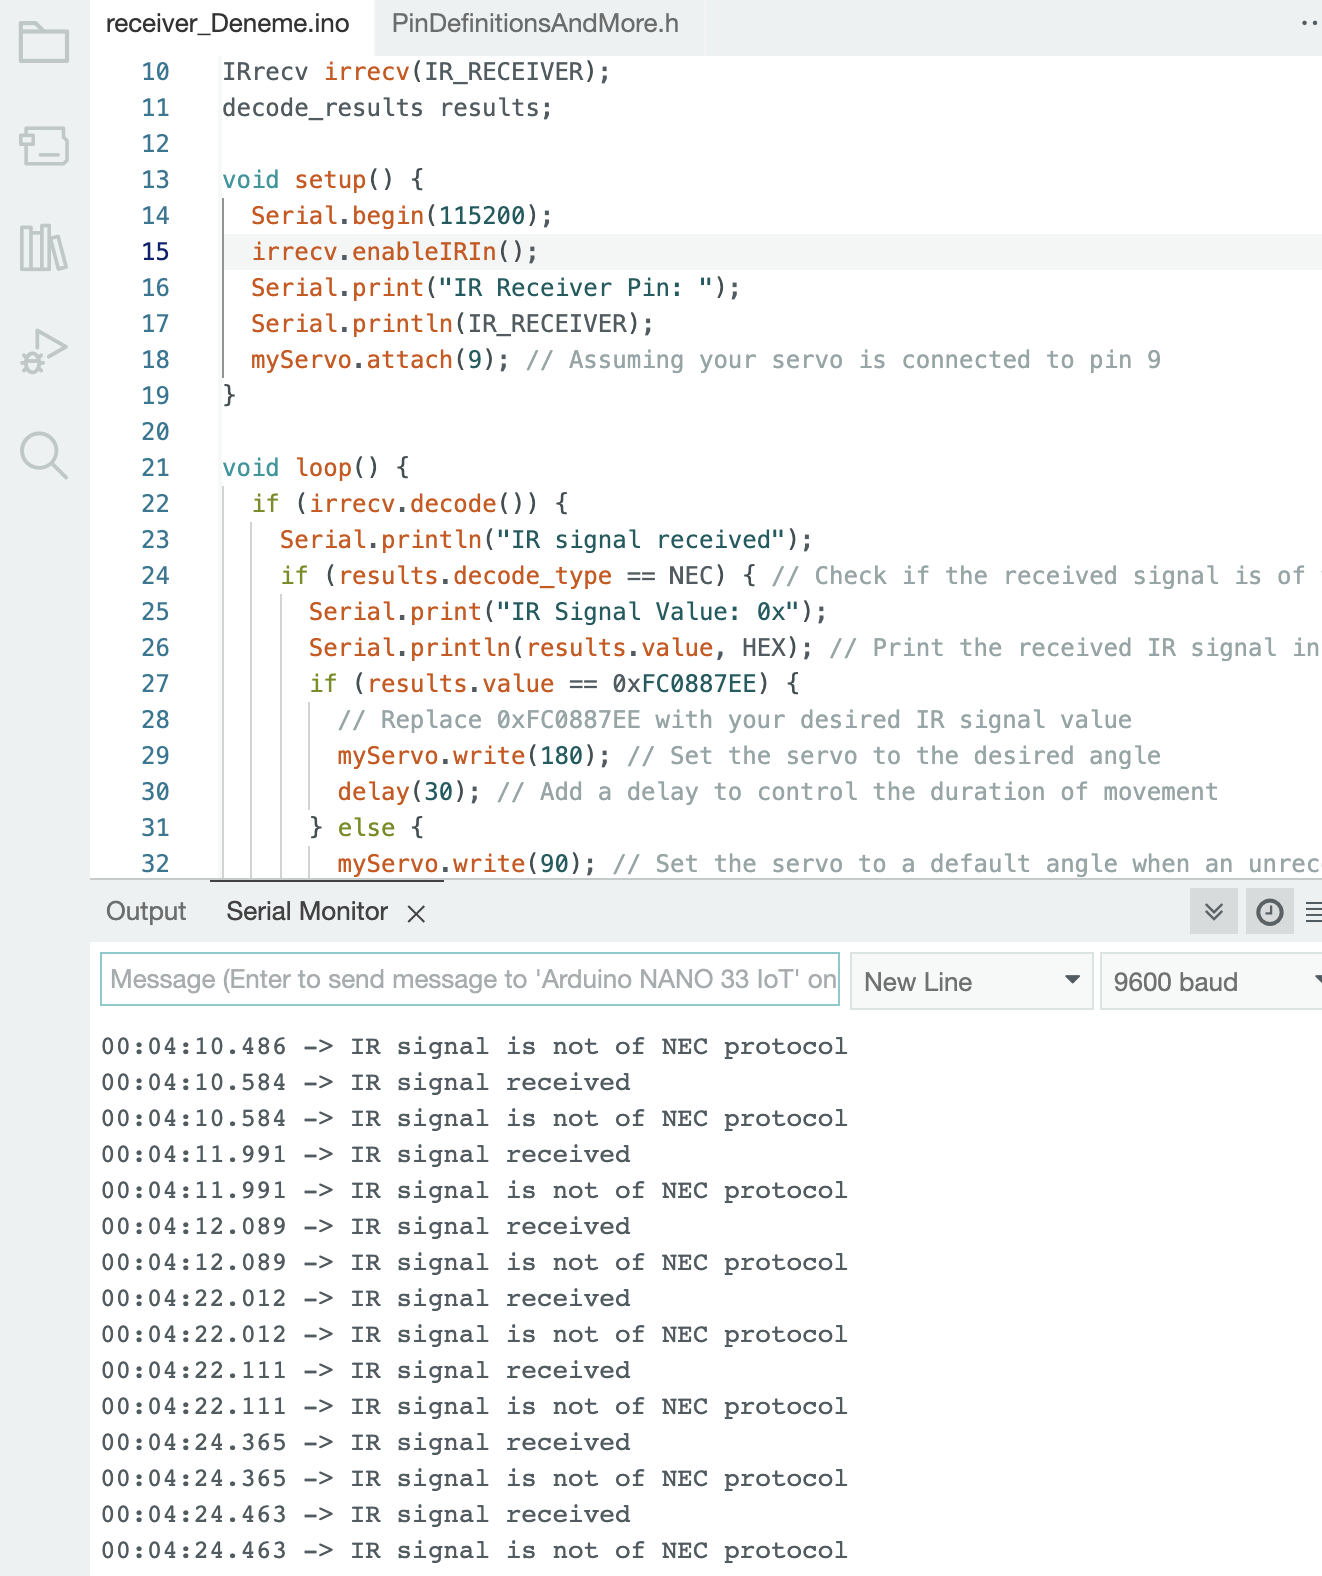
Then, I moved onto the receiver part which was more tricky since I had to use angles for my servo etc.
#define DECODE_NEC
#include <Arduino.h>
#include "PinDefinitionsAndMore.h"
#include <IRremote.h>
#include <Servo.h>
const int IR_RECEIVER = 2;
Servo myServo;
IRrecv irrecv(IR_RECEIVER);
decode_results results;
void setup() {
Serial.begin(115200);
irrecv.enableIRIn();
Serial.print("IR Receiver Pin: ");
Serial.println(IR_RECEIVER);
myServo.attach(9); // Assuming your servo is connected to pin 9}
void loop() {
if (irrecv.decode()) { Serial.println("IR signal received");
if (results.decode_type == NEC) { // Check if the received signal is of the NEC protocol Serial.print("IR Signal Value: 0x");
Serial.println(results.value, HEX); // Print the received IR signal in hexadecimal
if (results.value == 0xFC0887EE) { // Replace 0xFC0887EE with your desired IR signal value
myServo.write(180); // Set the servo to the desired angle
delay(30); // Add a delay to control the duration of movement
} else { myServo.write(90); // Set the servo to a default angle when an unrecognized signal is received
} } else { Serial.println("IR signal is not of NEC protocol"); // Optional: Print a message if the protocol is not NEC } irrecv.resume(); // Receive the next IR signal
}}
Since I was alone, I tried to plug both arduinos into my computer and tried if the signal was being sent. It didn’t work so I thought that there was a problem with the code. After realized that the code was working but the problem was the servo and plugging both into 1 computer. But finaly, I got the signal (thanks to Spencer for lending me his computer)!!
Well, the issue now is I won’t be using my computer so have to figure out what kind of a battery to use. Also, I was not sure how to write the logic for 1 click is on and the other click is off. I went to codinglab hours with Kai, and he helped me write that.
There was not a lot of documentation about the motor I have but this website helped me to understand what the pins are etc. Jess explained to me which pins to use because I thought that using only one the of M pins would work but it won’t. Will figure that out soon.
Also, bought Sryrene sheets from Blick. I enjoyed watching the vacuum former and want to test it out mysef!
--
TONS OF PROGRESS (Thanks to Pedro & Karina)
TIP from Karina: Serial monitor was giving me this everytime I pressed the button. So, I assumed that the signal was being sent. But since we can’t see the IR with our eyes, I was not 100% sure. Karina opened up her phone camera and started pressing the button. There was no color change in the IR LED. Then, we used a random remote control to check if everything was alright - and BOOM, a color change! Apparently, a single wire was not fully in. This was a clever way of finding out if the signal is being sent or not. And with Pedro’s tip, I can control the receiver with random remote controls.
I bought two different flip flops. Experimented with the regular blue one and realized that it needs to be elavated or platform to hide the wires and arduino. First, I tried hallowing the platform flip flop but it was really hard and it was messy. Then, Lita came up with the idea of wooden clogs.

Helpful Links
Week 5 - Design Foundation
Assignment for week 7 - Remote controlled Chindogu w/Lita
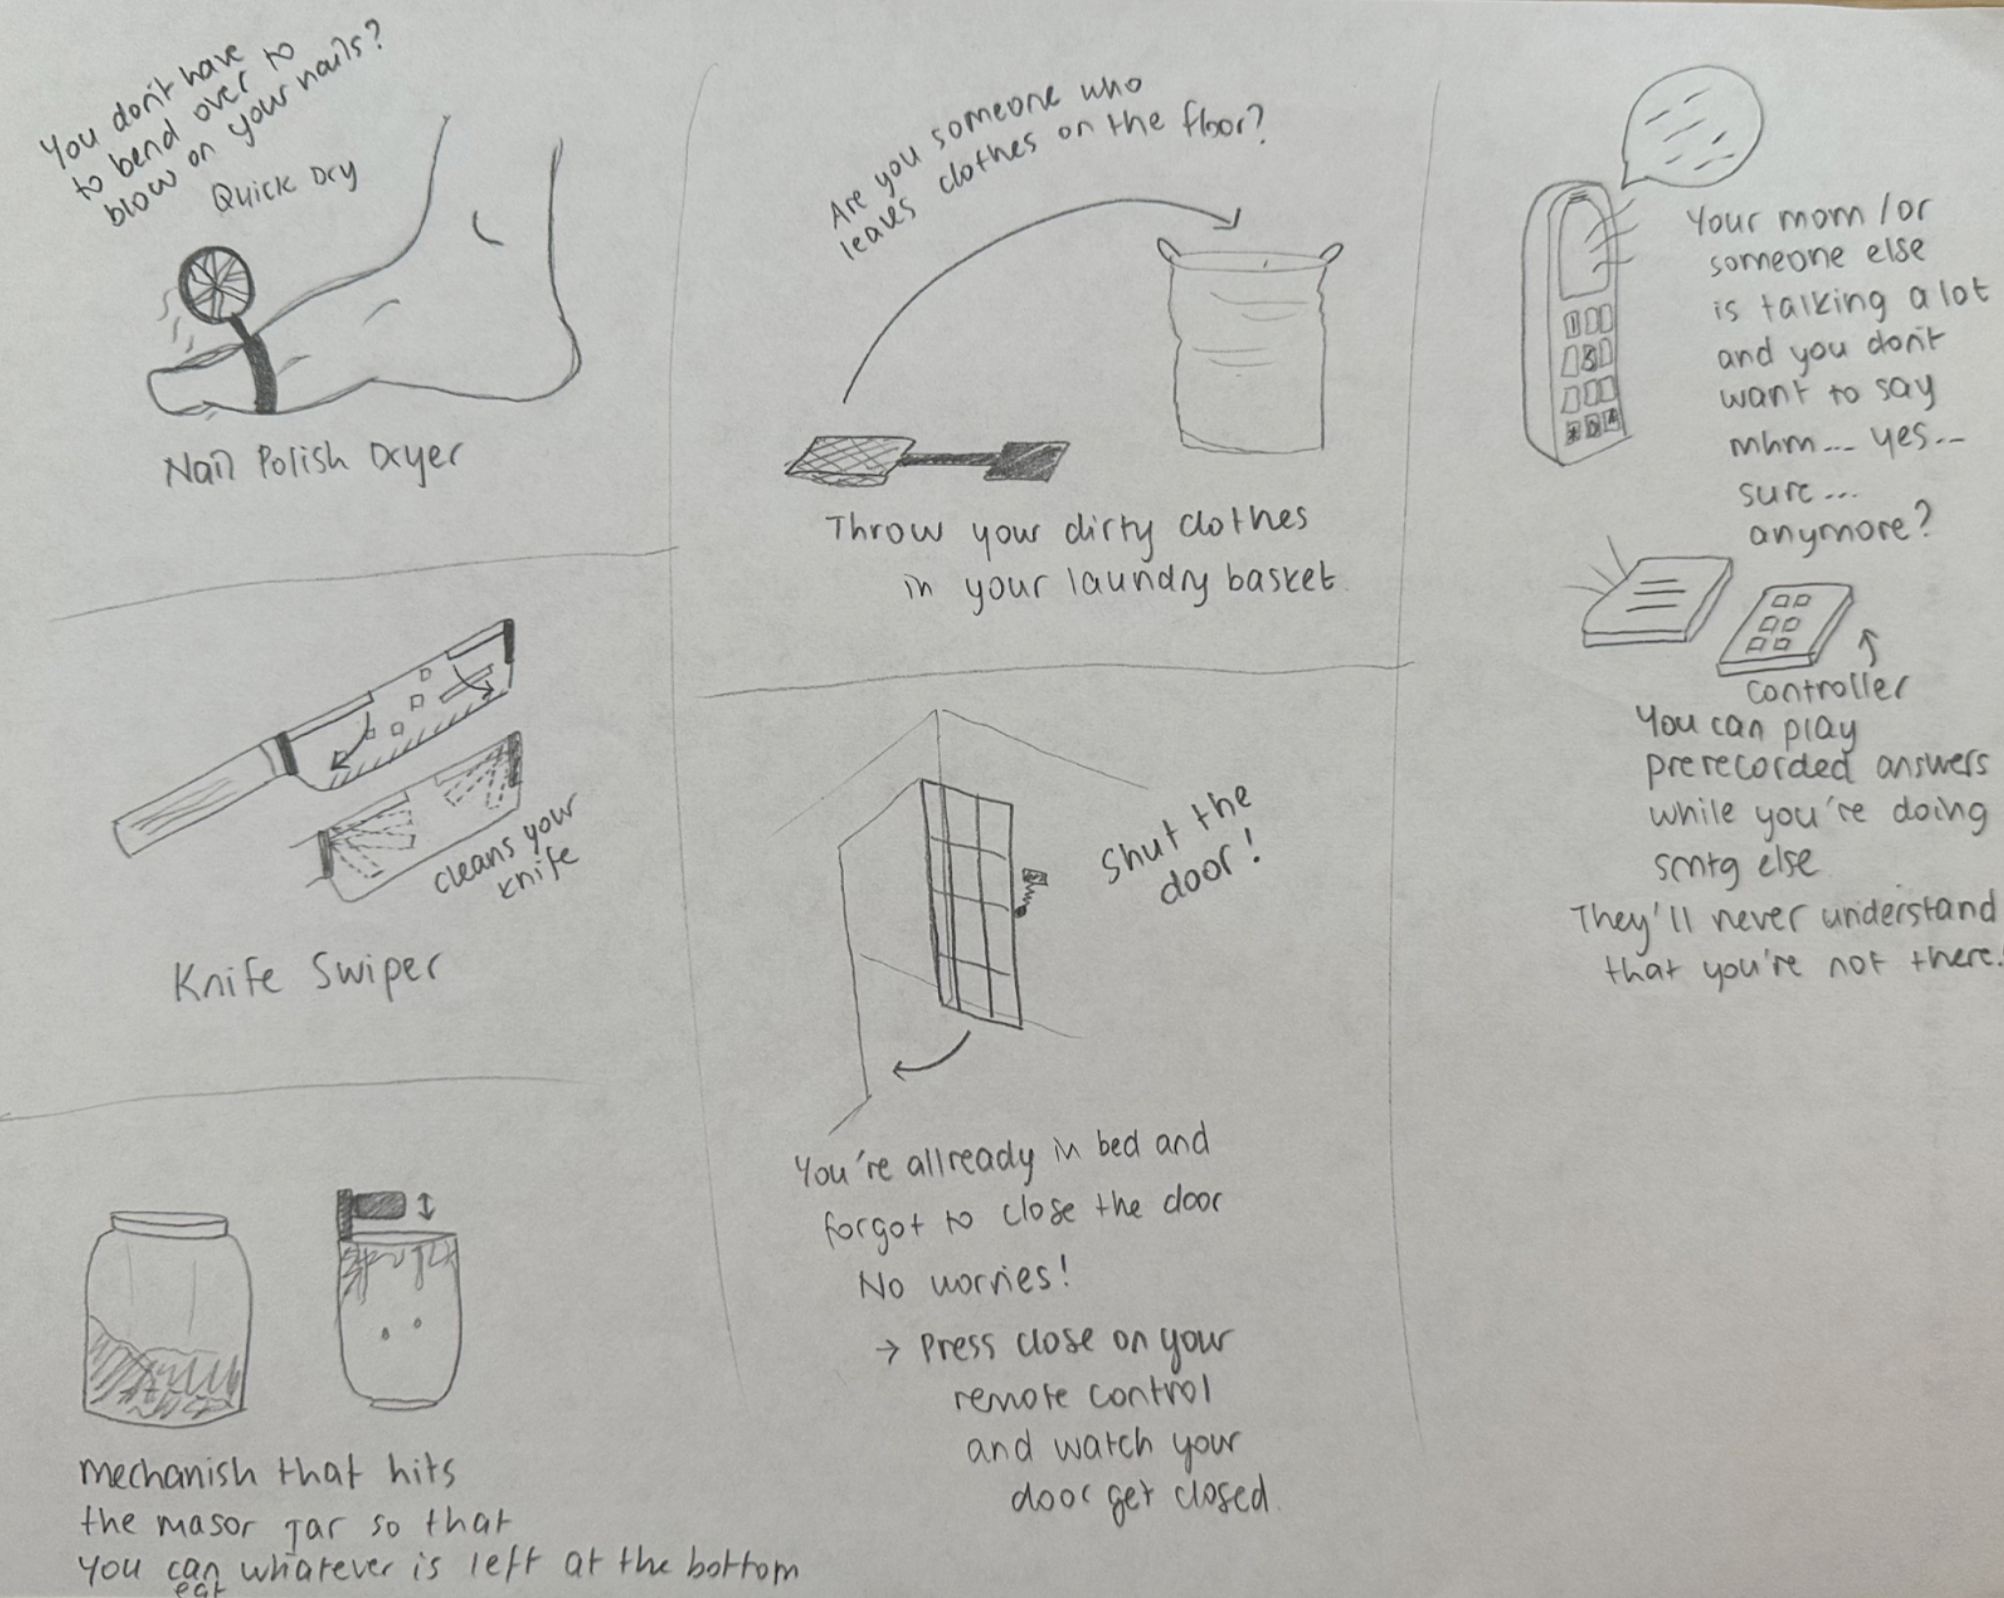
Chindogu’s are tools for everyday life, so during my time at home, I focused on my daily problems and ideated on possible “solutions” keeping in mind that they need to be remote-controlled.
- Magic 8ball // teletubby that tells your future (ideating with Lita)
- Remote controlled fan to dry your toe nail polish
- A swiper for your knife. that cleans whatever is left on it.
- Mechanism that hits the bottom of your jar. so that you don’t have to shake it.
- catapult for your dirty clothes.
- mechanism that shuts your door when you’re already in bed.
- pre-recorded sounds/answers so that you don’t have to listen someone talk for hours.
We want it to be like a clip-on or a charm/gibit. It could be a fashion statement and once you start feeling hot you can turn it on // or you just put nail polish and you want it to dry faster -- could be used both ways.
--
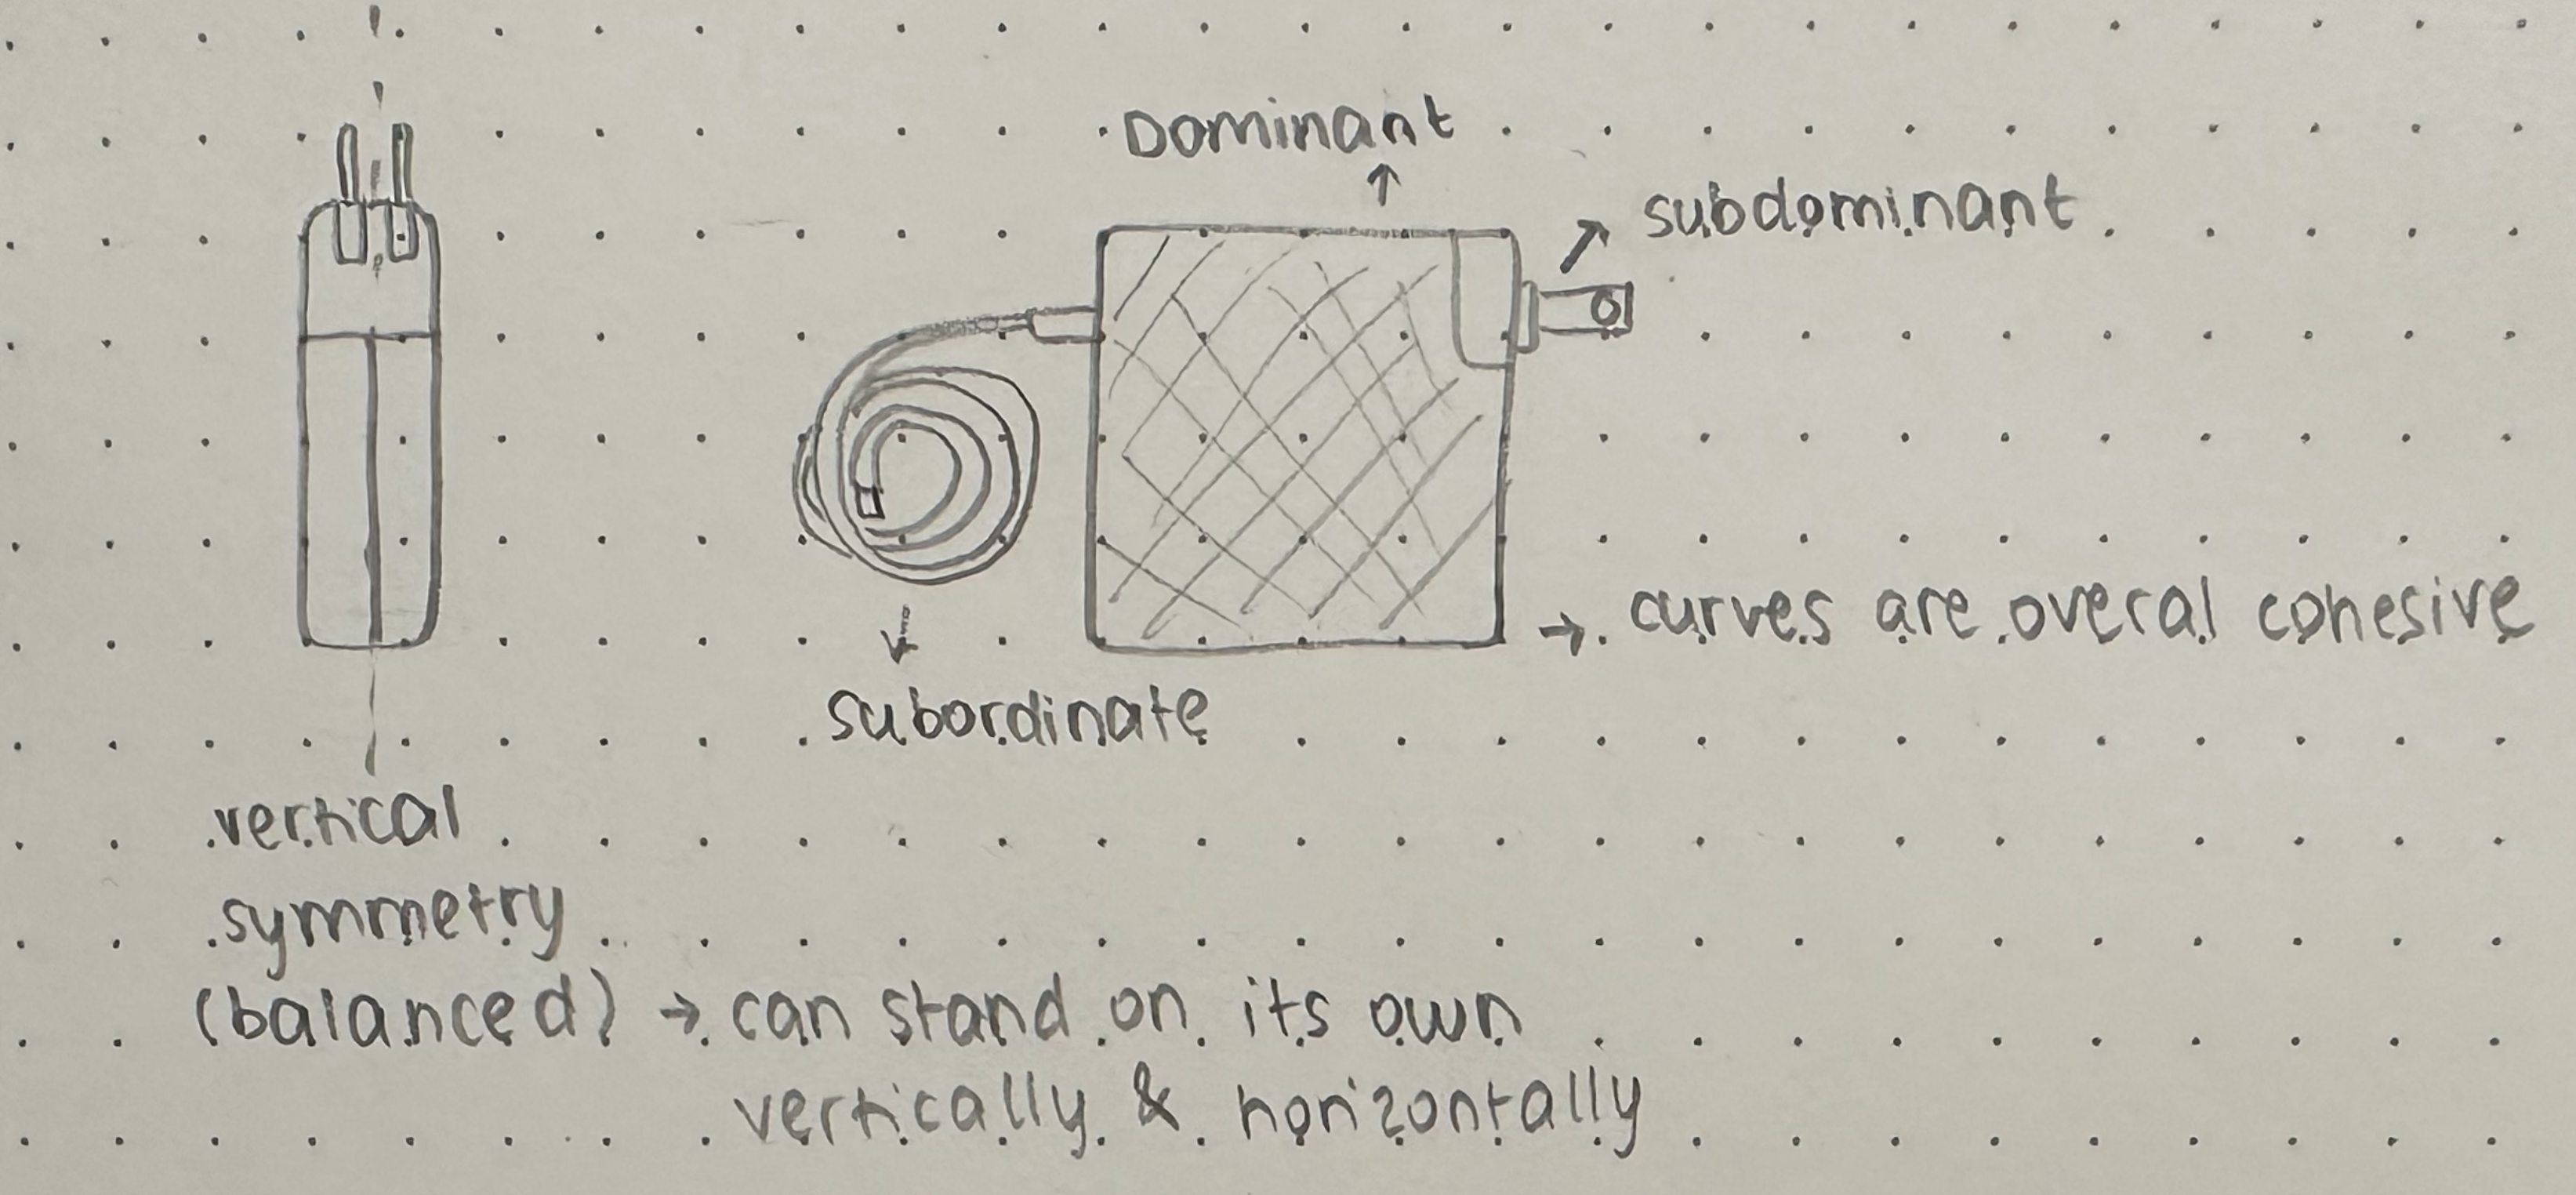
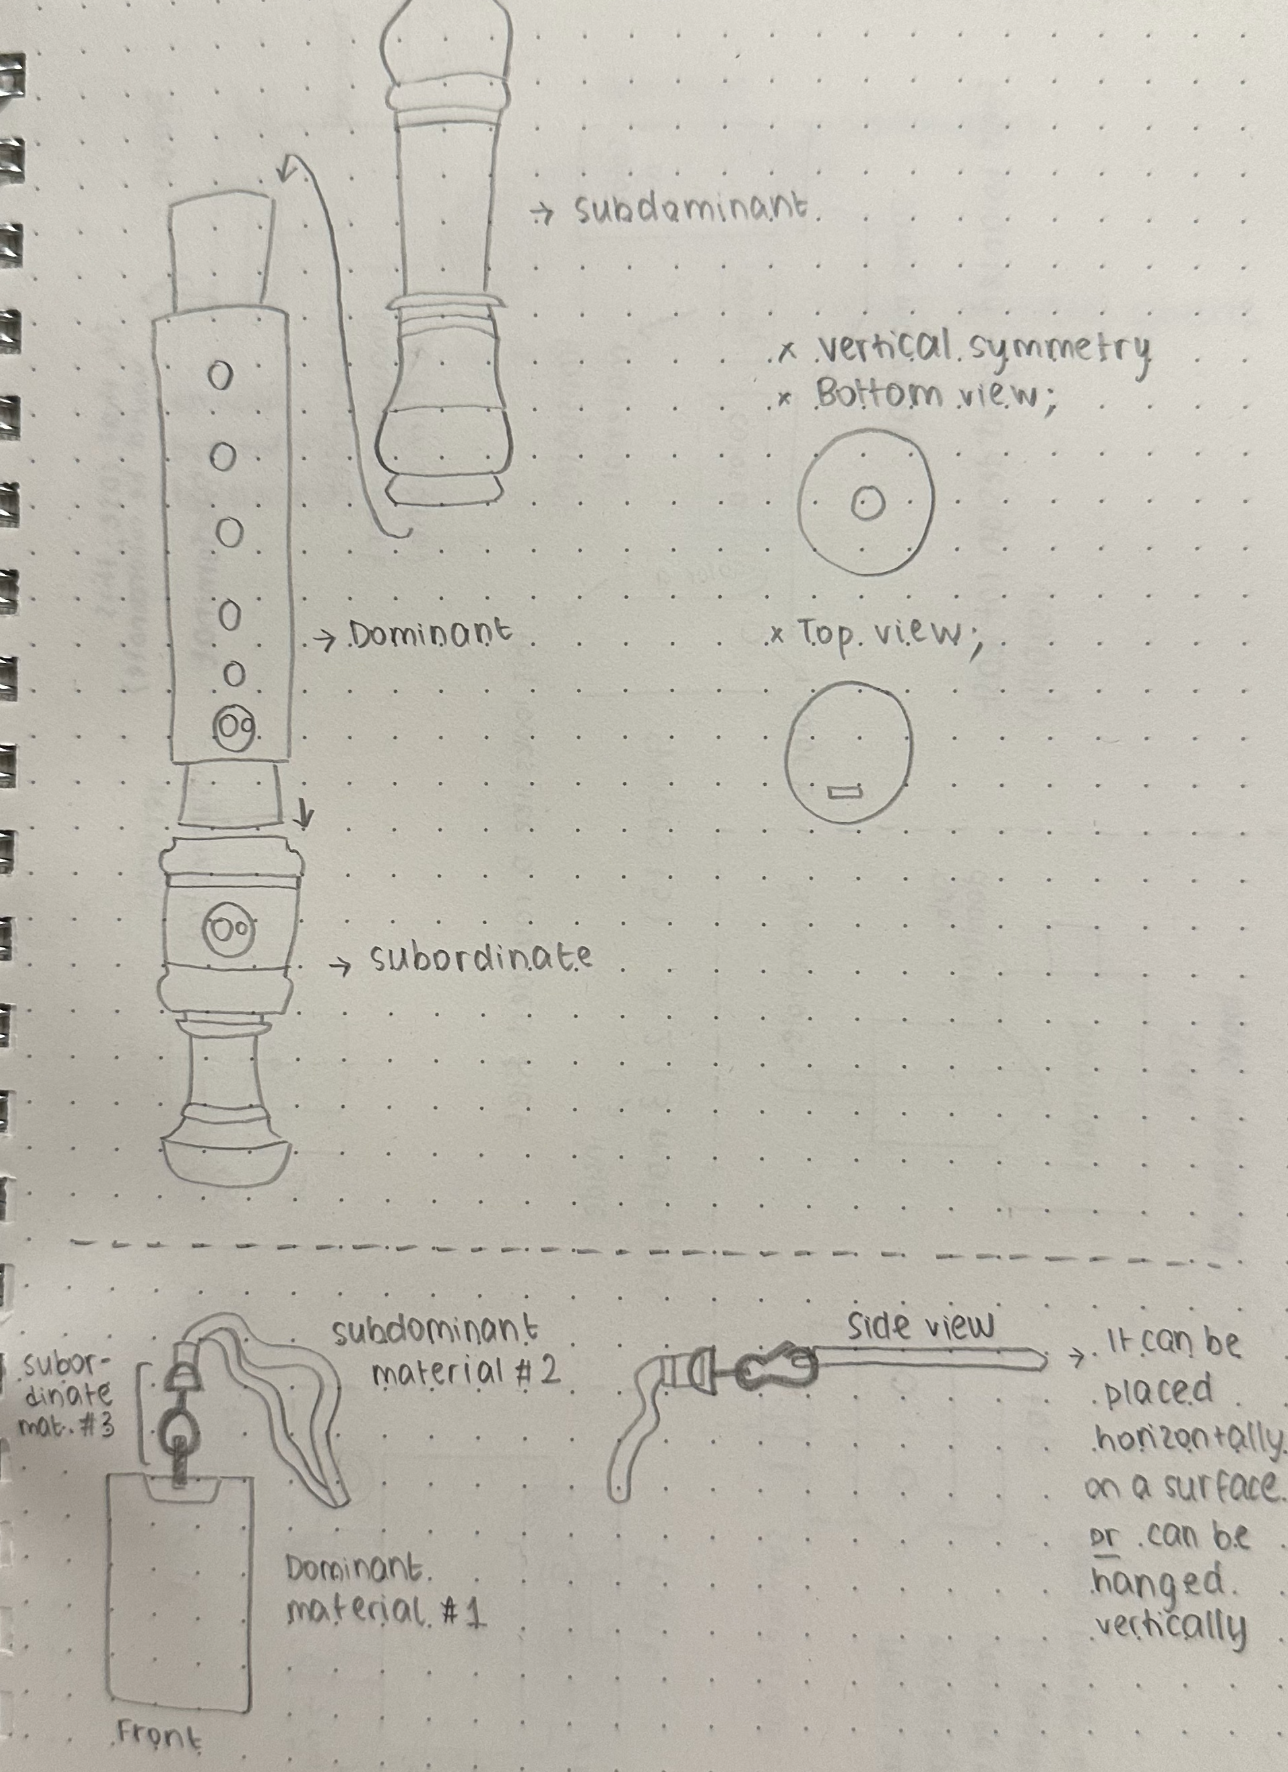
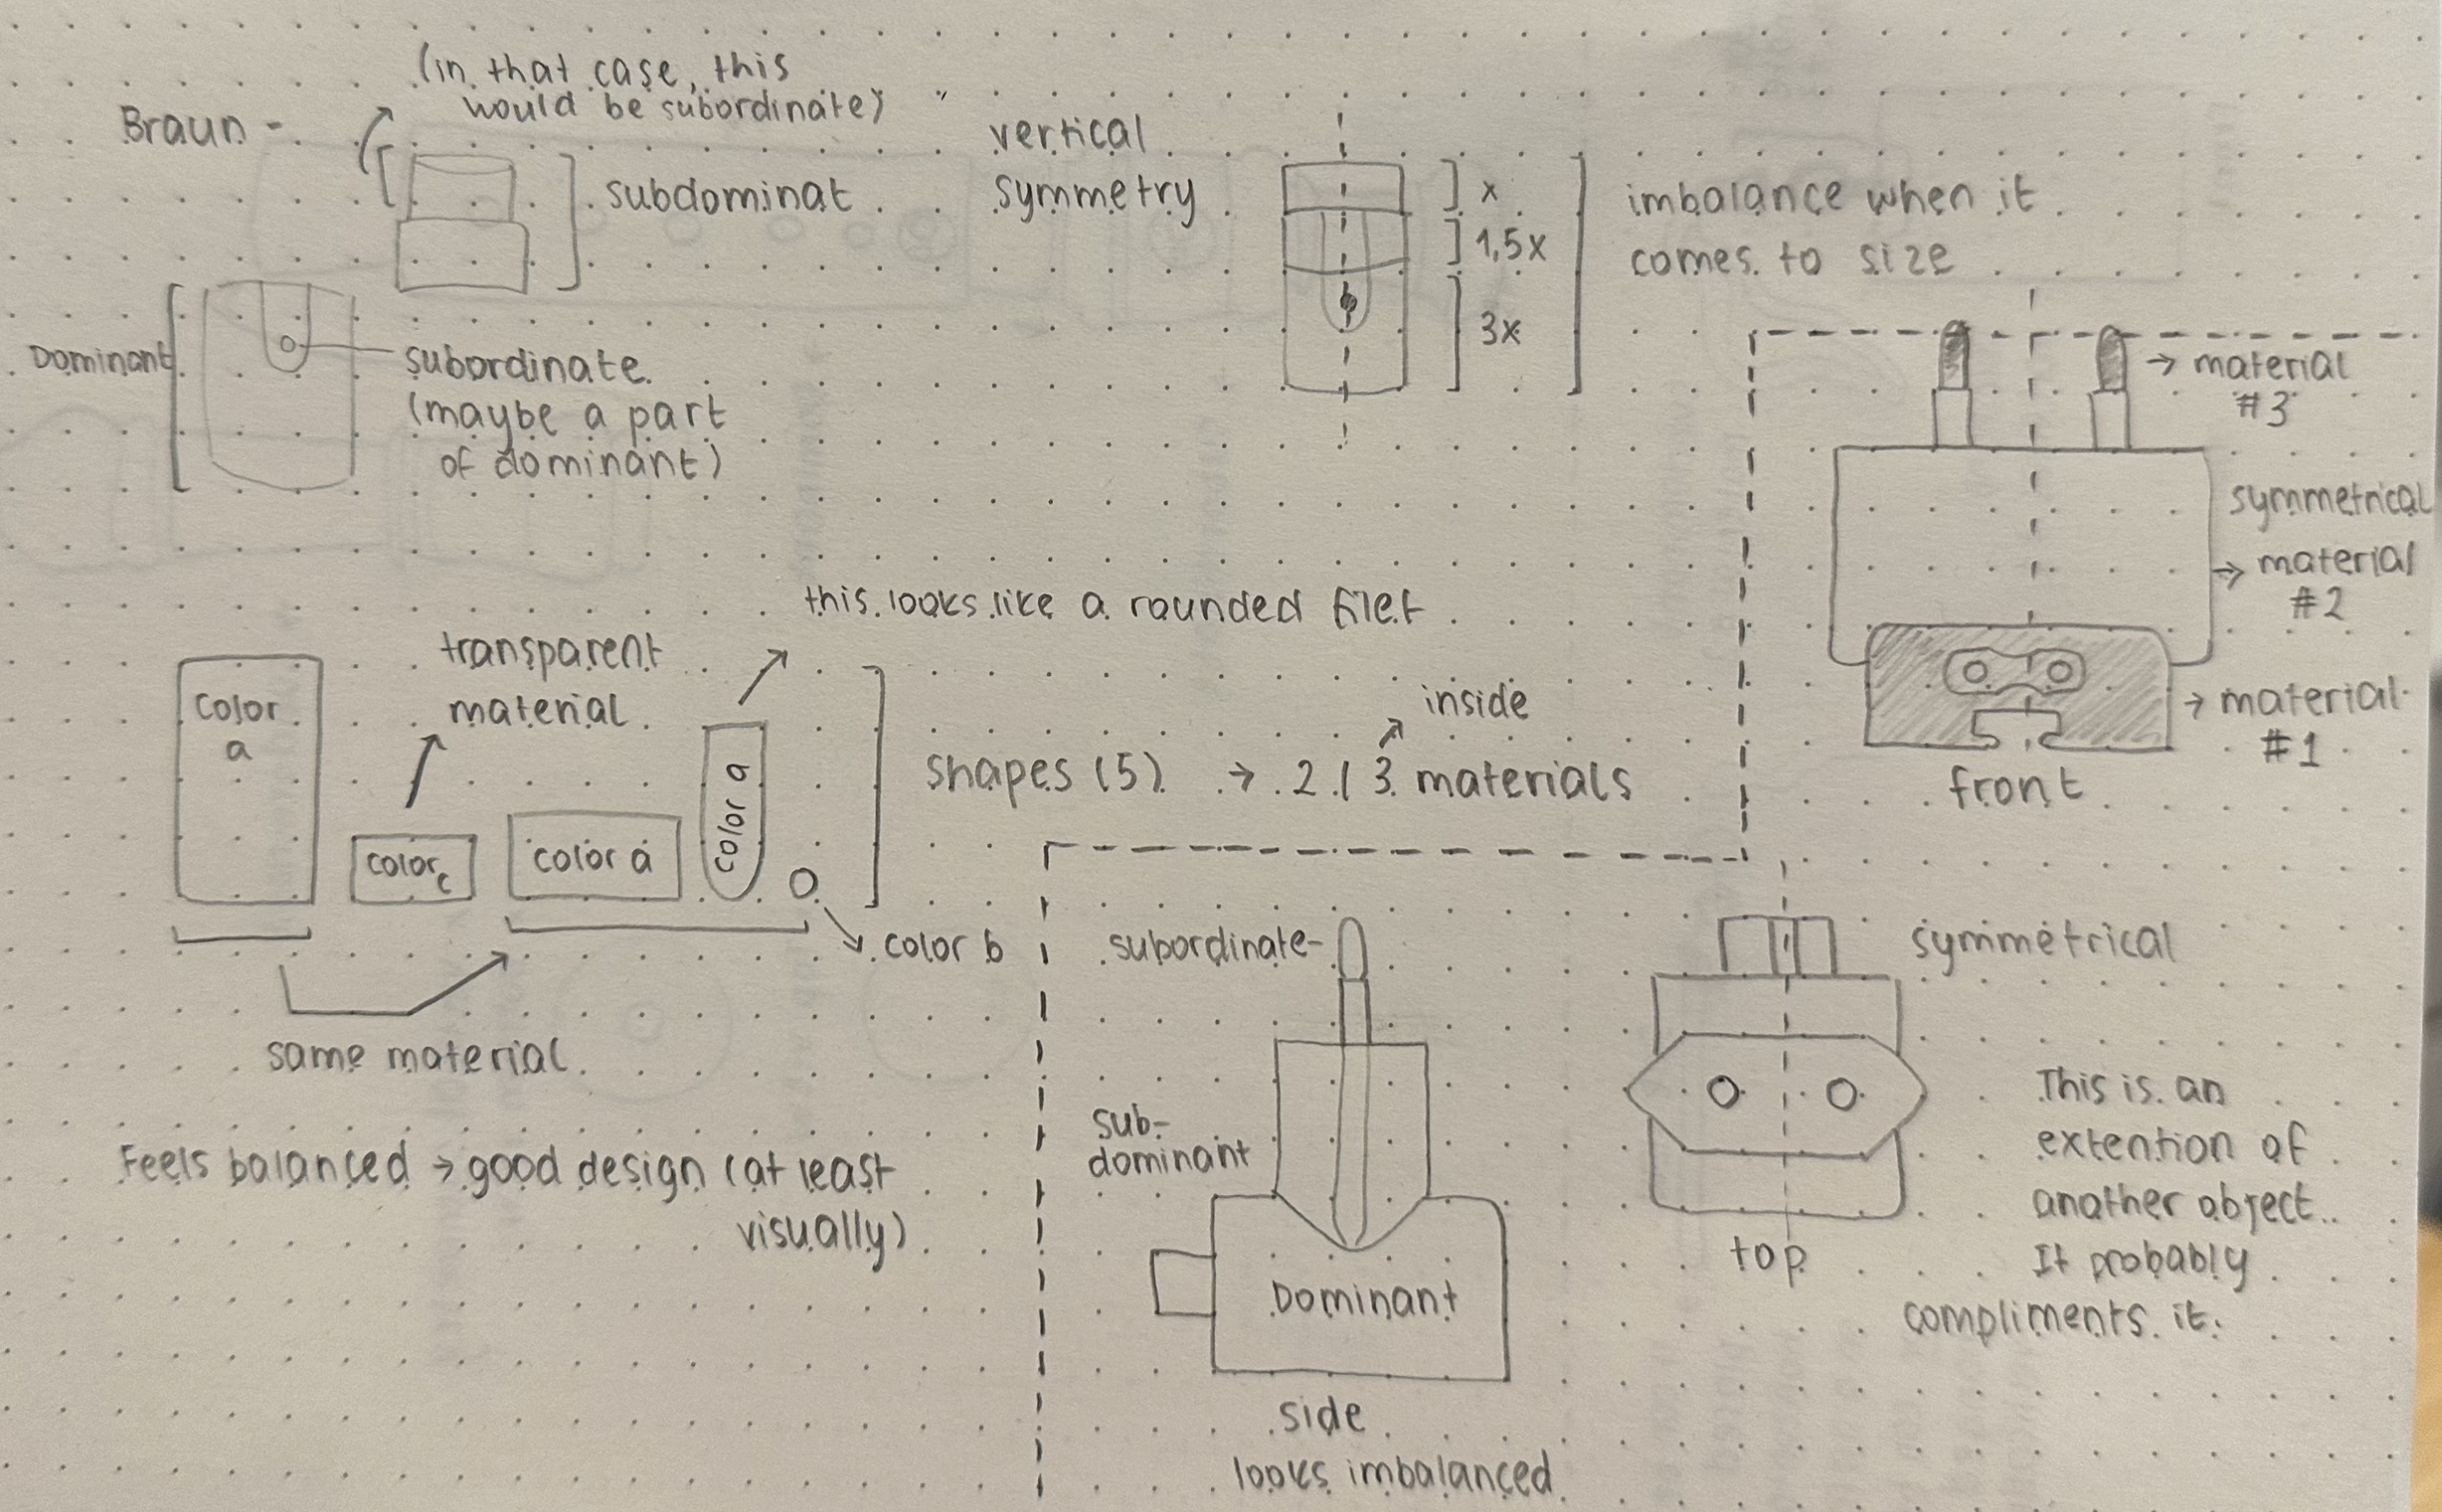
In-class activity: Establish relationships between the volumes by choosing dominant, subdominant, and subordinate forms.
![]()
![]()
![]()
--
Good Design (According to Dieter Rams)
- Good design is innovative
-
Good design makes a product useful
-
Good design is aesthetic
-
Good design makes a product understandable
-
Good design is unobtrusive (neutral and restrained - room for the user’s self-expression.)
-
Good design is honest
-
Good design is long-lasting
-
Good design is thorough down to the last detail
-
Good design is environmentally-friendly
- Good design is as little design as possible
Week 4 - Intro to Form & Pin-up
Notes // Office hour with Pedro
I couldn’t make sense of this diagram at first. Apparently, the interaction part means more absurd and according to others, our project seemed absurd which is also focusing on function. Interestingly there was one person who thought it focused on form and thinking. There is no right or wrong in that. It’s up to us where we want to be on the scope!

Our project had different curvatures (sharp and curved edges) which didn’t work well together. It was not cohesive in general and the use of different materials and colors made it difficult to see the object as one. Yes, we have two filaments for the 3D printer but we might have spray painted the pieces etc, there are ways. Now, it looked raw! I’m glad the mechanism worked (partially I guess?) but for the next assignment I’ll focus more on the form and the look. Having similar shapes and using the same angles for curves will make something look more unified and cohesive.
For the next assignment, we have to make a Chindogu with a remote control, so it’s crucial that once you see the remote you guess which object it’s controlling. Form and repetition comes in handy.
Tip #1: When creating a form, think about how you can repeat elements in the form. Similar lines, shapes and form will create harmony. -> Principle of repetition!
When you use multiple shapes it won’t look cohesize. You have to pay attention to rounded fillets and gaps. Then, she explains how you can improve any form with one simple design tweak.
I especially liked the chair example. The circular shape on the back and on the part where you sit is so subtle yet it looks harmonious. The cylindrical shapes on the sides and those circular shapes works well together. And going back to the class notes, they create a contrast with rectangular shapes.
Using contrast, one can create emphasis to features, drawing the viewer's attention to an element that is the focal point of the design. Contrast can also present an order or hierarchy that guides the usability of an object.
The remote control example is a good one to think about for the next assignment for sure. The design of it has different shapes and forms; angles, curves etc.
The Demise of “Form Follows Function” - Alice Rawsthorn
- ... the style of architecture should reflect its purpose, made sense at the time, and continued to do so for much of the last century, not just for buildings, but objects too.
- That is why the appearance of most digital products bears no relation to what they do.
There are no clues to suggest that it might play music.
- In ye olden days when form did follow function, you could guess roughly how to use an object from its appearance.
- U.I. design has become more sophisticated, increasingly relating to our physical behavior, rather than objects.
-That is why the first wave of U.I. designs sought to reassure us by using visual references to familiar objects to help us to operate digital ones.
- ... g-speak, which is now being developed by Los Angeles-based Oblong Industries as a means of operating computers through physical movements and gestures, rather than keyboards and mice.
- Others are skeptical that voice recognition and brain sensor technology will ever be reliable enough to replace physical controls. “They work ‘sometimes,’ but ‘sometimes’ isn’t enough for most people.
Nowadays, I rely on my experience and intuition to understand that that object is and how it’s being used. I feel back when I cannot figure it out. As Alice also mentioned, we need visual references (it could be the shape, the icons being used, the buttons etc) to operate products. Since I was born to this wave of technology, I’m better at connecting dots and find similarities. But this cause problems to my parents etc. They didn’t develop any intuition on how to use that product at all since they’re coming from a more “form follows fuction” standpoint where the appearence of things was a clue to what they were doing.
I agree with how “sometimes isn!t enough for most people” argument. I struggle a lot with voice recognition. It’s hard to find the exact technological terms when you try to tell something to Google-home etc. It’s easiler to follow a couple of steps in the setting on your phone and find whatever your problem is. Another problem is that, yes they don’t have clues to what they’re doing, but they also don’t offer tactica feedback! Take google-home for ex, to lower the sound you have to tap a part of the object and you’re not sure which side. So it becomes a try-and-error type of interaction. This absurdity of “let’s make things look cool / don’t have buttons” etc is clearly and issue and UI designers should look more deep into it.
Week 3 - Ideation
Class Notes
Scope - is about understanding the range. When you’re designing you have to choose which end of the spectrum you want to be. ( obvious/crazy, traditional/modern etc.) Or you can design something that is at the middle of both. You have to ask yourself where do you want to be on that line.
--
In-class Ideation Workshop - prototyping absurd futures
The two words that I got were: tactical and mobile.
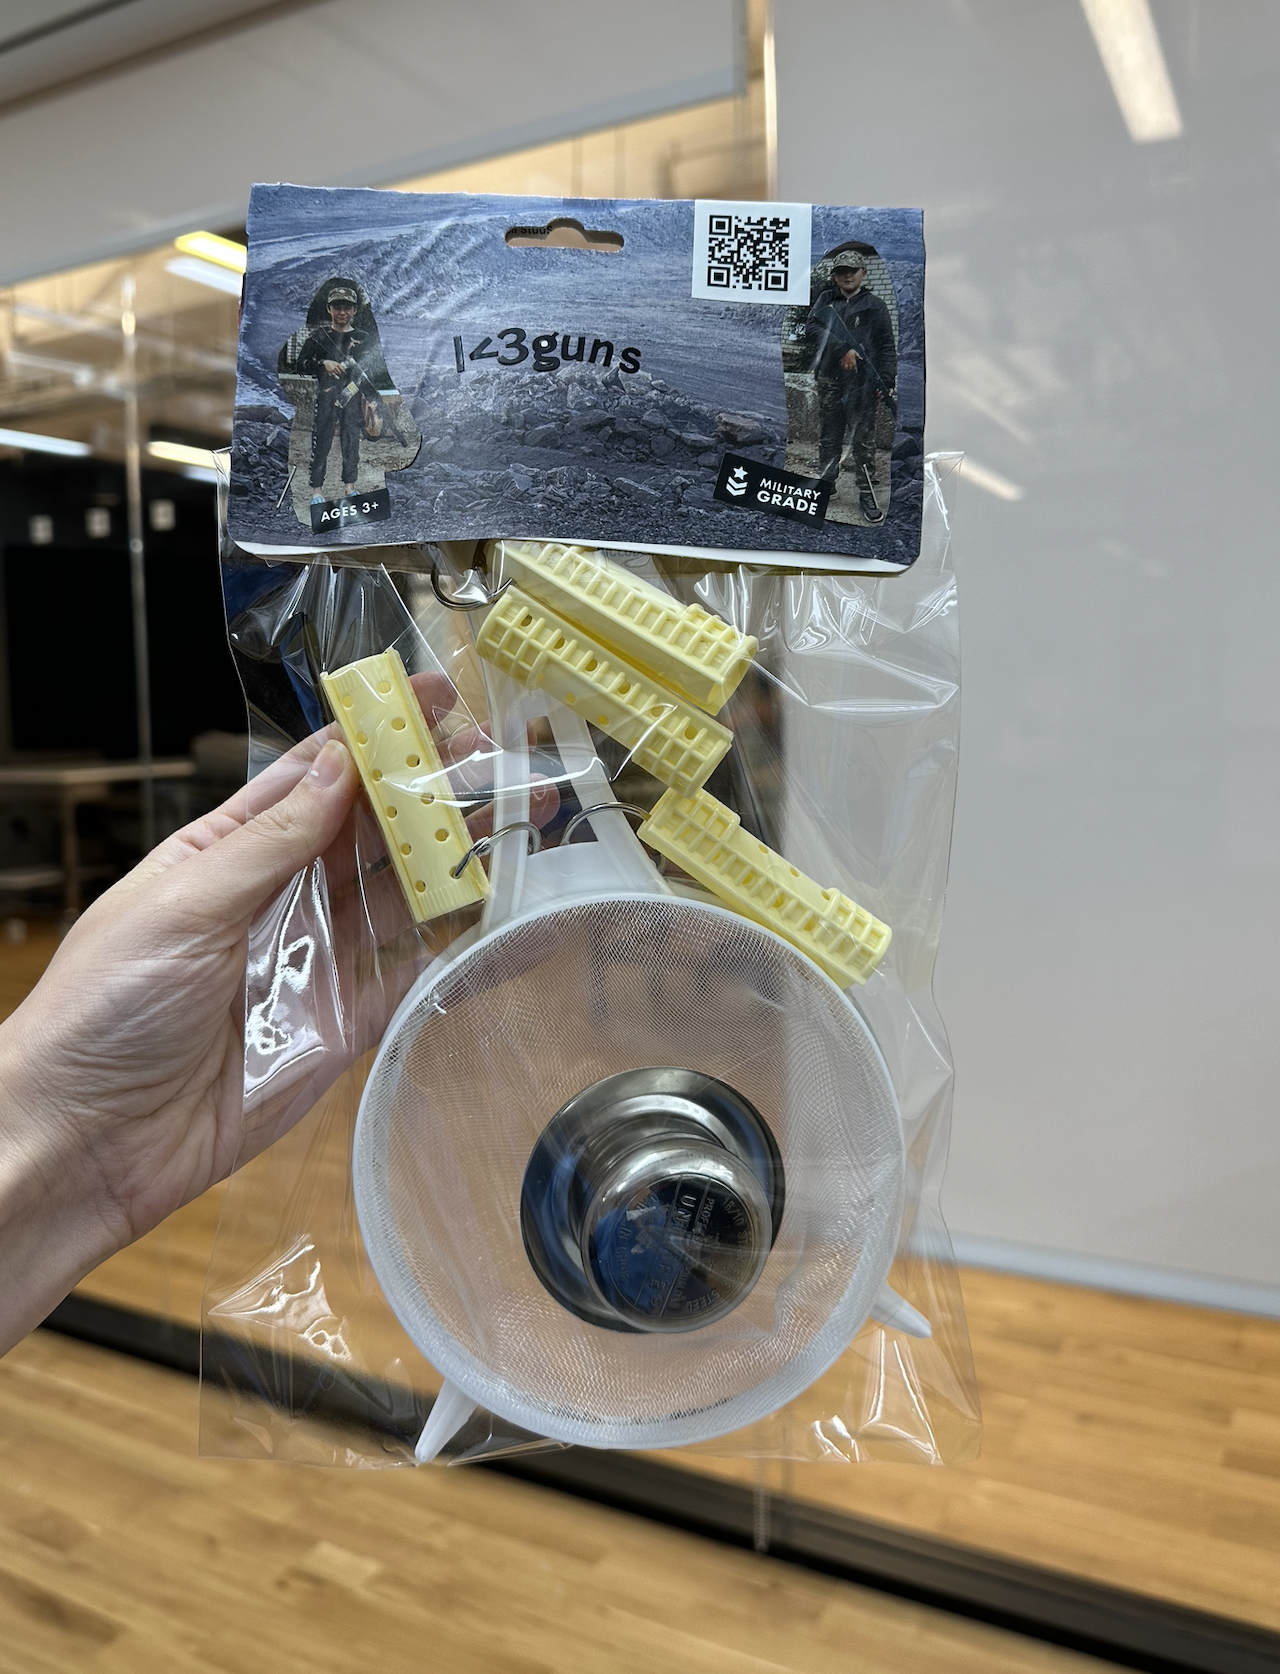
I first started with the word “tactical” because it was a new word for me. While experimenting I came up with somesort of a wearable for kids where guns became a common object in everyday life. The rollers can be used as storage for bullets and the knob works as a protection for the heart. The colander-ish thing can store other daily objects. I really enjoyed working on the packaging. The tools to curve the edges of the paper and open the hole on the top center was interesting, I liked it! I found military-ish looking photos.

The second prototype is an ai-powered coctail maker. It can be carried anywhere and can be used whenever. It needs water only. The bean shape thing is for flavors (there was only 1 of those left, so I only put 1). From the front screen thing you choose your preference and the ai comes up with the perfect coctail recipee. For the packaging, I used photos of beverages and coctails.

--
Clown on-the-go
Week 2 - Chindogu
99% Invisible - Mini Stories w/ Vivian Le
Chindogu (chin = “weird or strange”, dogu = “tools) (strange tool)
“Chindogu” is the art of designing nearly useless gadgets. It started in Japan, with a man named Kenji Kawakami. They are a specific type of invention that sets out to solve one particular problem but it actually ends up causing so much more of an inconvenience that it’s almost entirely useless.
ex: AC free battery powered battery charger; all it takes are 12 new batteries to fully charge that one battery of the same type!
Vivian adds that we, as humansi tend to marry utility and design. But they don’t have to be like this. In the spirit of Chindogu, the chindogu represents the freedom to challenge the suffocating historical dominance of conservative utility. And so, the spirit of nonconformity and anti-consumerism is something that’s rooted in its concept. So, they are suppose to be like a design without the restrictive threat of materalism.

The website also displayed videos and this invention was my favorite one. It’s so funny and absurd and looks extremely useless. But it serves a purpose that you probably don’t have to wear it everyday and that makes it a Chindogu. I wonder how it would feel to walk in such shoe.
--
Hackable/Transformable Objects
This what I found on my treasure hunt! Most of the objects are made out of a mix of different materials, which struck me the most. I like that some of them are extendable or can elongate.
--
Updates on Clown-on-the-go
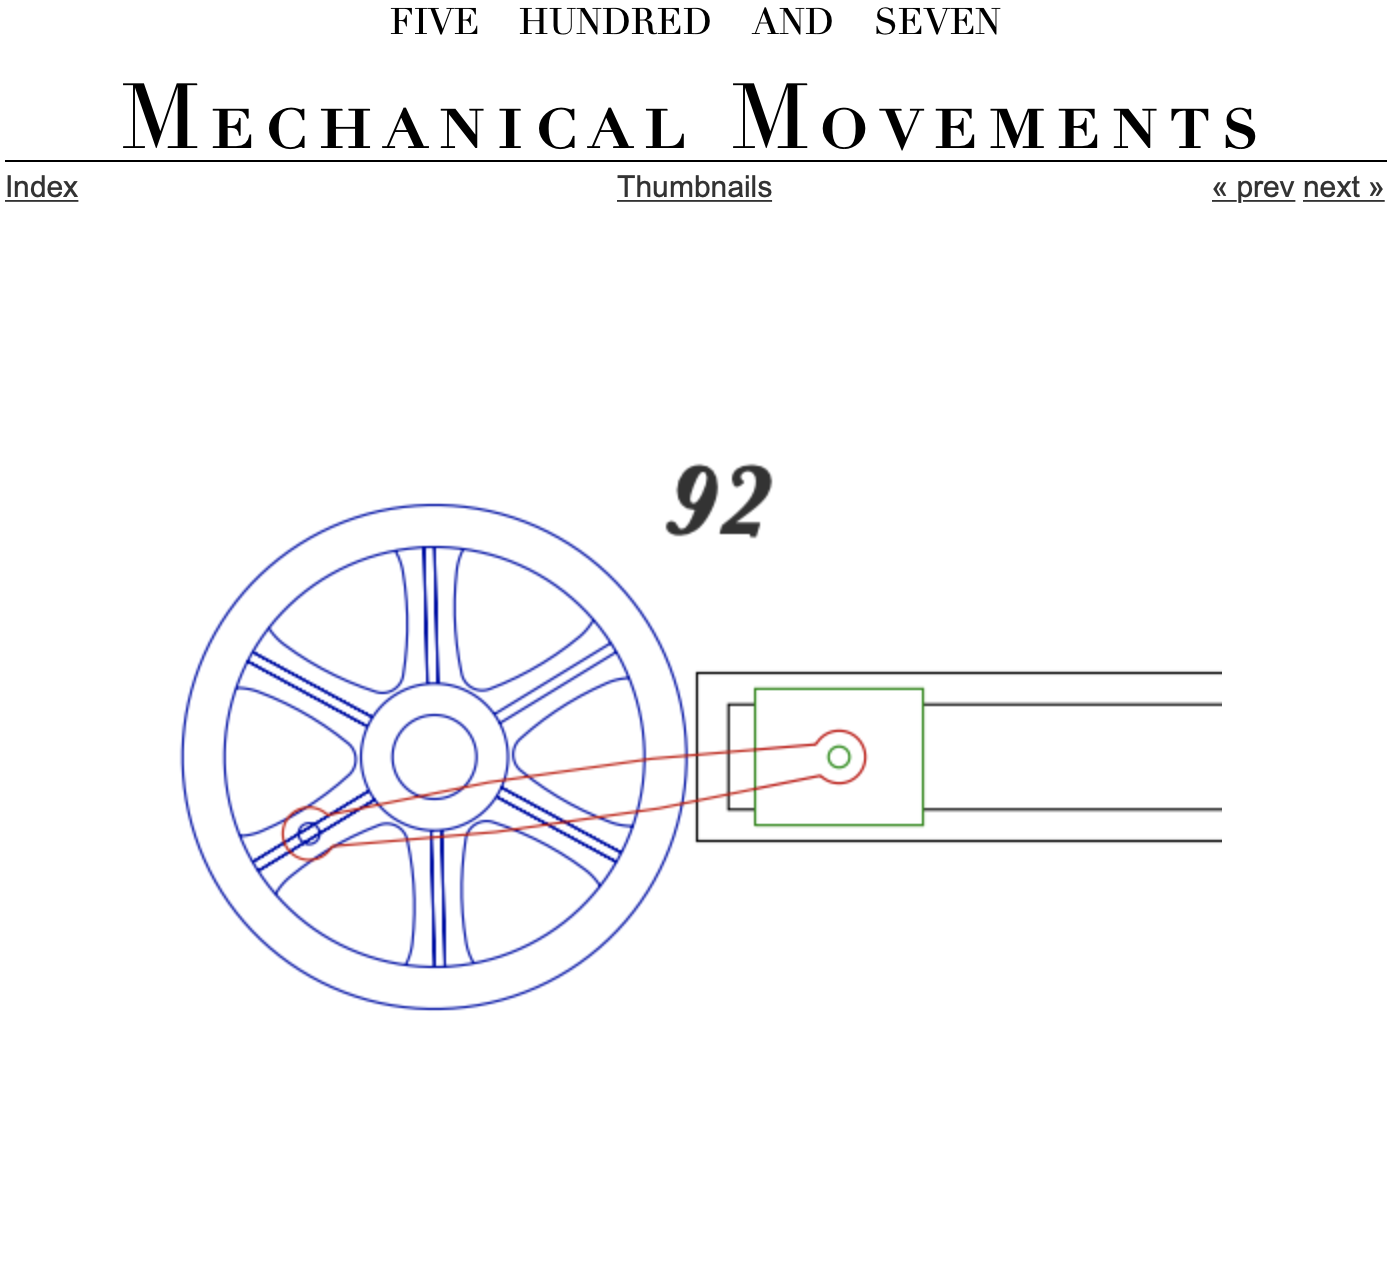
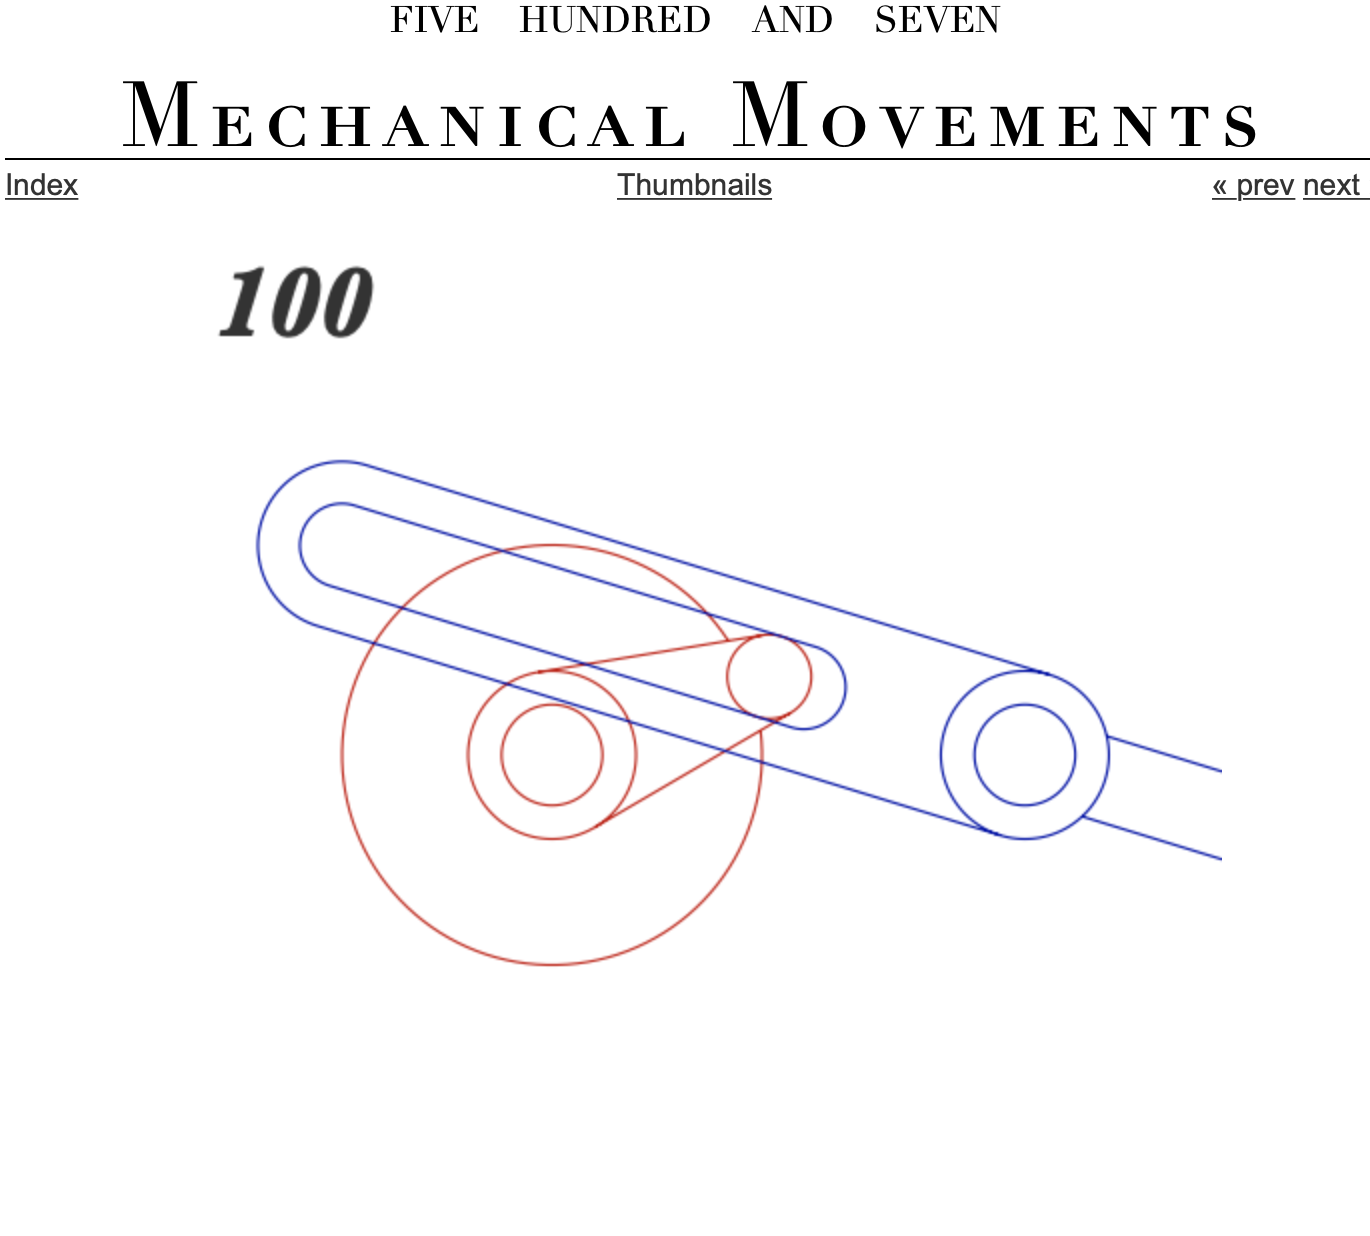
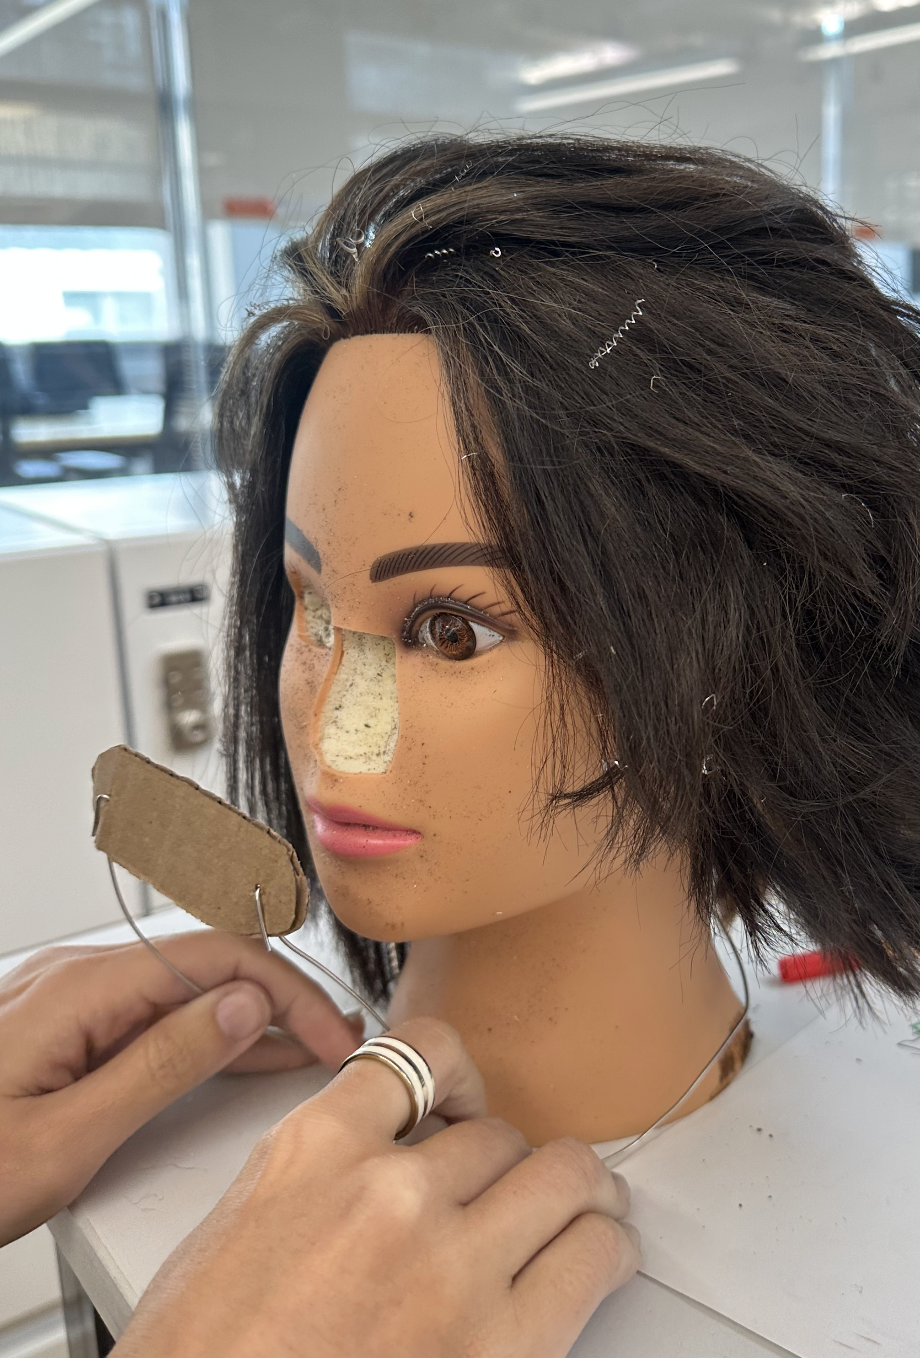
We’re having troubles finding the best way to create the motion of applying the lipstick. We looked at pendulums, magnetic fields and now looking more into mechanical movements. After prototyping and giving it a try, we realized that the thing will not turn 360 degrees, the motor will have to move back after it reached that certain point. Since we also want the camera screen to be used, we’re trying to figure out what’s the best way to position the motor and the suction cup.
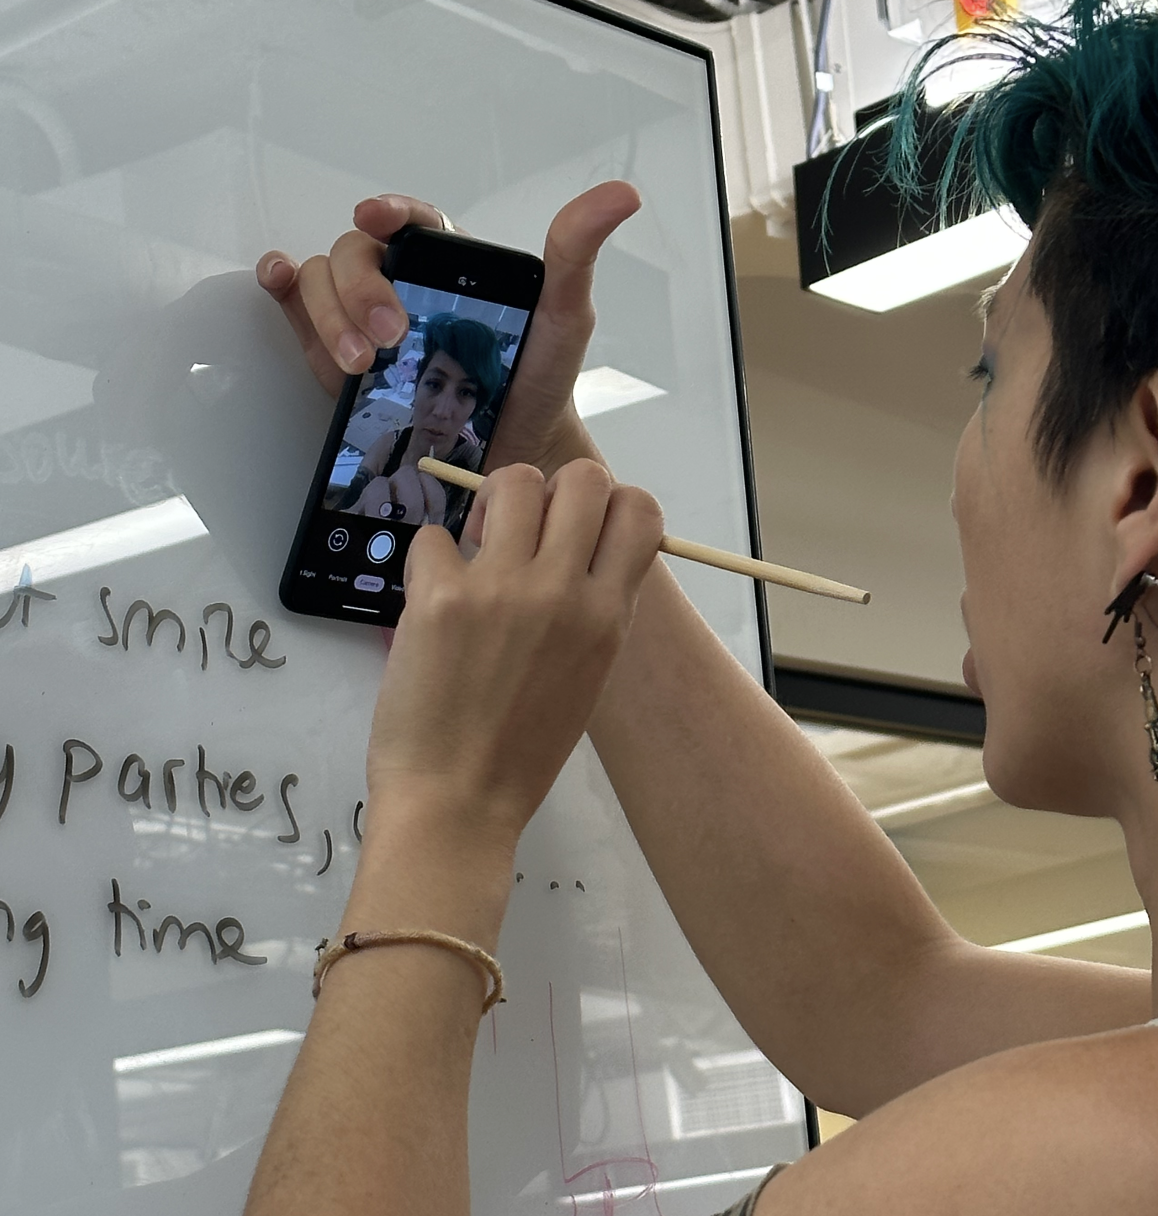
Somebody mentioned this website, and we found movements that can help us. #92 is a straight motion, the clown will have to make their lips purse. #100 is something that best suits are idea!
Also, love how the Lucky Cat works. I found about it last year during my Art Toy Design class, so simple and so cheap. - The original mechanism inside a lucky cat uses an electromagnetic coil coupled with a small controller circuit powered by a single 1.5V battery. -

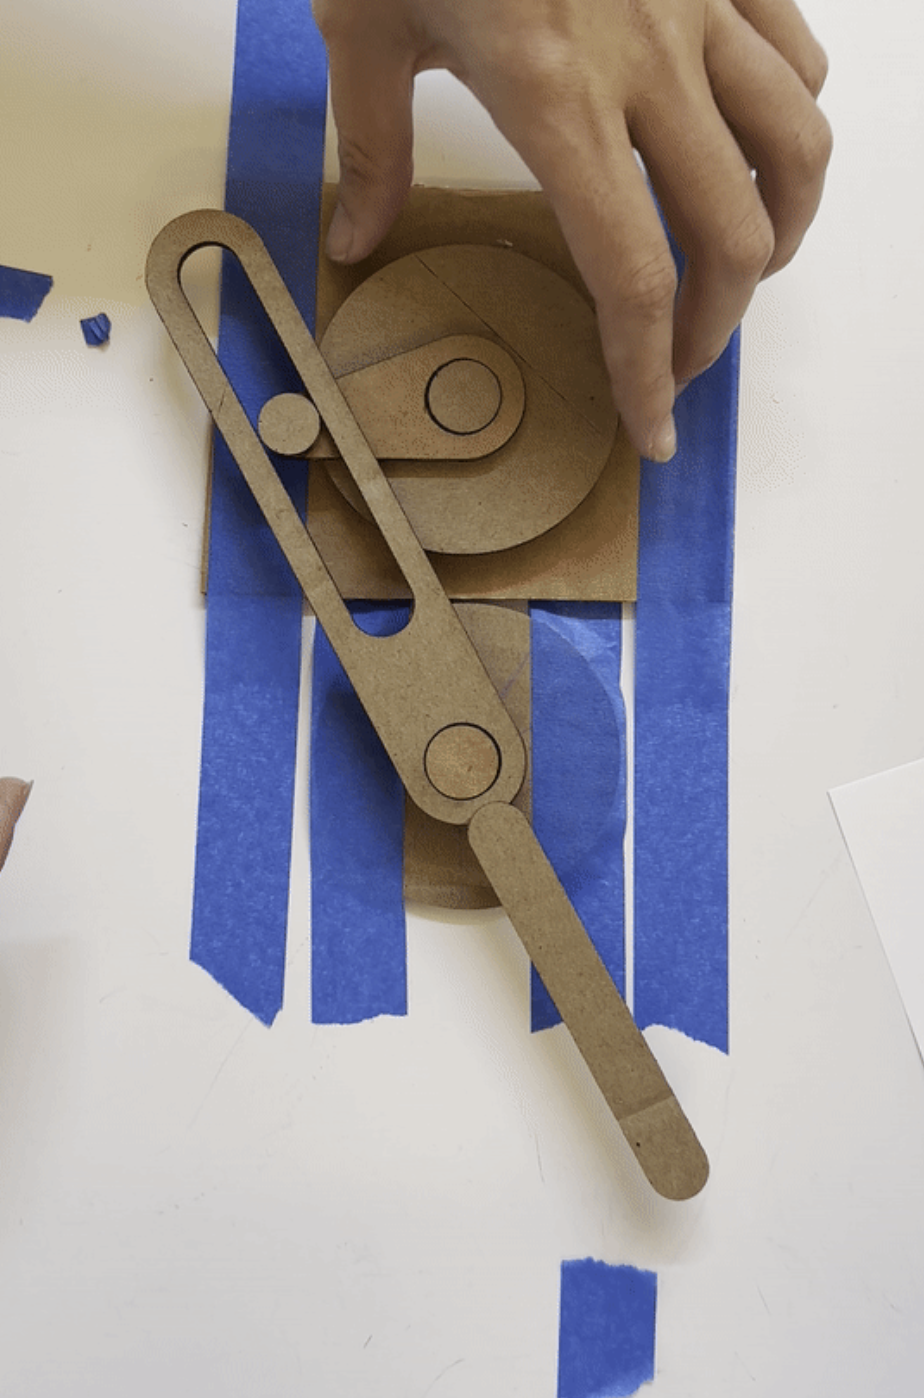
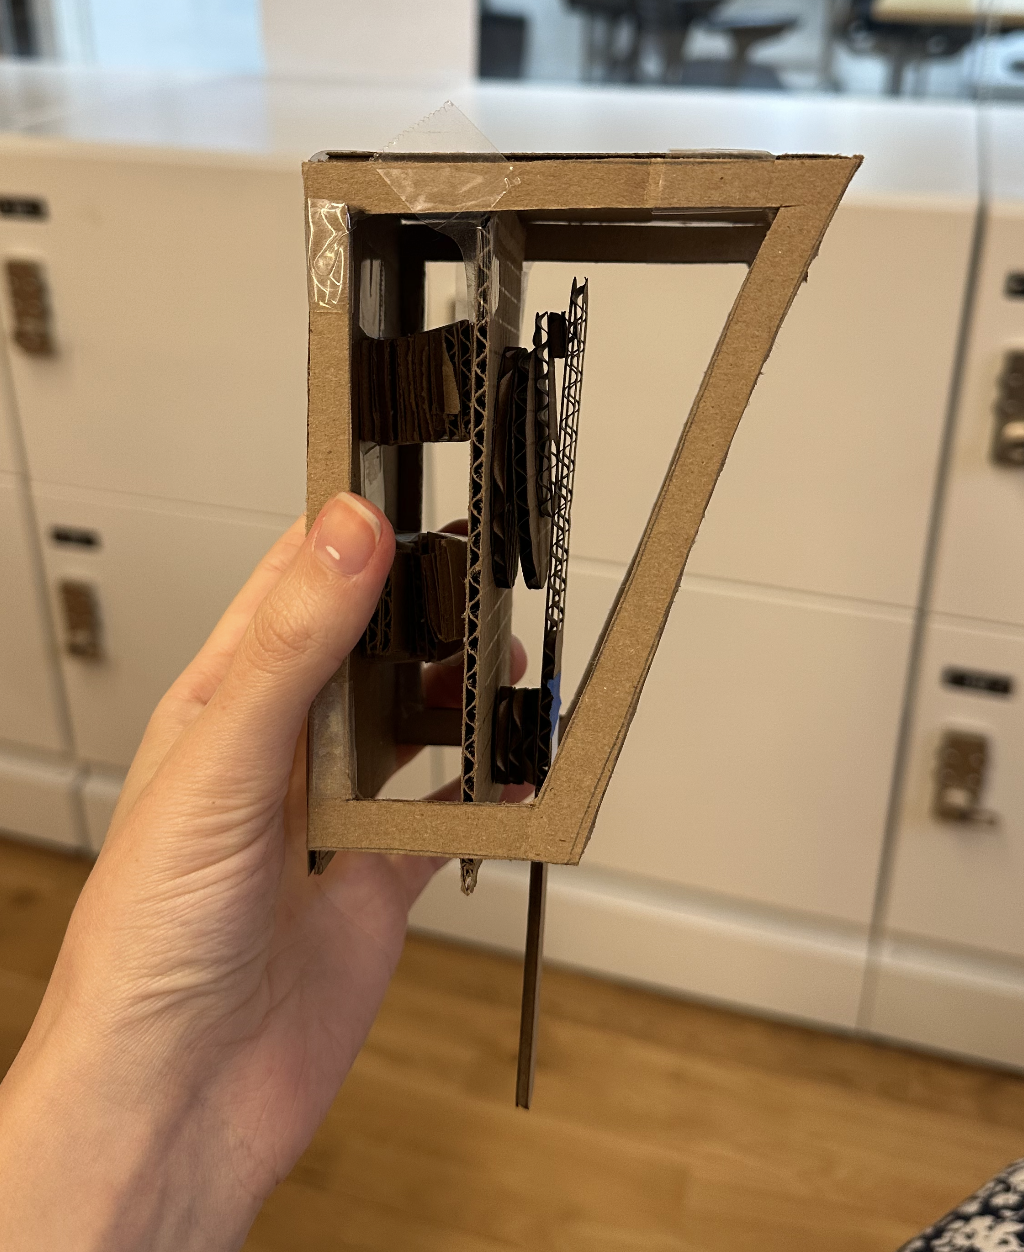
We liked the example of mechanical movements and decided to prototype it out of cardboard. The half oval curve at the tip was what we needed! We didn’t wanted to program arduino or use it because we thought it would take too much space. So, with this movement, the motor will keep turning 360 degrees, we won’t be changing the angle. First we made it bit big to understand the movement better. Then, we made everthing smaller so that it can fit at the back of the phone.


We did a bunch of sketches to figure out how to place the mechanism. Since we want to see the lipstick while it’s being applied, we dested out different angles and placements for the tip of the pendulum. We figured that it’s for the best to place it at the back and make the pendulum long enough that the lipstick can be seen from the selfie camera.
The electronics we ordered from Adafruit came right on time and we started testing out the motor. We figured out how to get the power out from the phone to the motor! Karina had to solder things and break a usb-c to usb connector thingy. The pendulum on the right is being powered from the phone! The first motor we used was working really fast. So, we decided to go with the other gear ratio. Honestly, I’m glad it all worked!
The first version of the cardboard prototype was the one above. After playing with it, we saw that the light and right edges should be open because the rotating disk needs much more space. The other challenge was to find the right angle and the area to fix the pendulum and to make it tight enought that everything is in place. It also needed to be good enought to carry all this + the lipstick.
Next step was to 3d model the case and see if it holds the phone. In the meantime we ordered suctions cups which will be screwed into the case aswell. Karina modeled the case by getting the measurements out of the cardboard prototype. And I used the ai file to draw the final pieces of the mechanism. Then Phil told me that I can export my ai file as .dxf and import it into Fusion! This method helped me big time!!! Then I extruded the pieces and we both printed these using the 3D printer.
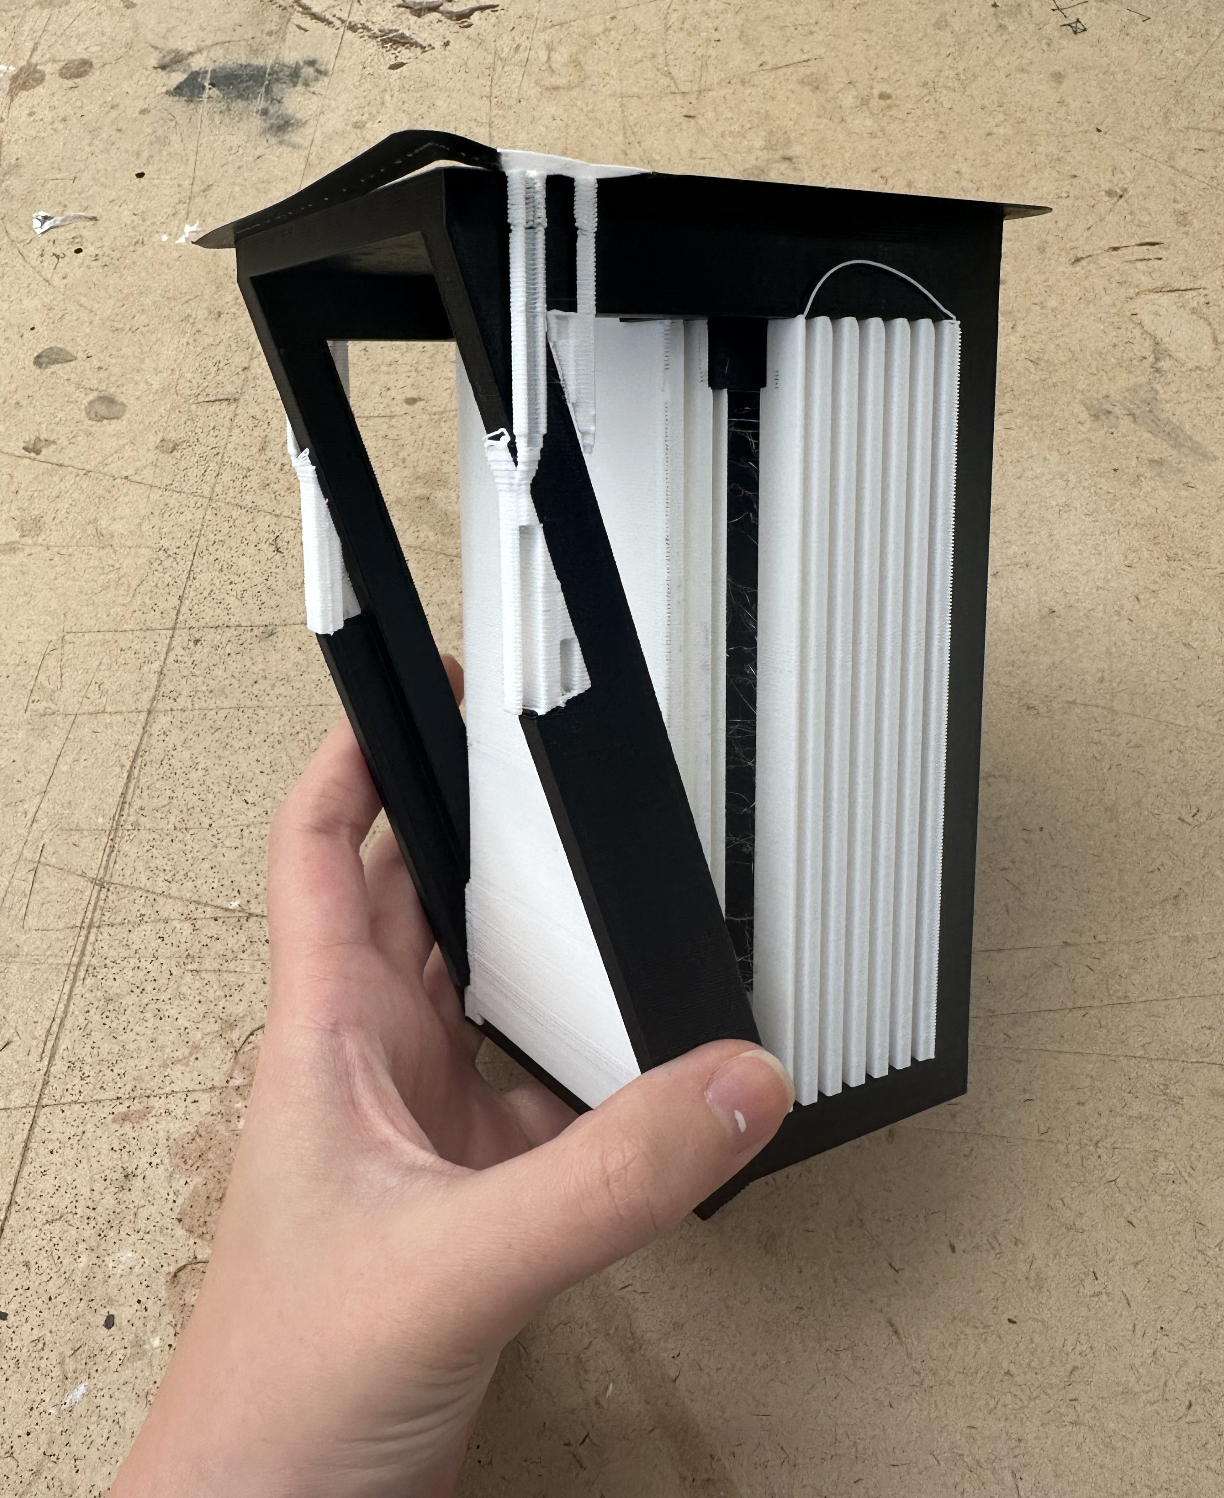
We’ll make some small tweaks but overall the case hold the phone in place.
Week 1 - Introduction to Absurd Design
Initial Ideas for project #1
- Back scratcher
- Eraser that vibrates
- Make-up add on -- perfect clown make-up
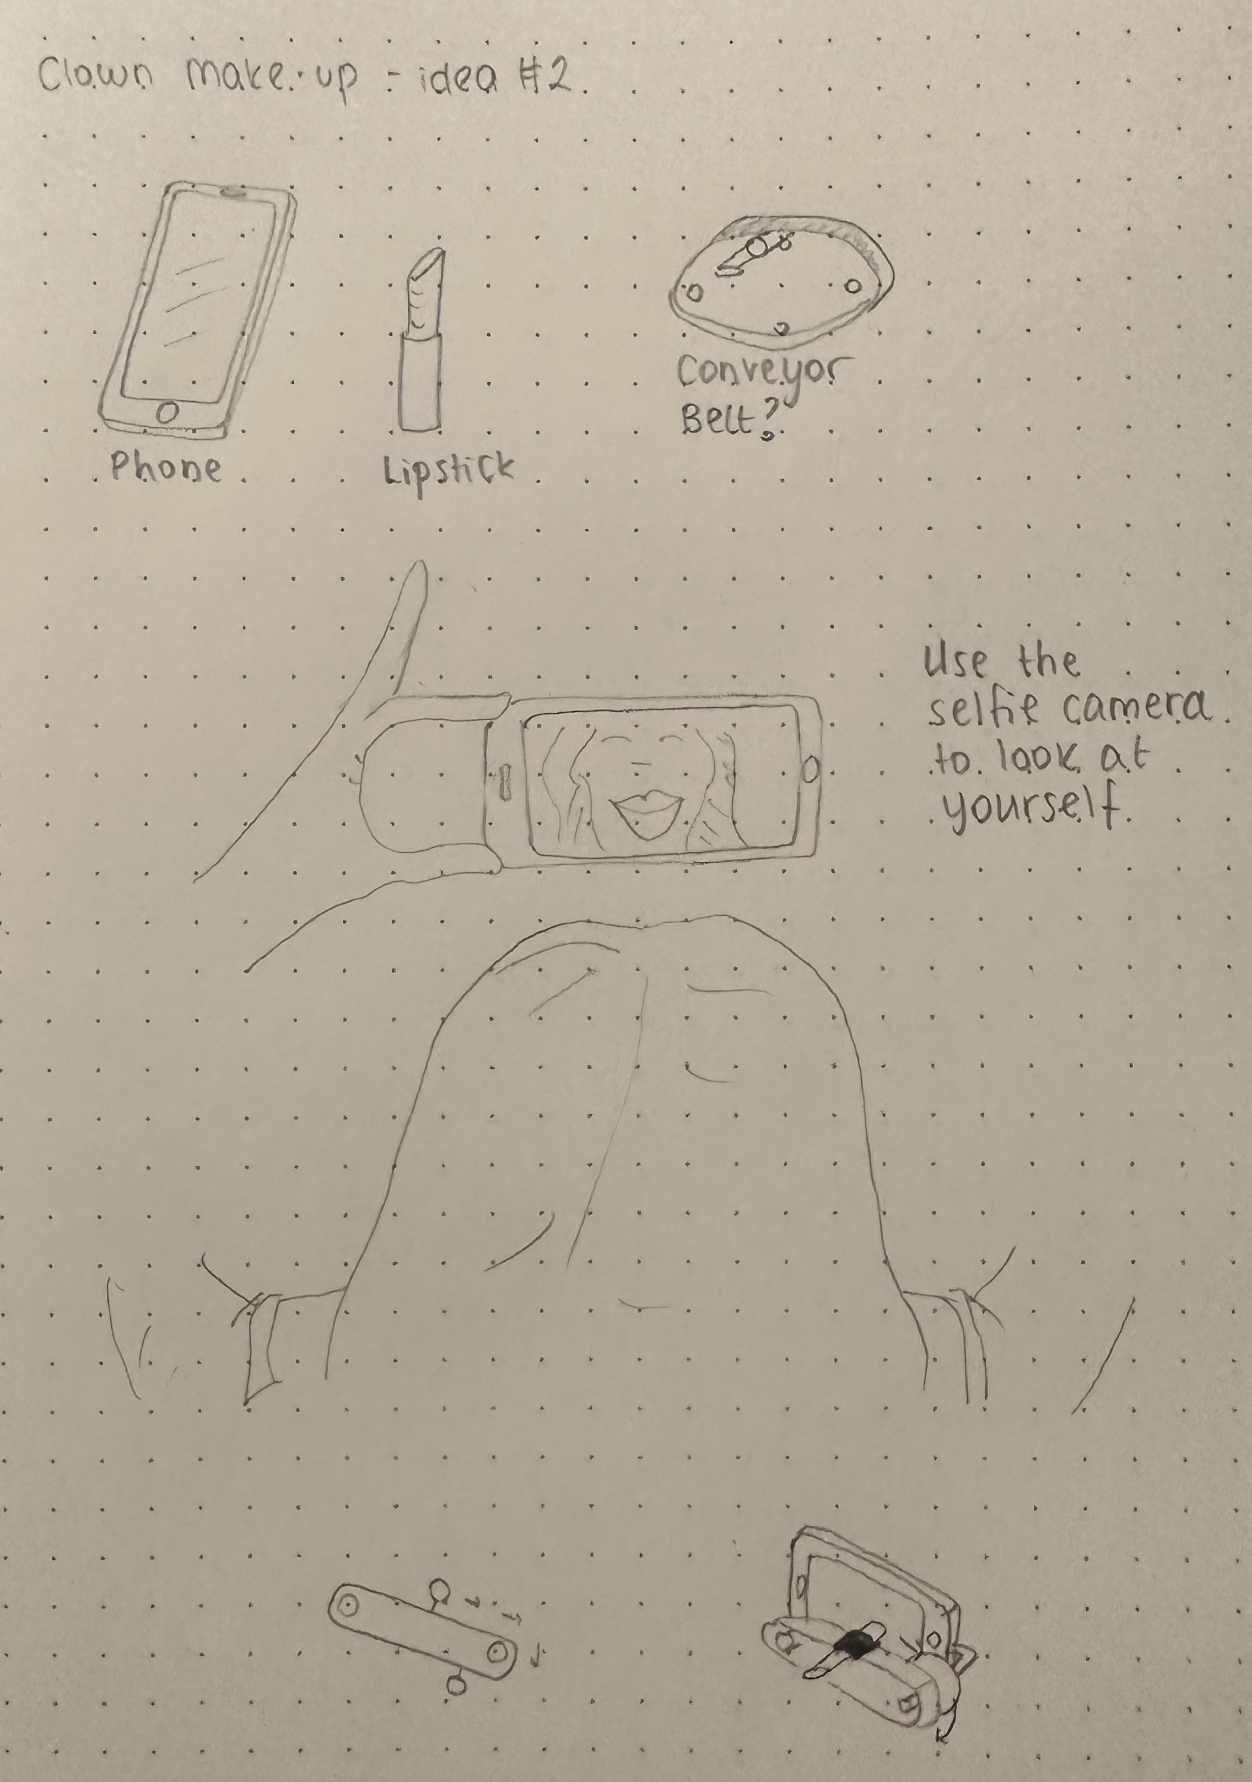
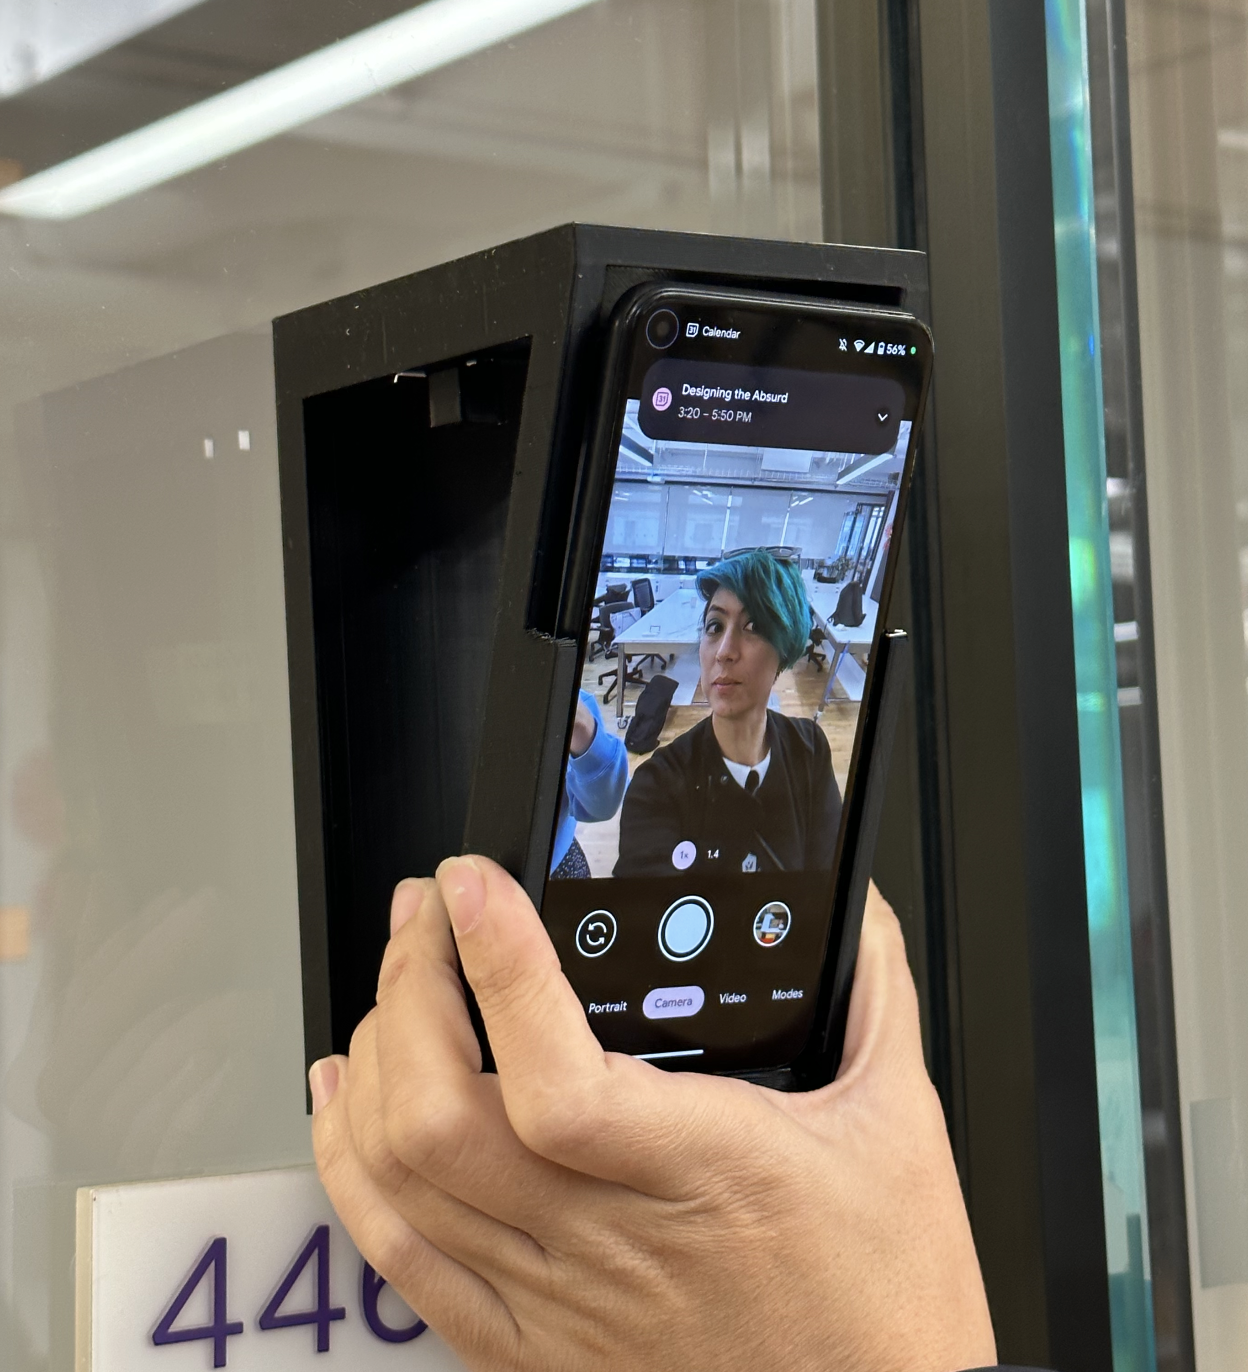
We (Karina and I) decided to move forward with the “Clown-on-the-go” idea. Basically, this clown needs help putting their lipstick on but also has to do other clown-related stuff. So, they use this add-on and get it powered by the phone. The phone not only works as a power source but it also works as the mirror.
Once it’s powered, the conveyor belt-ish thing will move and the lipstick will move along the belt, putting the lipstick on the clown. The clown can watch theirself from the selfie camera angle.
Since this add-on needs to be sturdy enough to hold all these pieces and have a nice pressure for the lipstick, we started sketching out couple ways to attach it to the phone and the clown itself. First idea was to create something like a harmonica holder. The second way was to have something attached to a helmet (and make it disappear with the clown wig). Then, Phil introduced the idea of a suction cup. All seemed ok but we weren’t sure if this is a add-on or an accessory.
Talking to Pedro helped a lot and he asked whether this is an add-on to the phone or the phone itself works as the add-on. This helped us think more on the idea behind this absurd device.
Once it’s powered, the conveyor belt-ish thing will move and the lipstick will move along the belt, putting the lipstick on the clown. The clown can watch theirself from the selfie camera angle.
Ideation and Links
Motorized Makeup Applicator by Loreal (for look and feel)
Lipstick Applying Robot by Simone Giertz
DIY Conveyor Belt
*you may click and watch
Since this add-on needs to be sturdy enough to hold all these pieces and have a nice pressure for the lipstick, we started sketching out couple ways to attach it to the phone and the clown itself. First idea was to create something like a harmonica holder. The second way was to have something attached to a helmet (and make it disappear with the clown wig). Then, Phil introduced the idea of a suction cup. All seemed ok but we weren’t sure if this is a add-on or an accessory.
Talking to Pedro helped a lot and he asked whether this is an add-on to the phone or the phone itself works as the add-on. This helped us think more on the idea behind this absurd device.
--
Closing note: Turkish artist Irfan Sayar created numerous ideas/projects/inventions using his artist name Zihni Sinir and this was one of my favorite one as a kid. I don’t quite remember why but out of all those ideas, this one stuck. It’s fun! (Link for his other projects)

--
Natasha Jen - Design Thinking is Bullshit
The steps are not always straight-forward.// The main issue is that the process lacks freedom and risks. Even if you repeat the steps, you can’t control the outcomes nor scale it in the way you want it. Trying to follow steps turns the process into a business-oriented way of thinking.
Allan Wexler
Try/Find different ways of thinking or use different materials etc to get different outcomes. Otherwise, you can’t think outside the box since you’re basically in the box. This idea goes well with how Natasha says that the process lacks risks. Without risks, you can’t create something new or different.
Lipsum™
Integer turpis massa, varius ultricies est sed, aliquet feugiat enim. Nulla facilisi. Ut in justo in ex faucibus ultricies. Proin id erat quis lorem vehicula commodo. Phasellus pharetra libero pretium ultricies aliquam. Vivamus eleifend, ligula ut venenatis aliquet, massa elit efficitur lorem, fermentum molestie elit ligula in ex. Duis mauris tellus, pharetra et orci a, aliquam imperdiet augue. Pellentesque elit neque, tincidunt sit amet imperdiet eget, porta ut metus. Nulla id leo tortor. Donec elementum ac sapien eget feugiat. Donec lorem dui, vestibulum quis nisl et, feugiat mattis massa.
Phasellus Rez
Praese
Praese
Suspendía
©MMXXI
Integer turpis massa varius